
Setup: Panasonic Home Network System HD Camera KX-HNC805C User Guide
Content
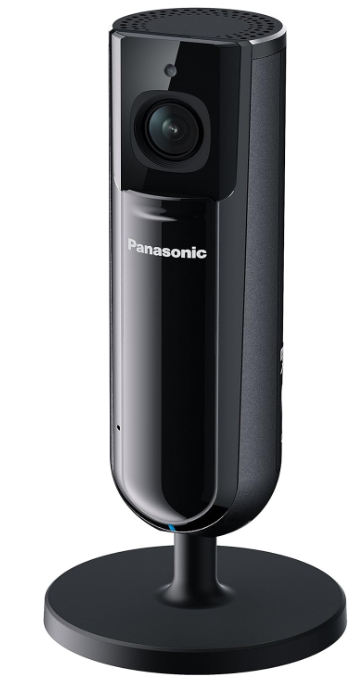
Panasonic Home Network System HD Camera KX-HNC805C
Introduction
The Panasonic Home Network System HD Camera KX-HNC805C is a sleek, high-performance indoor security camera designed to seamlessly integrate with Panasonic's home network ecosystem. Featuring a stylish metallic design that complements modern interiors, this camera delivers crystal-clear 1080p Full HD video with smooth 30 frames per second capture, providing peace of mind through reliable home monitoring.
Equipped with a fast-focusing lens and a large image sensor, the KX-HNC805C excels even in low-light conditions, ensuring clear visibility day and night. It supports automatic recording triggered by built-in visual, sound, and temperature sensors onto a microSD card (up to 128 GB), enabling easy video access on your PC or mobile device anytime, anywhere through wireless connectivity.
Ideal for homeowners, renters, and small office managers seeking a versatile and elegant surveillance solution, this camera supports seamless integration with Panasonic's Home Network Systems for convenient control and monitoring. The device is powered via a 3-meter power cord and is intended for indoor use only.
With an estimated price range of approximately $150 to $200 USD, the Panasonic KX-HNC805C is widely available through online retailers and authorized Panasonic dealers. Its combination of advanced imaging technology and smart home compatibility makes it a competitive choice for those looking to enhance their home security infrastructure.
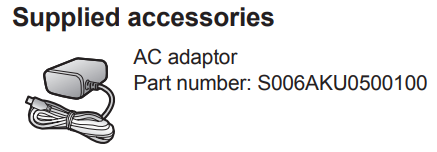
Accessory information
- Brightness sensor
Allows the camera to switch automatically to nightt vision mode in low-light conditions. - Lens
- Privacy shutter
Prevents others from monitoring live camera images or sound when the shutter is closed. - Microphone
- LED indicator
- microSD card slot
- Stand
- MSETUPN
Used when performing initial setup. - Speaker
- micro-USB connector
Used to connect the AC adaptor to the camera. - Reset button
Used to reset the camera’s settings. - Temperature sensor
Setup
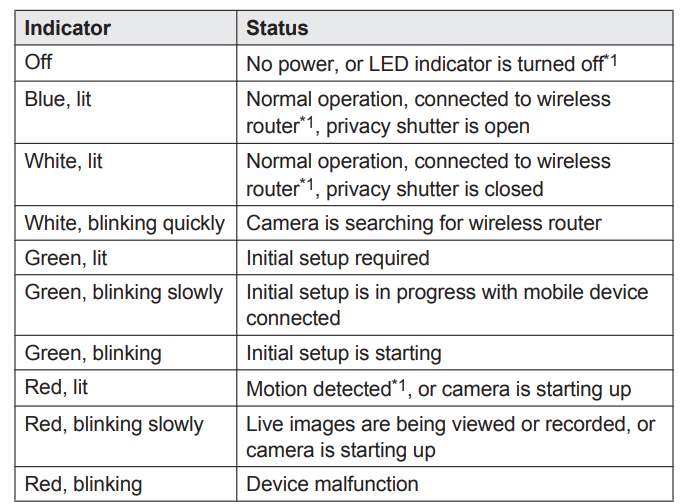
LED indicator
You can use the LED indicator to confirm the camera’s status.
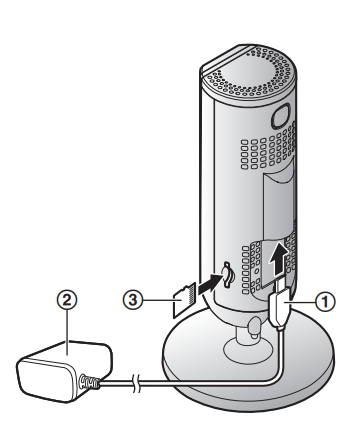
Connections
- Insert the AC adaptor plug (A) firmly into the camera’s micro-USB connector.
- Connect the AC adaptor (B) to the power outlet.
- Insert a microSD card (user-supplied; C) into the camera’s microSD card slot. (This is not necessary, you do not want to record camera images.)Setup overview
After you have connected your camera, here is what you will need to do to access it from your mobile device. Each procedure is explained in this chapter.
Setup overview
After you have connected your camera, here is what you will need to do to access it from your mobile device. Each procedure is explained in this chapter.
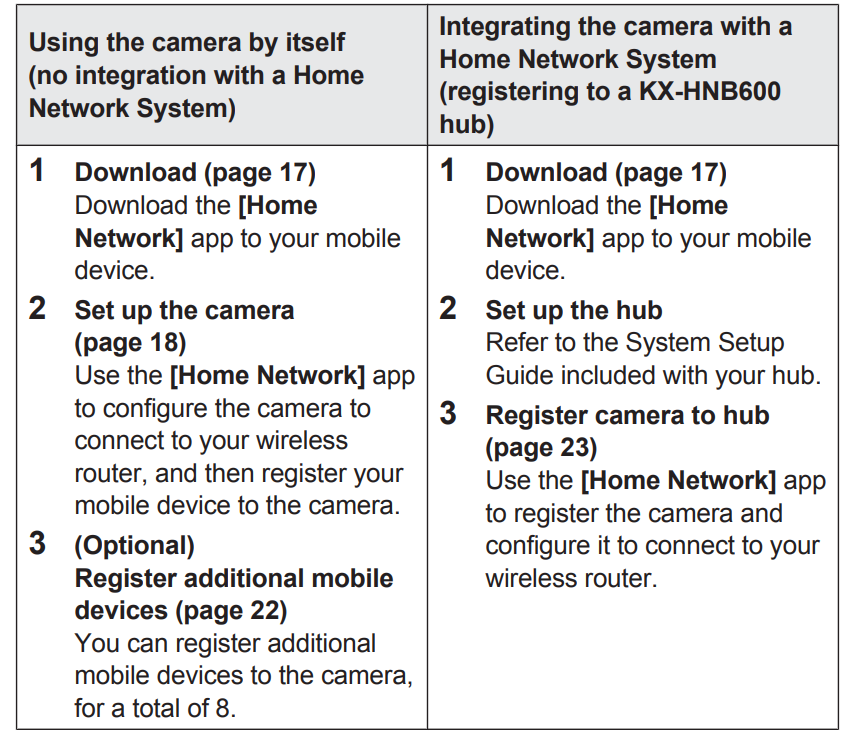
Setting up the camera (initial setup)
Confirm the following before you begin.
- Make sure you have installed the [Home Network] app on your mobile device– Make sure the camera is located within range of your wireless router
- Make sure your mobile device is connected to your wireless router
- Make sure your mobile device can connect to the Internet
- Make sure you know the network name (SSID) and password assigned to your wireless router
Initial setup (for iPhone, iPad users)
- Do not perform this procedure if you want to integrate the camera with your Home Network System. Use the procedure on page 23.
- If your mobile device is already registered to a hub and you want to use your camera by itself, see “Information for current hub users”, page 21.
- Plug in the camera and wait about 1 minute for the camera’s LED to light in green. R If the LED does not light in green, or if you experience trouble during this procedure, reset the camera (page 24) and then repeat this procedure.
- Start the [Home Network] app.
If prompted, follow the on-screen instructions and select the appropriate region/country.3 Tap [HD Camera]. - Tap [Set up the HD Camera]. 5 When prompted, press the MSETUPN button on the back of the camera, and then tap [Next].
The LED indicator blinks in green. - Change your mobile device’s Wi-Fi setting temporarily so that it connects to the camera directly.
Open your mobile device’s [Settings] app, tap [Wi-Fi], select
“KX-HNC800_Panasonic”, enter “00000000” as the password, and then tap [Join].
If more than 1 item is named
“KX-HNC800_Panasonic” is displayed, wait approximately. 10 minutes and perform this procedure from the beginning. - Start the [Home Network] app again.
- If necessary, enter the password required to connect to your wireless router and then tap [Next].
The camera and your mobile device connect to your wireless router. If prompted, follow the n-screen instructions and connect yourr mobile device to your wireless router, start the app again, and then tap [Add This Mobile Device].
If you enter the wrong password, an error is displayed. Repeat the initial setup procedure from the beginning. - When prompted, press the MSETUPN button on the back of the camera. R The camera registers your mobile device.
- When prompted, set the password that will be used to access the camera.
- When prompted, enter a name for your mobile device and then tap [OK].
- This setting allows you to change the name assigned to your device. It can help you identify your mobile device when performing certain operations, such as deregistering a mobile device.
A list of all cameras registered to the app is displayed when initial setup is complete.
- Initial setup (for Android device users)
- Do not perform this procedure if you want to integrate the camera with your Home Network System. Use the procedure on page 23.
- If your mobile device is already registered to a hub and you want to use your camera by itself, see “Information for current hub users”, page 21.
- Plug in the camera and wait about 1 minute for the camera’s LED to light in green.
If the LED does not light in green, or if you experience trouble during this procedure, reset the camera (page 24) and then repeat this procedure. - Start the [Home Network] app.
If prompted, follow the on-screen instructions and select the appropriate region/country. - Tap [HD Camera].
- Tap [Set up the HD Camera].
- When prompted, press the MSETUPN button on the back of the camera.
The LED indicator blinks in green.
The app temporarily changes your mobile device’s Wi-Fi settings so that it connects to the camera directly.. - If necessary, enter the password required to connect to your wireless router and then tap [Next].
The camera and your mobile device connect to your wireless router.
If you enter the wrong password, an error is displayed. Repeat the initial setup procedure from the beginning. - When prompted, press the MSETUPN button on the back of the camera.
The camera registers your mobile device. - When prompted, set the password that will be used to access the camera.
- When prompted, enter a name for your mobile device and then tap [OK].
- Plug in the camera and wait about 1 minute for the camera’s LED to light in green.
- This setting allows you to change the name assigned to your device. It can help you identify your mobile device when performing certain operations, such as deregistering a mobile device.
- A list of all cameras registered to the app is displayed when initializationn iis complete Information for current hub users
- If your mobile device is already registered to a hub and you want to use your camera by itself (i.e., you do not want to integrate the camera with your Panasonic Home Network System), perform the following.
- Plug in the camera and wait about 1 minute for the camera’s LED to light in green.
If the LED does not light in green, or if you experience trouble during this procedure, reset the camera (page 24) and then repeat this procedure. - Start the [Home Network] app.
- From the [Home Network] app home screen, tap [Settings].
- Tap [Device Registration] ® [Registration] ® [HD Camera] ® [Method 2].
- iPhone, iPad users
Continue from step 4 ,,the initial setup procedure on page 18
Android device users, continue from step 4 of the initial setupp procedure on page 20. For assistance,
- Plug in the camera and wait about 1 minute for the camera’s LED to light in green.
Registering additional mobile devices to the camera
- Do not perform this procedure if the camera is integrated with your Home Network System. Use the procedure found in the System Setup Guide included with your hub and register the additional mobile device to your hub.
- After you set up the camera, you can register additional mobile devices. You can register up to 8 mobile devices to a camera. Each mobile device can be registered to up to 32 cameras. Confirm the following before you beginbegin..n
- Make sure you have completed the initial setup procedure
- Make sure your mobile device can connect to the Internet
- Make sure your wireless router and the camera are turned on
- Make sure your mobile device and the camera are connected to the same wireless router
- Using the mobile device that you want to register, download the [Home Network] app and then start the app.
If prompted, follow the on-screen instructions and select the appropriate region/country. - Tap [HD Camera].
- Tap [Add This Mobile Device].
- When prompted, press the MSETUPN button on the back of the camera.
The camera registers your mobile device. - When prompted, enter the password required to access the camera.
This password was set during initial setup. - When prompted, enter a name for your mobile device and then tap [OK].
This setting allows you to change the name assigned to your device. It can help you identify your mobile device when performing certain operations, such as deregistering a mobile device.
A list of all cameras registered to the app is displayed when registration is complete. ete
- Using the mobile device that you want to register, download the [Home Network] app and then start the app.
Registering the camera to your hub
- Do not perform this procedure if you are using the camera by itself (i.e., you do not have a KX-HNB600 hub). Use the initial setup procedure (page 18). If you want to integrate your HD camera with a Panasonic Home Network System, you must register the camera with the hub. Registering the camera
- Confirm the following before you begin.
- Make sure you can use your mobile device to access the hub
- Make sure the hub’s firmware is up to date and that you are using the latest version of the [Home Network] app.
- For more information, refer to the System Setup Guide included with your hub and the User’s Guide (page 30).
- Plug in the camera and wait about 1 minute for the camera’s LED to light in green.
- If the LED does not light in green, or if you experience trouble during this procedure, reset the camera (page 24) and then repeat this procedure.
- Start the [Home Network] app.
- From the [Home Network] app home screen, tap [Settings].
- Tap [Device Registration] ® [Registration] ® [HD Camera] ® [Method 1].
- When prompted, press the MSETUPN button on the back of the camera.
- The camera registers your mobile device.
- The app’s home screen is displayed when registration is complete.
- Follow the on-screen instructions. When prompted, set the password that will be used to access the camera.
Note:- When registration is complete, the hub sounds one long beep.
- If registration fails, the hub sounds several short beeps.
Resetting the camera
Use this procedure if you have trouble setting up the camera.
- Plug in the camera.
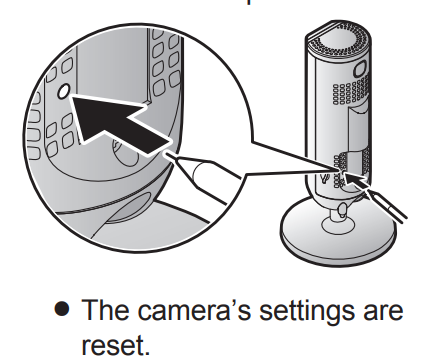
- Using an object with a thin tip, press and hold the reset button on the back of the camera for about 10 seconds, then release the button when the camera beeps.
- Wait for the camera’s LED to light in green.
Note:
After resetting the camera, you cannot use the camera again until it is set up. Refer to the relevant page in this section to set up the camera.
Specifications
- Standards
IEEE 802.11a/b/g/n - Frequency range
2.412 GHz – 2.462 GHz (channels 1–11) 5.180 GHz – 5.320 GHz (channels 36–64) 5.500 GHz – 5.600 GHz (channels 100–116) 5.650 GHz – 5.700 GHz (channels 132–140) 5.745 GHz – 5.825 GHz (channels 149–165) - RF transmission power
100 mW (peak transmission power) - Encryption
WPA2-PSK (TKIP/AES), WPA-PSK (TKIP/AES), WEP (128/64 bit) - Power source
120 V AC, 60 Hz - Power consumption
Standby: approx. 2.3 W
Maximum: approx. 3.8 W - Operating conditions
0 °C – 40 °C (32 °F – 104 °F) 20 % – 80 % relative air humidity (dry) - Image sensor
2.0 megapixel CMOS - Minimum illuminance required*1 0 lx
- Focal length
Fixed (0.2 m (8 inches) – infinity) - Angular field of view
Horizontal: approx. 121°
Vertical: approx. 67° - Motion detection method
Visual sensor - Adjustable mounting angles*2
Vertical: facing forward - facing down, approx. 130° - Dimensions (including stand)
(height × width × depth) Approx. 142 mm ´ 68 mm ´ 68 mm (5 19/32 inches ´ 2 11/16 inches ´ 2 11/16 inches) - Mass (weight) (including stand)
Approx. 210 g (0.46 lb)- The infrared LEDs that surround the camera lens will illuminate in low-light conditions.
- Adjustable when mounting.
Warranty
- Panasonic Canada Inc.
- 5770 Ambler Drive, Mississauga, Ontario L4W 2T3
- PANASONIC PRODUCT - LIMITED WARRANTY
- EXCHANGE PROGRAM
- Panasonic Canada Inc. warrants this product to be free from defects in material and workmanship under normal use and for a period as stated below from the date of original purchase agrees to, at its option either (a) repair your product with new or refurbished parts, (b) replace it with a new or a refurbished equivalent value product, or (c) refund your purchase price. The decision to repair, replace,, or refund will be made by Panasonic Canada Inc.
- Home Network System Products – One (1) year microSD card (Included model only) – One (1) year
- This warranty is given only to the original purchaser, or the person for whom it was purchased as a gift, of a Panasonic brand product mentioned above sold by an authorized Panasonic dealer in Canada and purchased and used in Canada, which product was not sold “as is”, and which product was delivered to you in new condition in the original packaging. TORDER TO BE ELIGIBLE TO RECEIVE WARRANTY SERVICE HEREUNDER, A PURCHASE RECEIPT OR OTHER PROOF OF DATE OF ORIGINAL PURCHASE, SHOWING AMOUNT PAID AND PLACE OF PURCHASE,, IS REQUIRED
LIMITATIONS AND EXCLUSIONS
- This warranty ONLY COVERS failures due to defects in materials or workmanship, and DOES NOT COVER normal wear and tear or cosmetic damage. The warranty ALSO DOES NOT COVER damages which occurred in shipment, or failures which are caused by products not supplied by Panasonic Canada Inc., or failures which result from accidents, misuse, abuse, neglect, mishandling, misapplication, alteration, faulty installation, set-up adjustments, misadjustment of consumer controls, improper maintenance, improper batteries, power line surge, lightning damage, modification, introduction of sand, humidity or liquids, commercial use such as hotel, office, restaurant, or other business or rental use of the product, or service by anyone other than a Authorized Servicer, or damage that is attributable to acts of God.
- Dry cell batteries are also excluded from coverage under this warranty. Rechargeable batteries are warranted for ninety (90) days from the date of original purchase.
- THIS EXPRESS, LIMITED WARRANTY IS INSTEAD OF ALL OTHER WARRANTIES, EXPRESS OR IMPLIED, INCLUDING ANY IMPLIED WARRANTIES OF MERCHANTABILITY AND FITNESS FOR A PARTICULAR PURPOSE. IN NO EVENT WILL PANASONIC CANADA INC. BE LIABLE FOR ANY SPECIAL, INDIRECT,, OR CONSEQUENTIAL DAMAGES RESULTING FROM THE USE OF THIS PRODUCT OR ARISING OUT OF ANY BREACH OF ANY EXPRESS OR IMPLIED WARRANTY.
(As examples, this warranty excludes damages for lost time, travel to and from the Authorized Servicer, loss of or damage to media or images, data, ta, or other memory or recorded content. This list of items is not exhaustive, but for illustration only.) - In certain instances, some jurisdictions do not allow the exclusion or limitation of incidental or consequential damages, or the exclusion of implied warranties, so the above limitations and exclusions may not be applicable. This warranty gives you specific legal rights,, and you may have other rights which vary depending on your province or territory.
Troubleshooting the Panasonic Home Network System HD Camera KX-HNC805C
Common issues encountered with the KX-HNC805C include connectivity interruptions, motion detection inaccuracies, and video recording errors. For example, motion detection may fail or generate false alerts if the camera faces sudden brightness changes or if objects and backgrounds have similar colors.
- Connectivity Problems: Ensure the camera’s power cord is securely connected and the wireless network signal is strong. Restarting the camera and router can help resolve intermittent connection issues.
- Motion Detection Errors: Adjust the sensitivity settings and select specific monitoring areas via the camera’s app to reduce false alarms.
- Video Storage Issues: Confirm that the inserted microSD card is compatible (up to 128 GB, SDHC/SDXC format) and properly formatted. If errors persist, try reformatting the card via the camera's settings.
- Error Codes: Refer to the user manual for specific
ic error codes; common alerts typically relate to card errors or network disconnections and can often be fixed by reinserting the microSD card or reestablishing the Wi-Fi connection.
Preventive measures include positioning the camera away from direct light sources to minimize false motion alerts and regularly updating the camera firmware via the Panasonic Home Network app.
Panasonic offers a limited warranty covering manufacturing defects. For technical support, users can contact Panasonic customer service through their official website or dedicated support phone line for personalized assistance.
Pros & Cons of the Panasonic Home Network System HD Camera KX-HNC805C
- Pros:
- High-quality 1080p Full HD video with smooth 30fps recording enhances image clarity.
- Fast-focusing lens and a large sensor improve low-light performance for reliable night monitoring.
- Multiple sensors (visual, sound, temperature) enable smart motion detection and recording triggers.
- Compatible with Panasonic Home Network Systems for integrated home automation control.
- Supports microSD card storage (up to 128 GB), allowing local video archiving without cloud fees.
- Cons:
- Requires constant power via cord; no battery operation limits placement flexibility.
- Indoor use only; lacks weatherproofing for outdoor deployment.
- No pan or tilt capabilities, so the camera angle is fixed once installed.
- Motion detection can be sensitive to environmental changes, causing occasional false alerts.
- Compared to some alternatives, it lacks advanced AI features like facial recognition or cloud storage.
Overall, the Panasonic Home Network System HD Camera KX-HNC805C offers excellent value for money given its image quality and integration capabilities, making it a strong contender for users prioritizing local storage and network compatibility over advanced AI features.
Customer Reviews of the Panasonic Home Network System HD Camera KX-HNC805C
Users consistently praise the Panasonic Home Network System HD Camera KX-HNC805C for its sharp, clear video quality and reliable performance within home networks. Many highlight the ease of accessing recorded footage via microSD cards and appreciate the stylish design fitting well into home environments.
Common praises include dependable live streaming through smartphones a and a simple setup with the Panasonic app. Several reviewers recommend the camera for indoor monitoring, noting its effectiveness in detecting motion and capturing detailed images even in low light.
However, some customers have reported issues such as occasional false motion alerts triggered by lighting changes and the inconvenience of the non-battery-powered design restricting placement. Star ratings average around 4 out of 5, reflecting overall satisfaction with minor drawbacks.
Based on customer feedback, the Panasonic KX-HNC805C is recommended for buyers looking for a dependable indoor HD camera integrated into a Panasonic home network, especially for those valuing local video storage and consistent image clarity.
Faqs
How do I set up the panasonic Home Network System HD Camera KX-HNC805C for the first time without using the home network hub?
What should I do if my panasonic Home Network System HD Camera KX-HNC805C fails to connect to my Wi-Fi network during setup?
Can I integrate the panasonic Home Network System HD Camera KX-HNC805C with other smart home devices or systems?
How do I use the privacy shutter on the panasonic Home Network System HD Camera KX-HNC805C, and what happens when it’s closed?
What are the key features that make the panasonic Home Network System HD Camera KX-HNC805C stand out for home monitoring?
How do I maintain the panasonic Home Network System HD Camera KX-HNC805C to ensure optimal performance?
Can I access the panasonic Home Network System HD Camera KX-HNC805C remotely from multiple devices?
What steps should I take if the panasonic Home Network System HD Camera KX-HNC805C stops recording or sending notifications?
Leave a Comment