
Usage: Panasonic Home Network System Indoor Camera KX-HNC210 Instruction Guide
Content
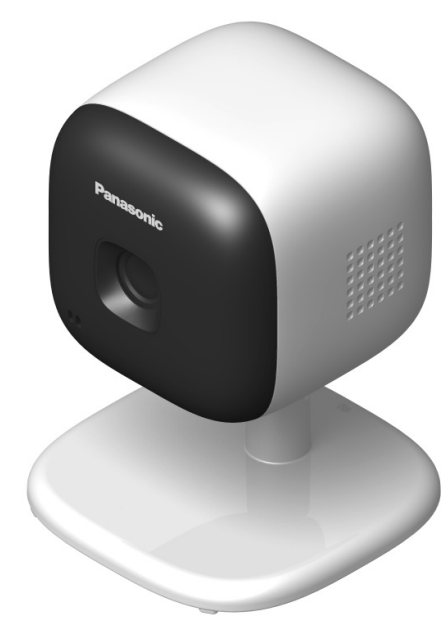
Panasonic Home Network System Indoor Camera KX-HNC210
Introduction
The Panasonic Home Network System Indoor Camera KX-HNC210 is a versatile and feature-rich addition to any home security setup. This full-color camera offers night vision, motion detection, and two-way communication, making it an ideal choice for monitoring indoor spaces. With its built-in microphone and speaker, users can not only view live footage but also interact with family members or pets remotely.
Key benefits include its ability to integrate seamlessly with other Panasonic Home Network System devices, such as the KX-HNB600 hub, allowing for a comprehensive home security solution. The camera is suitable for a wide range of users, from families looking to keep an eye on their children to homeowners seeking enhanced security features.
Estimated price ranges for the Panasonic KX-HNC210 vary, but it is generally available for purchase at major electronics retailers. The camera is designed to operate effectively in temperatures between 0°C and 40°C and can be powered via Wi-Fi, making installation straightforward.
Accessory information
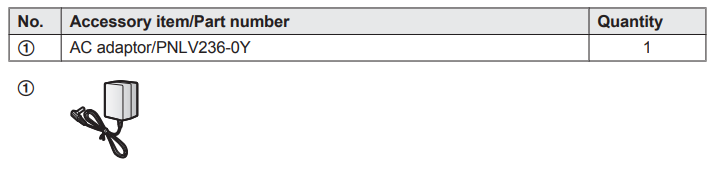
Supplied accessories
Additional accessories
Please contact your nearest Panasonic dealer for sales information.

Part names and functions
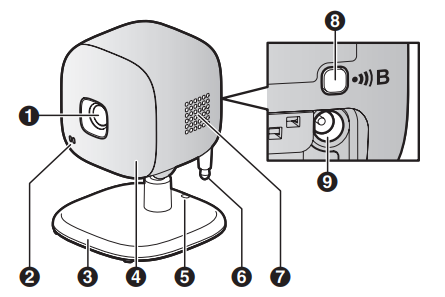
- Lens unit
- Microphone
- Stand
- LED indicator
- Hole
- You can prevent the camera from falling by passing a string through the hole in the stand.
- Temperature sensor
- Speaker

- Used when registering the camera to the hub.
- DC jack
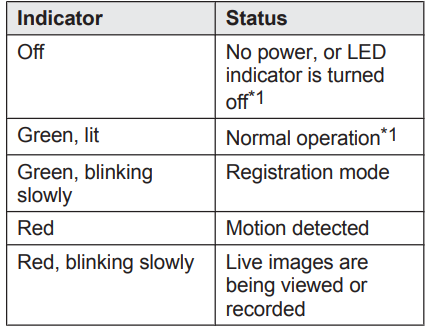
LED indicator
You can use the LED indicator to confirm the camera’s status.
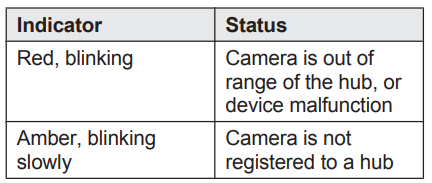
Setup overview
- Initial setup
Make sure you can access the system using your mobile device. For details, refer to the System Setup Guide included with your hub. - Registration
Required only if the camera was purchased separately (i.e., not as part of a bundle). - Confirm the usage area..
Read the information in this document to confirm that the desired usage area is suitable for proper operation. - Connection
Place the camera in the desired location and connect it to the power outlet.
Registering the camera
This procedure is not required for devices that were included as part of a bundle.
Before you can use the camera, it must be registered with the hub.
If the camera is not registered to a hub, the camera’s LED indicator blinks slowly in amber. You can register each device by using the registration buttons or the [Home Network] app.
Note:
Before registering the camera, make sure the AC adaptors of the hub and camera are connected and each device is powered.
Using registration buttons
- Hub:
Press and hold CAMERAN until the LED indicator blinks slowly in green. - Camera:
Press and hold until the LED indicator blinks slowly in green (page 7).
When registration is complete, the hub sounds one long beep.
Note:
To cancel without registering the camera, press on the hub and on the camera again.
If registration fails, the hub sounds several short beeps.
Using the app
When you register the camera by using the [Home Network] app, you can assign a name to your devices and group them by location. For more information, refer to the User’s Guide (page 13).
Information about sensor features
The camera has 3 sensor features: a visual sensor used for motion detection, a temperature sensor, and a sound sensor. Please read the following information about each sensor before deciding where to install the camera.
Note:
The camera’s sensor features are not designed to be used in situations that require high reliability. We do not recommend the use of the sensor features in these situations.
- Panasonic takes no responsibility for any injury or damage caused by the use of the camera’s sensor features.
Using visible light to detect motion
The camera can detect motion by recognizing changes in the brightness of areas that are visible to the camera.
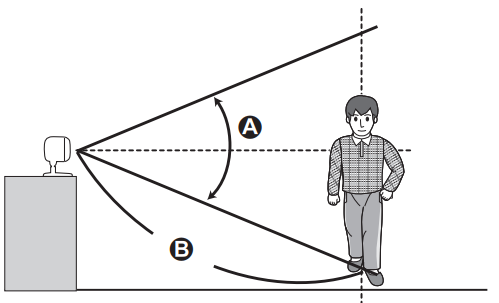
- Vertical detection range: approx. 50°
- Distance of detectable motion: up to 5 m (16.4 feet) when motion sensitivity is set to the highest setting using the [Home Network] app.
Note:
- Movement may be incorrectly detected when the moving object and the background have similar colors.
- Movement may be incorrectly detected when there are sudden changes to the overall brightness level, such as when lights are turned on.
- Detection becomes difficult when the image is dark.
- You can adjust the sensitivity of the camera’s motion detection feature, and select which areas of the camera image are monitored for motion detection. For more information, refer to the User’s Guide.
(page 13).
Direction of motion
It is easier to detect objects that move sideways in front of the camera, and more difficult to detect objects that move directly toward the front of the camera.
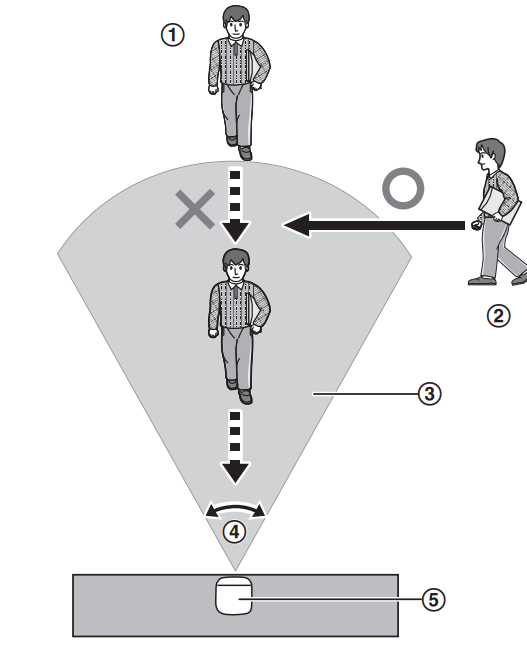
- It is difficult to detect movement directly towards the front of the camera.
- It is easy to detect movement sideways in front of the camera.
- Detection range
- Horizontal detection range: approx. 70°Camera
Temperature sensor
The sensor is triggered when the set temperature range is exceeded.
Note:
The temperature sensor may not detect temperature accurately if the camera is exposed to warm or cool breezes from heating/cooling systems.
- You can adjust the temperature setting of the temperature sensor. For more information, refer to the User’s Guide (page 13).
- Sound sensor
The sensor is triggered when the set sound level is exceeded.
Note:
- The sound sensor does not function while the camera’s lullaby feature is playing a lullaby.
- The sound sensor may not function as desired when the camera is placed in noisy environments.
- You can adjust the sound level setting of the sound sensor. For more information, refer to the User’s Guide (page 13).
Information about the night vision mod
The camera features an array of infrared LEDs that light automatically in low-light conditions, allowing camera images to be viewable even when the surrounding area is dark.
Note:
- When night vision mode is active, the colors in camera images may appear different from normal.
- When night vision mode is active, the array of infrared LEDs that surrounds the camera’s lens lights up in a faint red color that can be seen in the dark.
- If the camera is installed in front of a window and points directly at the window, images may be poor when night vision mode is active.
Confirming the usage area
Wireless communication range
The wireless communication range of each device in the system from the hub is approximately 50 m (160 feet) indoors and approximately 300 m (1,000 feet) outdoors. Wireless communication may be unreliable when the following obstacles are located between the hub and other devices.
- Metal doors or screens
- Walls containing aluminum-sheet insulation, R Walls made of concrete or corrugated iron,n R Double-pane glass windows
- Multiple walls
- When using each device on separate floors or in different buildings
Note:
- The camera’s LED indicator blinks in red if it is out of range of the hub. In this case, confirm all connections, including those of the hub.
Usage area cautions
Using the camera in the following areas may cause deformation, malfunction, or operational failure.
- In direct sunlight
- Areas exposed to grease or steam, such as kitchens
- Near fire or heating devices
- Near magnetic fields (such as near microwaves and magnets)
- Areas subject to extreme temperature changes, such as those next to air conditioners
- Areas with reflective objects, such as glass, that can interfere with the detection of temperature variation
- Areas where the temperature is affected by strong illuminating objects (such as fluorescent lights)
- Near devices that emit strong radio waves, such as mobile phones
Connections
- Insert the AC adaptor plug firmly into the DC jack.
- Connect the AC adaptor to the power outlet.
Note:
Use only the supplied Panasonic AC adaptor PNLV236.
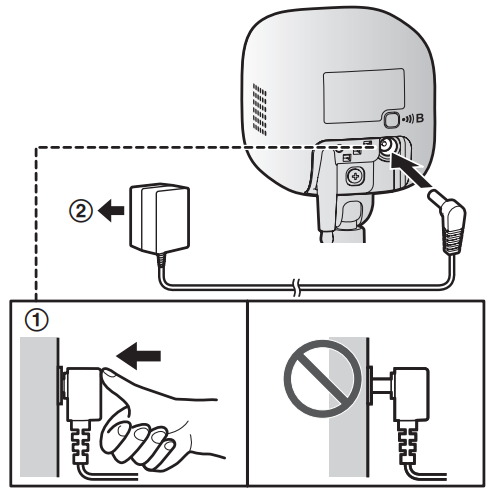
Note about power connections
- AC adaptor connection
The AC adaptor must remain connected at all times. (It is normal for the adaptor to feel warm during use.)
The AC adaptor should be connected to a vertically oriented or floor-mounted AC outlet. Do not connect the AC adaptor to a ceiling-mounted AC outlet, as the weight of the adaptor may cause it to become disconnected. - Power failure
The camera will not work during a power failure.
Placing the camera on a flat area
When you place the camera on a flat area, you can prevent the camera from falling by passing a string through the hole (page 7) in the stand.
- Pass a string (not supplied) through the hole in the stand.
- Tie the string and hook it to the bracket.
Wall mounting
- Mount the camera in a stable location where the unit can be adequately supported when installing.
- The AC adaptor should be connected to a vertically oriented or floor-mounted AC outlet. Do not connect the AC adaptor to a ceiling-mounted AC outlet, as the weight of the adaptor may cause it to become disconnected.
- Do not mount the camera on a soft material. It may fall down, break, or cause injury.
- Do not mount the camera on the following places: plasterboard, ALC (autoclaved lightweight cellular concrete), concrete block, plywood less than 25 mm (1 inch) thick, etc.
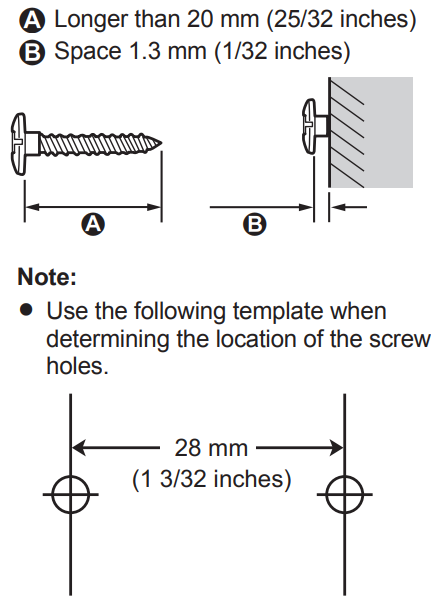
Drive the screws (not supplied) into the wall.
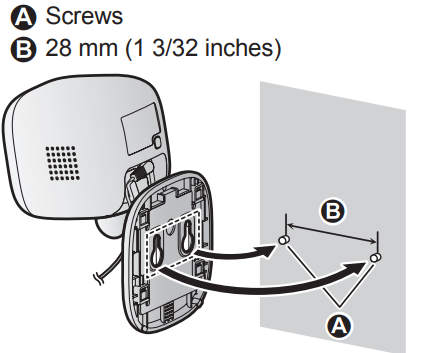
Mount the camera to the wall.
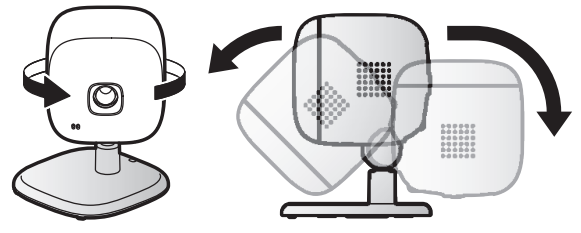
Adjust the angle of the camera.
Specifications
- Standards
DECT (Digital Enhanced Cordless
Telecommunications) - Frequency range
DECT: 1.92 GHz – 1.93 GHz - RF transmission power
DECT: 115 mW (max.) - Power source
120 V AC, 60 Hz - Power consumption
Standby: 2.2 W
During operation:
3.0 W (when the LED lights are not lit)
4.0 W (when the LED lights are lit) - Operating conditions
0 °C – 40 °C (32 °F – 104 °F) up to 90 % relative humidity(non-condensing) - Transmitting range
Approx. 50 m (160 feet) indoors
Approx. 300 m (1,000 feet) outdoors - Image sensor 0.3 megapixel CMOS
- Minimum illuminance required 0 lx*1
- Focal length
Fixed (0.4 m (1.3 feet) – infinity) - Angular field of view (camera angle)
Horizontal: approx. 70°
Vertical: approx. 50° - Motion detection method: Visual sensor
- Motion detection range
Horizontal: approx. 70°
Vertical: approx. 50° - Adjustable mounting angles
Horizontal: ±90°
Vertical: facing forward - facing down approx. 60° (adjustable when mounting) - Dimensions (height ´ width ´ depth) Approx. 102 mm ´ 75 mm ´ 75 mm (4 inches ´ 2 15/16 inches ´ 2 15/16 inches)
- Mass (weight)
Approx. 160 g (0.35 lb) - The infrared LEDs that surround the camera lens will illuminate in low-light conditions.
Panasonic Products Limited Warranty
Limited Warranty Coverage (For USA Only)
If your product does not work properly because of a defect in materials or workmanship, Panasonic Corporation of North America (referred to as “the warrantor”) will, for the length of the period indicated on the chart below, which starts with the date of original purchase (“warranty period”), at its option either (a) repair your product with new or refurbished parts,(b) replace it with a new or a refurbished equivalent value product, or (c) refund your purchase price. The decision to repair, replace, ace, or refund will be made by the warrantor.

During the “Labor” warranty period, there will be no charge for labor. During the “Parts” warranty period, there will be no charge for parts. This Limited Warranty excludes both parts and labor for non-rechargeable batteries, antennas, and cosmetic parts (cabinet). This warranty only applies to products purchased and serviced in the United States.
This warranty is extended only to the original purchaser of a new product that has not been sold “as is”.
- Mail-In Service--Online Repair Request
- Online Repair Request
- To submit a new repair request and for quick repair status, visit our website
- When shipping the unit, carefully pack it, include all supplied accessories listed in the Owner’s Manual, and send it prepaid, adequately insured, and well-packed in a carton box. When shipping Lithium Ion batteries, please visit our website at
Panasonic, as we are committed to providing the most up-to-date information. Include a letter detailing the complaint, a return address, and provide a daytime phone number where you can be reached. A valid registered receipt is required under the
Limited Warranty.
IF REPAIR IS NEEDED DURING THE WARRANTY PERIOD, THE PURCHASER WILL BE REQUIRED TO FURNISH A SALES RECEIPT/PROOF OF PURCHASE INDICATING DATE OF PURCHASE, AMOUNT PAID,, AND PLACE OF PURCHASE. CUSTOMER WILL BE CHARGED FOR THE REPAIR OF ANY UNIT RECEIVED WITHOUT SUCH PROOF OF PURCHASE.
- Limited Warranty Limits and Exclusions
- This warranty ONLY COVERS failures due to defects in materials or workmanship, and DOES NOT COVER normal wear and tear or cosmetic damage. The warranty
- ALSO DOES NOT COVER damages which occurred in shipment, or failures which are caused by products not supplied by the warrantor, or failures which result from accidents, misuse, abuse, neglect, mishandling, misapplication, alteration, or faulty
installation, set-up adjustments, misadjustment of consumer controls, improper maintenance, power line surge, lightning damage, modification, introduction of sand, humidity or liquids, commercial use such as hotel, office, restaurant, or otherbusiness or rental use of the product, or service by anyone other than a Factory Service Center or other Authorized Servicer, or damage that is attributable to acts of God. - THERE ARE NO EXPRESS WARRANTIES EXCEPT AS LISTED UNDER “LIMITED WARRANTY COVERAGE”.
- THE WARRANTOR IS NOT LIABLE FOR INCIDENTAL OR CONSEQUENTIAL DAMAGES RESULTING FROM THE USE OF THIS PRODUCT, OR ARISING OUT OF
OF ANY BREACH OF THIS WARRANTY.
(As examples, this excludes damages for lost time, travel to and from the servicer, loss of or damage to media or images, data, or other memory or recorded content. - The items listed are not exclusive, but for illustration only.)
- ALL EXPRESS AND IMPLIED WARRANTIES, INCLUDING THE WARRANTY OF MERCHANTABILITY, ARE LIMITED TO THE PERIOD OF THE LIMITED WARRANTY. Some states do not allow the exclusion or limitation of incidental or consequential damages, or limitations on how long an implied warranty lasts, so the exclusions may not apply to you. This warranty gives you specific legal rights,and you may also have other rights which vary from state to state. If a problem with this product develops during or after the warranty period, you may contact your dealer or Service Center. If the problem is not handled to your satisfaction, then write to:
- Consumer Affairs Department Panasonic Corporation of North America 661 Independence Parkway Chesapeake, VA 23320
Troubleshooting the Panasonic KX-HNC210
Common issues with the Panasonic KX-HNC210 often relate to connectivity or motion detection sensitivity. Here are some troubleshooting steps:
- Connection Issues: Ensure the camera is properly registered to the hub and that Wi-Fi connectivity is stable.
- Motion Detection False Alarms: Adjust the sensitivity settings to reduce false positives.
For more complex issues, refer to the user manual or contact Panasonic support. Warranty and support options are available through the official Panasonic website.
Pros and Cons of the Panasonic KX-HNC210
Pros
- Seamless Integration: Works well with other Panasonic Home Network System devices.
- Advanced Sensors: Includes motion, sound, and temperature sensors for comprehensive monitoring.
- Two-Way Communication: Allows for real-time interaction with family members or pets.
Cons
- Power Consumption: May require more power than some users expect, especially with LED lights on.
- Resolution: The 0.3 megapixel resolution may be lower than some competitors.
Customer Reviews and Feedback
Users praise the Panasonic KX-HNC210 for its ease of setup and integration with other Panasonic devices. However, some users note that the camera's resolution could be higher. Common complaints include occasional connectivity issues, which can be resolved by checking the hub registration and Wi-Fi stability.
Overall, the Panasonic KX-HNC210 is a solid choice for those already invested in the Panasonic Home Network System, offering good value for money and reliable performance.
Faqs
How do I set up the Panasonic Home Network System Indoor Camera KX-HNC210 for the first time?
What should I do if the Panasonic Home Network System Indoor Camera KX-HNC210 is not working properly?
Can I use the Panasonic Home Network System Indoor Camera KX-HNC210 with the HomeHawk app?
How often should I maintain the Panasonic Home Network System Indoor Camera KX-HNC210?
What are the key features that make the Panasonic Home Network System Indoor Camera KX-HNC210 different?
Is the Panasonic Home Network System Indoor Camera KX-HNC210 compatible with smart home devices like smart plugs?
How do I optimize the performance of the Panasonic Home Network System Indoor Camera KX-HNC210?
Can I mount the Panasonic Home Network System Indoor Camera KX-HNC210 on any wall?
Leave a Comment