
Usage: Panasonic Home Monitoring Window Camera KX-HNC500 Instruction Guide
Content
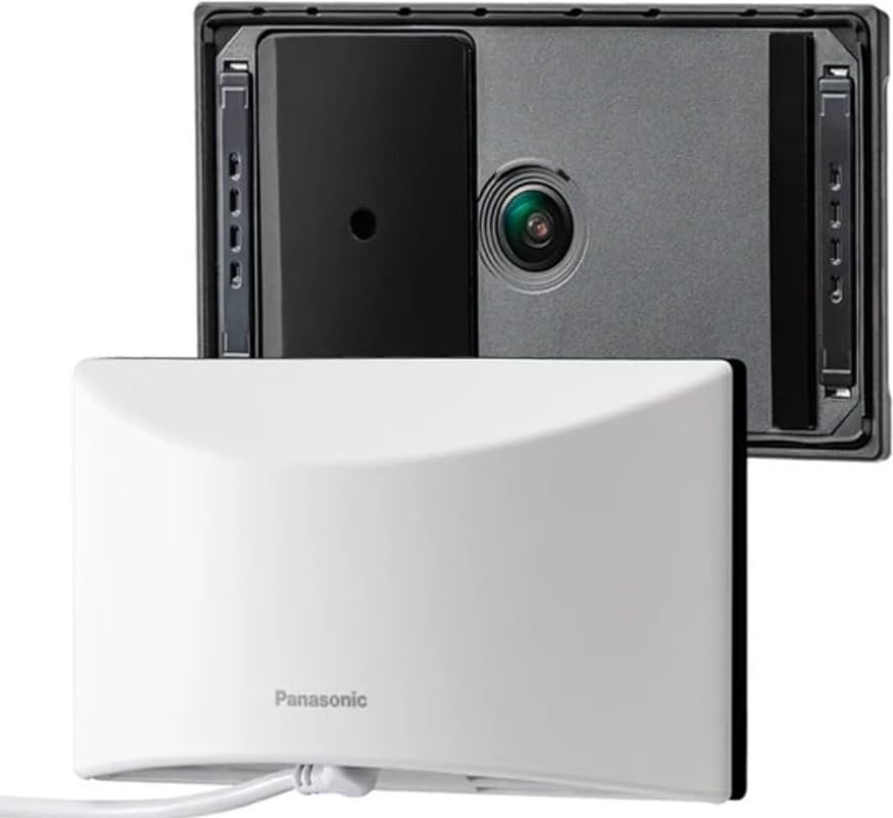
Panasonic Home Monitoring Window Camera KX-HNC500
Introduction
The Panasonic Home Monitoring Window Camera KX-HNC500 is an innovative indoor security solution designed to provide clear, reliable outdoor surveillance from inside your home. Featuring a sleek, discreet design, this camera adheres seamlessly to your interior window without drilling, using strong suction cups or double-sided tape. With its ability to record crisp 1080p Full HD video and a wide 150° field of view, this camera ensures comprehensive coverage of your home's exterior. Its advanced color night vision provides bright, sharp images even in low-light conditions, enhancing security around the clock.
Key benefits include continuous power through a standard wall outlet, eliminating battery concerns, and local storage options via a microSD card (sold separately), allowing users to avoid monthly cloud fees. The camera incorporates intelligent person detection technology and customizable motion detection zones, reducing false alerts caused by trees or passing cars. Additionally, compatibility with Amazon Alexa and Google Assistant offers convenient voice control and smart home integration.
Ideal for homeowners seeking a non-invasive, high-quality monitoring system that blends into their living space, the Panasonic KX-HNC500 suits users prioritizing ease of installation, clear video quality, and smart alert customization. The camera typically ranges between $150 to $200 and is widely available through major retailers and online stores.
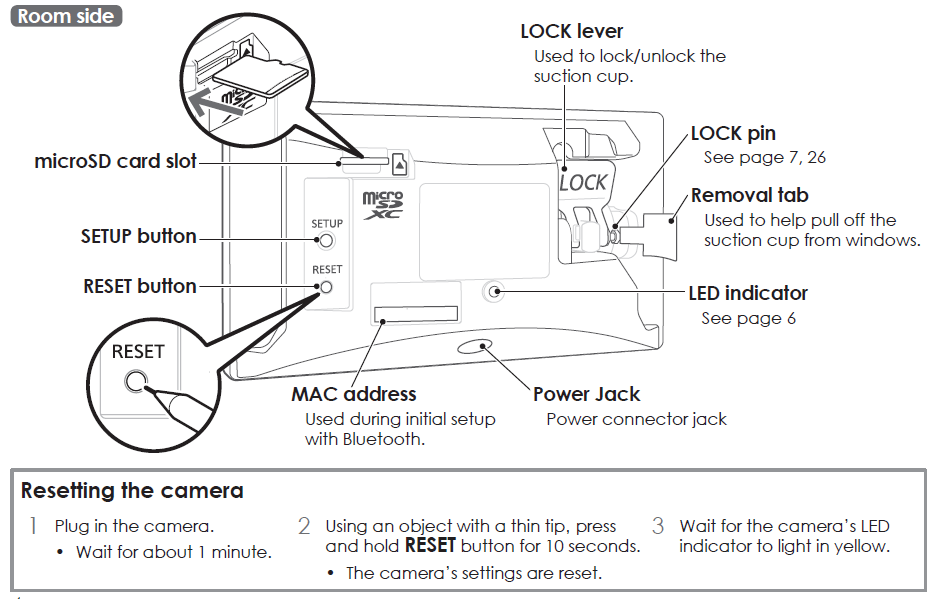
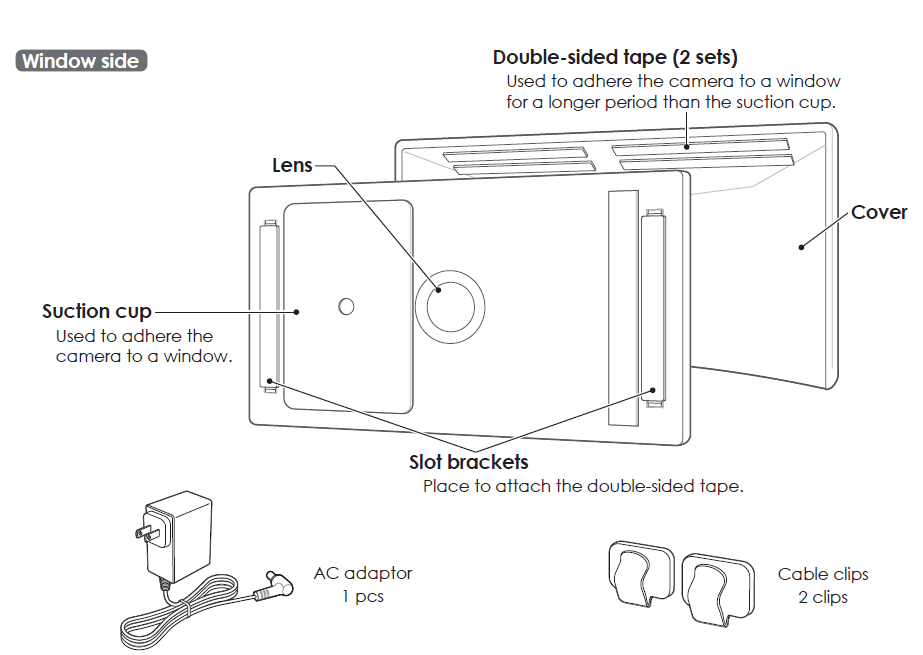
Part names and functions
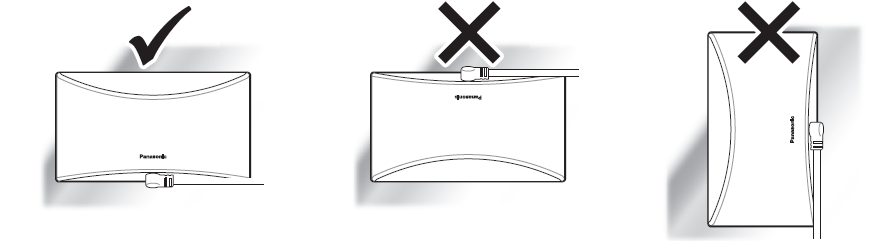
Installation alignment
Installation location cautions
- The camera may not be able to be installed in areas on the glass of windows that are uneven or have film, etc. attached.
- Depending on the installation location, the camera may hit against objects or people when the window is opened or closed.
About this system
- This system is not designed to provide complete protection from property loss. To the maximum extent permitted by applicable law‚ Panasonic will not be held responsible for any damage incurred as a result of property loss.
- The system’s wireless features are subject
to interference‚ therefore functionality in all situations cannot be guaranteed. Panasonic will not be held responsible for injury or damage to property that occurs in the event of wia wireless communication error or failure.
Privacy and rights of portrait
Please take into consideration the rights of others’ privacy. Generally said that “privacy” means the ability of an individual or group to stop information about themselves from becoming known to others. “Rights of portrait” means the right to be safe from having your own image taken and used indiscriminately without consent.
Security cautions
- Take appropriate measures to avoid the following security breaches when using this product.
- Leaks of private information
- Unauthorized use of this product
- Unauthorized interference or suspension of the use of this product
- Configure the wireless router that connects your mobile device to this product to use encryption for all wireless communication.
- Do not use the default password continuously. Change it to your own setting and set nea w one periodically. Do not use passwords that could be easily guessed by a third party. If you keep a record of your passwords‚ protect that record.
- If you lose your mobile device‚ change the password used to access this product.
- If you enable the product’s auto login feature‚ enable the screen lock or similar security feature on your mobile device.
- Performing the reset will delete all information. To avoid losing your previous setting‚ we recommend writing down the information.
- To prevent disclosure of personal information‚ enable the screen lock or similar security feature on your mobile device.
- When submitting the product for repair‚ make a note of any important information stored in the product‚ as this information may be erased or changed as part of the repair process.
- Use only trusted repair services authorized by Panasonic.
- Before disposing of the product‚ perform a factory data reset to erase any data stored in the product. Remove and erase the microSD card.
- If your mobile device will no longer be used with the product‚ delete your mobile device’s registration from the product and delete the corresponding app from your mobile device.
- This product may be used in ways that violate the privacy or publicity rights of others. You are responsible for how this product is used.
For your safety
To prevent severe injury and loss of life/property‚ read this section carefully before using the product to ensure proper and safe operation of your product.
WARNING
Power connection
- Use only the power source marked on the product.
- Do not overload power outlets and extension cords. This can result in the risk of fire or electric shock.
- Completely insert the AC adaptor/power plug into the power outlet. Failure to do so may cause electric shock and/or excessive heat, resulting in a fire.
- Regularly remove any dust‚ etc, From the AC adaptor/power plug by pulling it from the power outlet‚ then wiping with a dry cloth. Accumulated dust may cause an insulation defect from moisture‚ et, etc. resulting in a fire.
- Unplug the product from power outlets if it emits smoke‚ an abnormal smell‚ or makes an unusual noise. These conditions can cause fire or electric shock. Confirm that smoke has stopped emitting and contact ..us
- Unplug from power outlets and never touch the inside of the product if its casing has been broken.The danger of electric shock exists.
- Never touch the plug with wet hands. The danger of electric shock exists.
- Do not connect non-specified devices. Operating safeguards
- Unplug the product from power outlets before cleaning. Do not use liquid or aerosol cleaners.
- Do not disassemble the product.
- Never put metal objects inside the product. If metal objects enter the product‚ turn off the circuit breaker and contact an authorized service center.
- Keep small parts‚ such as microSD cards‚ out of the reach of children. There is a risk of swallowing.
- The applied nameplate is located at the bottom or rear of the product.
Medical
- Consult the manufacturer of any personal medical devices‚ such as pacemakers or hearing aids‚ to determine if they are adequately shielded from external RF (radio frequency) energy. Wireless LAN features operate between the frequencies listed below‚ with a peak transmission power of 100mw:
- 2.412 GHz – 2.462 GHz
- 5.180 GHz – 5.320 GHz
- 5.500 GHz – 5.720 GHz
- 5.745 GHz – 5.825 GHz
- Do not use the product in Healthcare facilities if any regulations posted in the area instruct you not to do so. Hospitals or Healthcare facilities may be using equipment that could be sensitive to external RF energy.
- CAUTION
Installation and location
- Never install wiring during a lightning storm.
- The AC adaptor is used as the main disconnect device. Ensure that the AC outlet is installed near the product and is easily accessible.
- Mount the product in a stable location. Failure to do so may cause the product to fall, resulting in damage to the product or injury.
- Do not mount the product on cracked or unstable windows. This may damage the windows.
- This product is a precision product and may be damaged if it falls.
- To prevent the product from being damaged, make sure to carefully read the Quick Start Guide and this document.
- When attaching the product using the suction cup, make sure to periodically reattach the product.
- Avoid using the suction cup and double-sided tape for long periods. Periodically replace them with new parts.
For best performance
Product location/avoiding noise
- This product uses radio waves to communicate with a wireless router.
- For maximum coverage and noise-free communications‚ place this product: Att a convenient‚ high‚ and central location with no obstructions between this product and the wireless router.
- Away from electronic appliances such as TVs‚ radios‚ personal computers‚ wireless devices‚ or other phones.
- Facing away from radio frequency transmitters‚ such as external antennas of mobile phone cell stations.
- Coverage and transmission quality depend on the local environmental conditions.
- If the transmission quality is not satisfactory‚ move this product to another location.
Environment
- Keep the product away from electrical nnoise-generatingdevices‚ such as fluorescent lamps and motors.
- The product should be kept free from excessive smoke‚ dust‚ high temperature‚ and vibration.
- Do not expose this product to direct sunlight or other forms of powerful light such as halogen lights, for long periods of time. (This may damage the image sensor.)
- Do not place heavy objects on top of the product.
- When you leave the product unused for a long period of time‚ unplug the product from the power outlet.
- The product should be kept away from heat sources such as heaters‚ kitchen stoves‚ etc.
- It should not be placed in rooms where the temperature is less than 0 °C (32 °F) or greater than 40 °C (104 °F). Damp basements should also be avoided.
- The maximum communication range may be shortened when the product is used in the following places: Near obstacles such as hills‚ tunnels‚ underground‚ near metal objects such as wire fences‚ etc.
- Operating the product near electrical appliances may cause interference. Move away from the electrical appliances.
Routine care
- Wipe the outer surface of the product with a wet wipe.
- Do not use benzine‚ thinner‚ or any abrasive powder.
Camera image quality
- Camera image and its quality may be affected on the mobile device based on surroundings such as lighting‚ brightness.
- Dirty windows and window screens affect the camera image quality.
- Regularly clean the windows and remove the window screens.
- Rain directly falling on a window may affect the camera image quality and human detection performance. We recommend installing the product on a window that is not exposed to direct rain, such as a window with a sunshade.
Protecting your recordings
- Do not remove the microSD card or disconnect the product’s AC adaptor while reading or writing data to the microSD card. Data on the card could become corrupted.
- If a microSD card malfunctions or is exposed to electromagnetic waves or static electricity‚ data on the card could become corrupted or erased. Therefore, we recommend backing up important data to a computer or other device.
Notice for product disposal‚ transfer‚ or return
- This product can store your private/confidential information. To protect your privacy/confidentiality‚ we recommend that you erase information from the memory before you dispose of‚ transfer‚ or return the product.
- Specifications
- Standards: IEEE 802.11a/b/g/n
Wireless LAN:
- Frequency range: 2.412 GHz – 2.462 GHz (channels 1 – 11) / 5.180 GHz – 5.320 GHz (channels 36–64) / 5.500 GHz – 5.720 GHz (channels 100–144) / 5.745 GHz – 5.825 GHz (channels 149–165)
- RF transmission power: 100 mW (peak transmission power)
- Encryption: WPA2™-PSK (TKIP/AES)‚ WPA™-PSK (TKIP/AES)‚ WEP (128/64 bit)
- Wi-Fi device type: DFS client device
- Power source: 120 V AC‚ 60 Hz
Bluetooth:
- Bluetooth system specification: Ver. 5.0
- Wireless equipment classification: Class 1.5 Frequency range: 2.402 GHz – 2.48 GHz
- RF transmission power: +10 dBm (max)
- Power consumption: Standby: 3.0 W / Maximum: 4.1 W
- Operating conditions: 0 °C – 40 °C *1 (32 °F – 104 °F) / 20 % – 80 % relative air humidity (dry)
- Resolution: 1920 x 1080pixelsl (Full HD)‚ 1280 x 720 pixel (HD)‚ 640 x 480 pixel (VGA)
- Image sensor: 2.1 megapixel CMOS
- Minimum illuminance required: 0.20 lx *2
- Focal length: Fixed (1.5 m (4 feet 11 inches) – infinity)
- Camera field of view: Diagonal 150° microSD card *3, *4:
- Type: microSDHC card (4 GB – 32 GB)‚ microSDXC card (64 GB – 1 TB)
- Speed: Class10‚ or UHS Speed Class 1 or higher
- Motion detection method: Visual sensor
- Dimensions (height × width × depth): Approx. 73 mm × 130 mm × 32 mm (2 7/8 inches × 5 1/8 inches × 1 17/64 inches)
- Mass (weight): Approx. 135 g (0.29 lb)
- A fan operates when the camera becomes hot.
- The fan may be audible when it is operating.
- Illuminance to detect the form of people wh people are within approximately x. 4.8 m (16 feet) of the camera, and there is sufficient contrast with the background.
- We strongly recommend using a microSD card that is an “MLC flash memory” type or states its use for “video monitoring cameras” or “dash cam and home monitoring systems”.
- When recording images, images are not recorded in the following situations.
- When using 24/7 recording, images are not recorded for about 1 second between the minute recording intervals.
- When switching to HDR recording, images are not recorded for about the first 5 seconds.
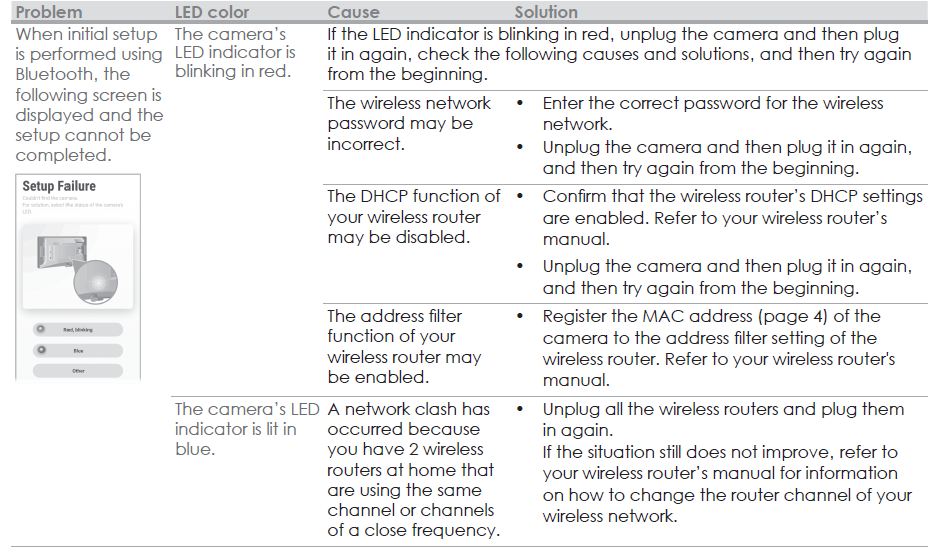
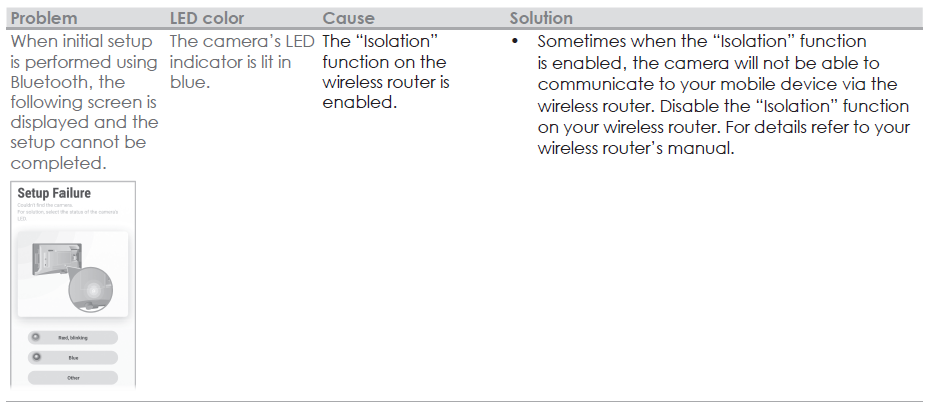
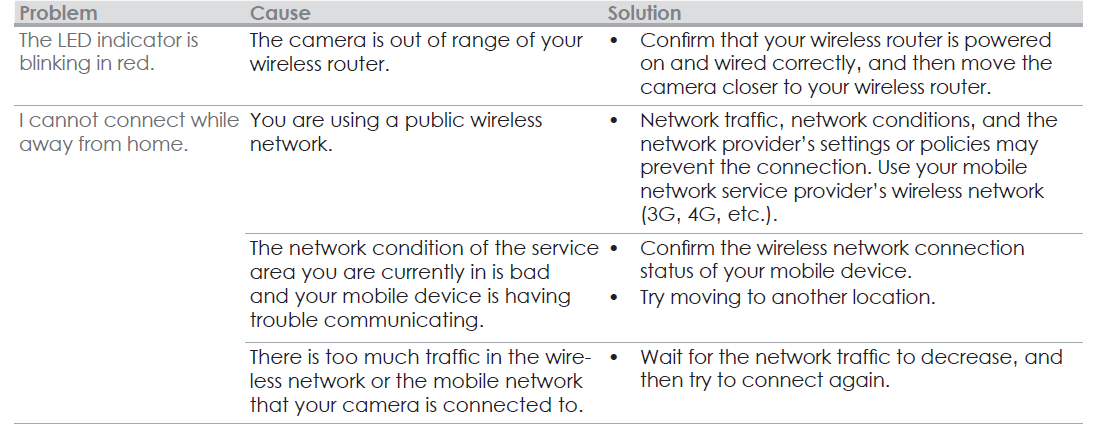
Troubleshooting (Initial setup by selecting “Bluetooth”)
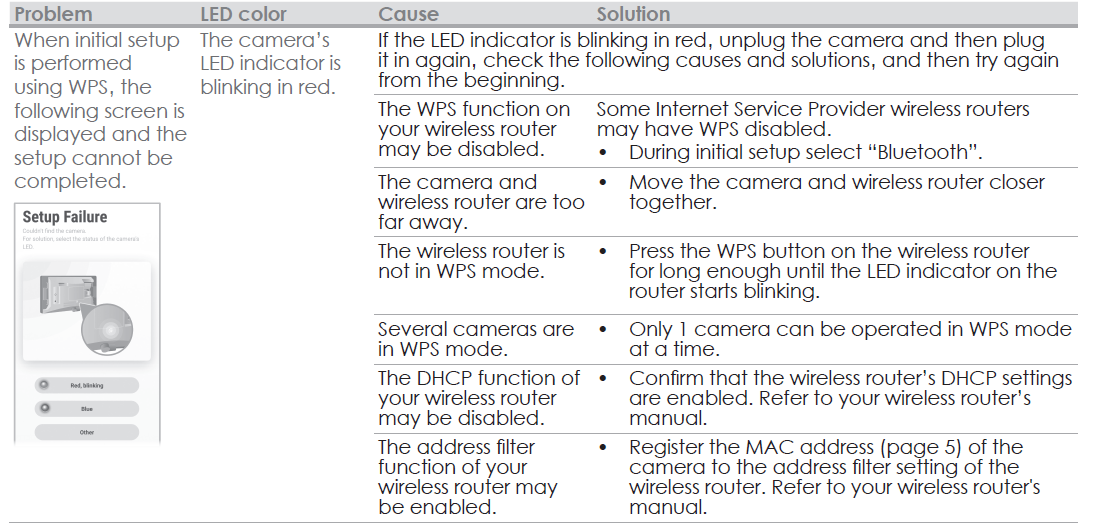
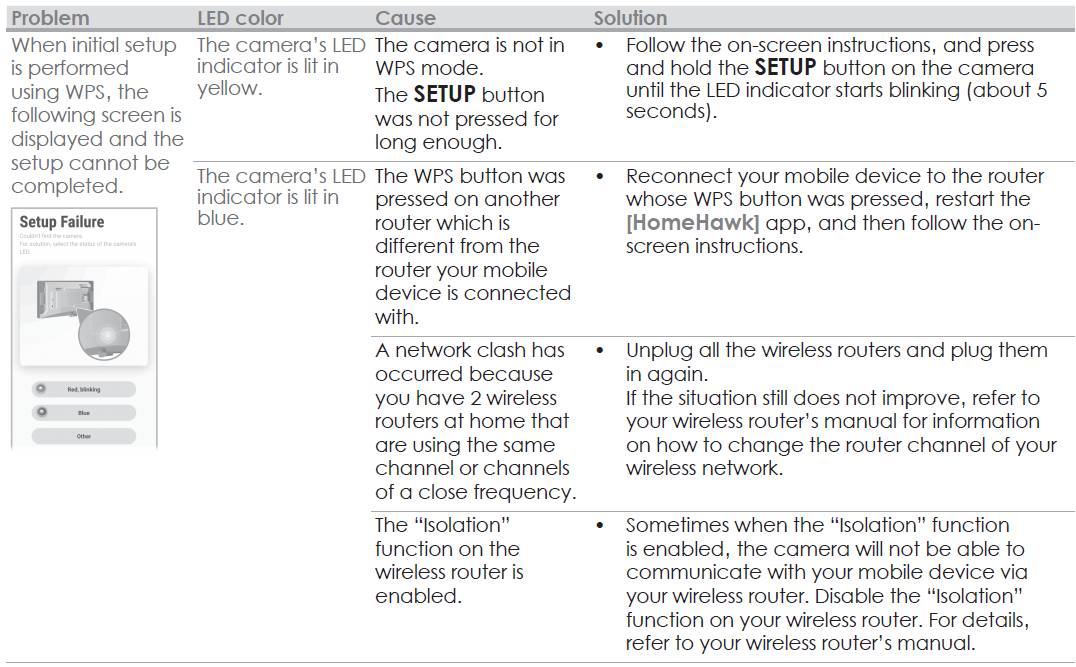
Troubleshooting (Initial setup by selecting “WPS”)
What is WPS?
- WPS is a function of wireless routers that is used to easily connect wireless devices to a wireless router
- A WPS button on a wireless router indicates that it has the WPS function. (Depending on the type of wireless router‚ the WPS function may be disabled on the wireless router even if there is a WPS button.)
- If you have trouble during the initial setup‚ check the following causes/solutions ffirst
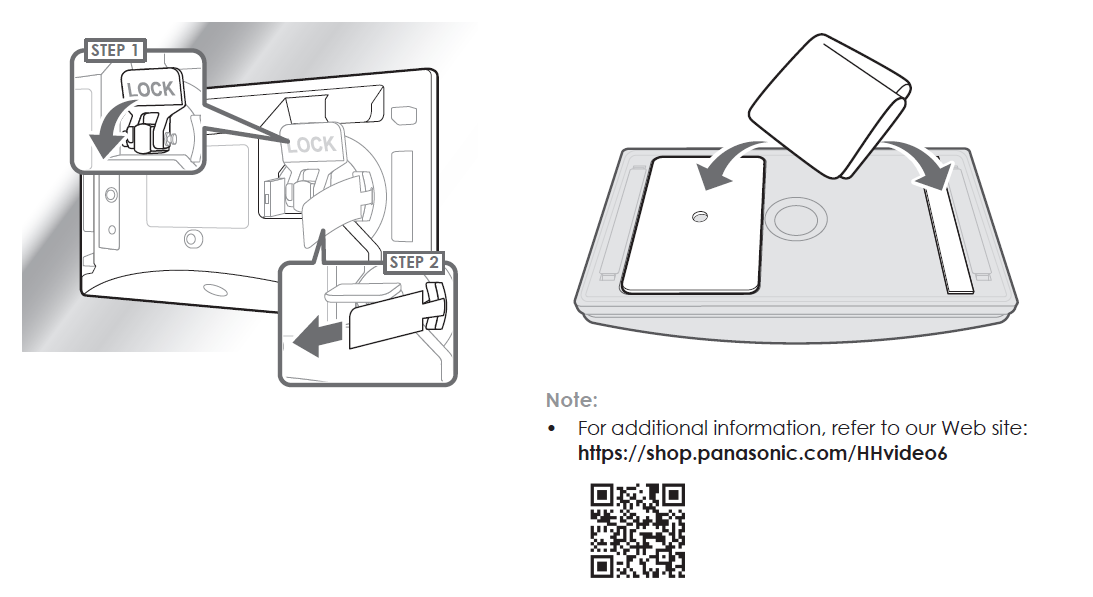
Cleaning the suction cup
- Remove the cover from the camera and then take the camera off the window.
- Wipe the suction cup with a wet wipe.
Panasonic Products Limited Warranty
Limited Warranty Coverage (For USA Only)
If your product does not work properly because of a defect in materials or workmanship‚ Panasonic Corporation of North America (referred to as “the warrantor”) will‚ for the length of the period indicated on the chart below‚ which starts with the date of original purchase (“warranty period”)‚ at its option either (a) repair your product with new or refurbished parts‚ (b) replace it with a new or a refurbished equivalent value product‚ or (c) refund your purchase price. The decision to repair‚ replace , or refund will be made by the warrantor.

Pros & Cons of Panasonic Home Monitoring Window Camera KX-HNC500
Pros
- High-Quality Video: Records clear 1080p Full HD footage with a broad 150° viewing angle, providing expansive coverage and detailed images.
- Color Night Vision: Enables bright and colorful night-time monitoring, outperforming many standard infrared cameras.
- Easy Installation: Attaches to windows using suction cups or double-sided tape, avoiding complex mounting or drilling.
- Continuous Power Supply: Powered via a wall outlet e, ensuring uninterrupted operation without battery replacement or recharging.
- Smart Detection Features: Person detection and customizable motion zones minimize false alarms, increasing alert accuracy.
- Local Storage Support: microSDXC card slot allows for local recording without subscription fees.
- Smart Home Integration: Works with Alexa and Google Assistant for voice commands and seamless automation.
Cons
- Indoor Use Only: Designed to be used indoors on windows; not weatherproof for outdoor installation.
- Requires Power Outlet: Must be plugged in continuously, which may limit camera placement.
- No Cloud Subscription Included: While local storage is supported, cloud backup requires separate services.
- Limited Angle Adjustment: The camera mount allows some rotation, but vertical tilting options are restricted.
- Price Point: Slightly higher than some entry-level window cameras but justified by advanced features and quality.
Customer Reviews and Feedback on Panasonic KX-HNC500 Home Monitoring Window Camera
Users frequently praise the Panasonic Home Monitoring Window Camera KX-HNC500 for its sharp image quality and reliable performance. With an average rating of 4.9 out of 5 stars, many customers highlight the ease of installation and clear color night vision as standout features. One user noted, “The camera’s person detection greatly reduced false alerts compared to my previous system.” Another appreciated the local storage option, emphasizing no extra fees for cloud recording.
Common complaints include the camera's dependency on continuous power, which restricts placement flexibility, and occasional connectivity issues that some users faced during setup. However, Panasonic’s customer support and thorough troubleshooting guides have mitigated many concerns. Overall, buyers recommend the KX-HNC500 for those wanting hassle-free monitoring with professional-grade video quality and smart features.
Faqs
How do I set up the panasonic Home Monitoring Window Camera KX-HNC500 for the first time?
What should I do if the panasonic Home Monitoring Window Camera KX-HNC500 loses suction and falls off the window?
Can I use the panasonic Home Monitoring Window Camera KX-HNC500 on double-glazed or condensation-prone windows?
How can I optimize video recording and motion detection on the panasonic Home Monitoring Window Camera KX-HNC500?
What are the recommended maintenance steps for the panasonic Home Monitoring Window Camera KX-HNC500?
How do I reset the panasonic Home Monitoring Window Camera KX-HNC500 if it is not responding?
Is the panasonic Home Monitoring Window Camera KX-HNC500 compatible with other Panasonic HomeHawk products?
Can I install the panasonic Home Monitoring Window Camera KX-HNC500 on east- or west-facing windows without image washout?
Leave a Comment