
Usage: Panasonic Home Monitoring Indoor Camera Instruction Guide
Content
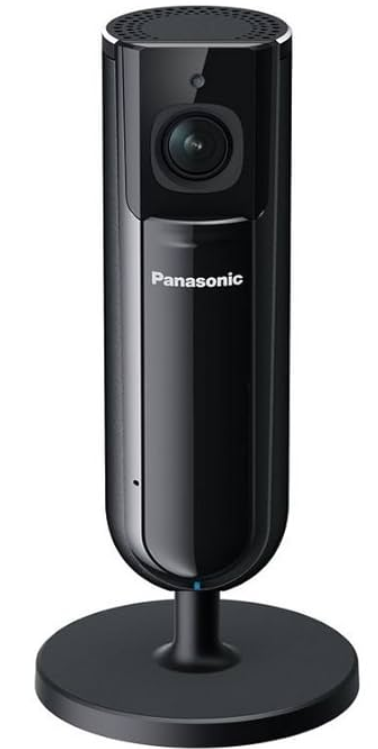
Panasonic Home Monitoring Indoor Camera
Introduction
The Panasonic Home Monitoring Indoor Camera is a smart, reliable solution for enhancing home security and peace of mind. Designed for modern households, this indoor camera offers crisp HD video quality, advanced motion detection, and seamless integration with your smartphone, making it ideal for monitoring children, pets, or valuables while you’re away
Key benefits include customizable motion zones, color night vision, two-way audio, and the ability to store footage locally via microSD card—no mandatory cloud subscription required. The camera supports multiple units per system, allowing you to expand coverage room by room[3]. Its intuitive app provides real-time alerts, live viewing, and easy setup, catering to both tech-savvy users and those new to smart home devices.
Target users include busy parents, pet owners, caregivers, and anyone seeking an affordable, user-friendly security camera. Use cases range from baby monitoring and pet surveillance to general home security and remote property checks. The estimated price range for Panasonic Home Monitoring Indoor Cameras typically falls between $100 and $200, depending on the model and included accessories. These cameras are widely available through major electronics retailers and online marketplaces.
With its blend of advanced features, ease of use, and flexible storage options, the Panasonic Home Monitoring Indoor Camera stands out as a versatile and value-packed choice for indoor security.
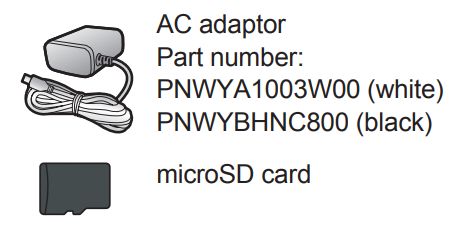
Accessory information
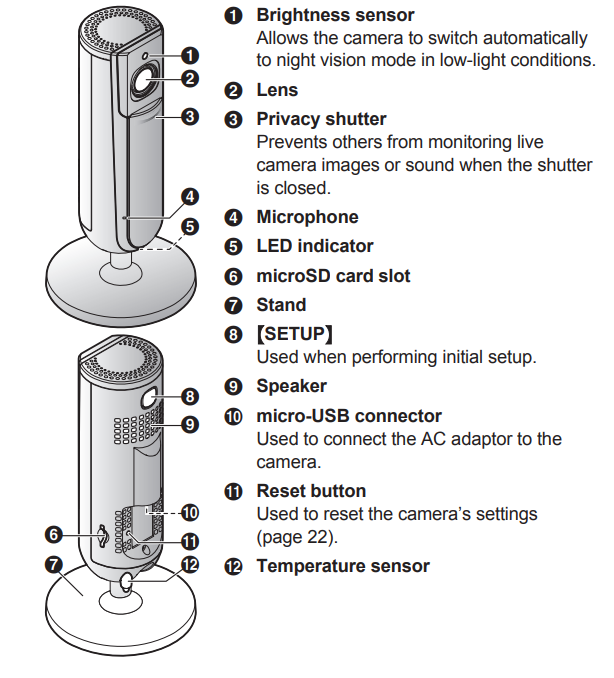
Part names and functions
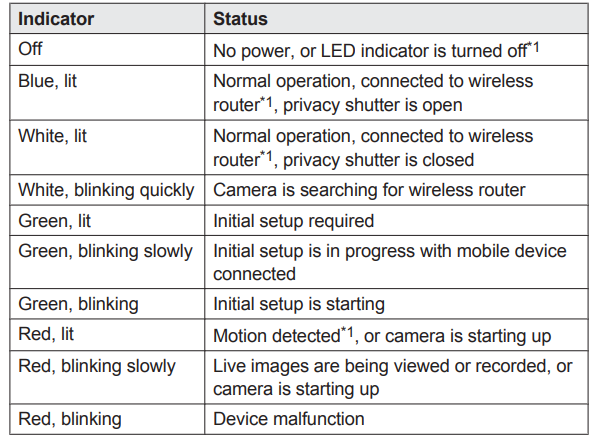
LED indicator
You can use the LED indicator to confirm the camera’s status.
Connections
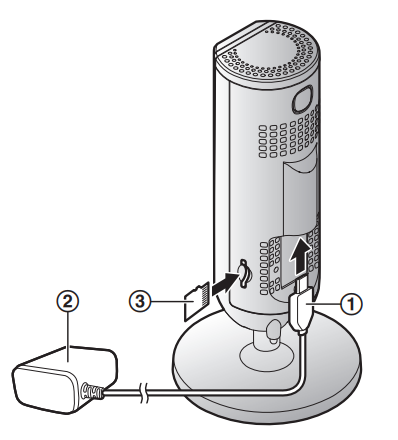
- Insert the AC adaptor plug (A) firmly into the camera’s micro-USB connector.
- Connect the AC adaptor (B) to the power outlet.
- Insert a microSD card (user-supplied; C) into the camera’s microSD card slot. (This is not necessary if you do not want to record camera images.)
Setting up the camera initial setup)
Confirm the following before you begin.
- Make sure you have installed the [HomeHawk] app on your mobile device
- Make sure the camera is located within range of your wireless router
- Make sure your mobile device is connected to your wireless router
- Make sure your mobile device can connect to the Internet
- Make sure you know the network name (SSID) and password assigned to your wireless router
Initial setup (for iPhone, iPad users)
- Plug in the camera and wait about 1 minute for the camera’s LED to light in green.
If the LED does not light in green, or if you experience trouble during this procedure, reset the camera (page 22) and then repeat this procedure. - Start the [HomeHawk] app.
The end-user license agreement is displayed the first time you start the app. - Follow the on-screen instructions.
- Tap [Indoor HD Camera]. 5 Tap [Set up the HD Camera]. 6 When prompted, press the MSETUPN button on the back of the camera, and then tap [Next].
The LED indicator blinks in green. - Change your mobile device’s wireless LAN setting temporarily so that it connects to the camera directly.
Open your mobile device’s [Settings] app, tap [Wi-Fi], select
“KX-HNC800_Panasonic”, enter “00000000” as the password, and then tap [Join]. - If more than 1 item named “KX-HNC800_Panasonic” is displayed, wait approximately. 10 minutes and perform this procedure from the beginning.
- Start the [HomeHawk] app again.
- If necessary, enter the password required to connect to your wireless router and then tap [Next].
- The camera and your mobile device connect to your wireless router.
- If prompted, follow the on-screen instructions and connect your mobile device to your wireless router, start the app again, and then tap [Add This Mobile Device].
- If you enter the wrong password, an error is displayed. Repeat the initial setup procedure from the beginning.
- When prompted, press the MSETUPN button on the back of the camera.
- The camera registers your mobile device.
- When prompted, set the password that will be used to access the camera.
- When prompted, enter a name for your mobile device and then tap [OK].
- This setting allows you to change the name assigned to your device. It can help you identify your mobile device when performing certain operations, such as deregistering a mobile device.
- A list of all cameras registered to the app is displayed when initial setup is complete.
Initial setup (for Android device users)
- Plug in the camera and wait about 1 minute for the camera’s LED to light in green. R If the LED does not light in green, or if you experience trouble during this procedure, reset the camera (page 22) and then repeat this procedure.
- Start the [HomeHawk] app.
- The end-user license agreement is displayed the first time you start the app.
- Follow the on-screen instructions.
- Tap [Indoor HD Camera]. 5 Tap [Set up the HD Camera]. 6 When prompted, press the MSETUPN button on the back of the camera.
- The LED indicator blinks in green.
- The app temporarily changes your mobile device’s wireless LAN settings so that it connects to the camera directly.
- If necessary, enter the password required to connect to your wireless router and then tap [Next].
- The camera and your mobile device connect to your wireless router. R If you enter the wrong password, an error is displayed. Repeat the initial setup procedure from the beginning.
- When prompted, press the MSETUPN button on the back of the camera.
- The camera registers your mobile device.
- When prompted, set the password that will be used to access the camera.
- When prompted, enter a name for your mobile device and then tap [OK].
- This setting allows you to change the name assigned to your device. It can help you identify your mobile device when performing certain operations, such as deregistering a mobile device.
- A list of all cameras registered to the app is displayed when initial setup is complete.
Registering additional mobile devices to the camera
After you set up the camera, you can register additional mobile devices. You can register up to 8 mobile devices to a camera. Each mobile device can be registered to up to 32 cameras.
Confirm the following before you begin.
- Make sure you have completed the initial setup procedure
- Make sure your mobile device can connect to the Internet
- Make sure your wireless router and the camera are turned on
- Make sure your mobile device and the camera are connected to the same wireless router
- Using the mobile device that you want to register, download the [HomeHawk] app and then start the app.
- If prompted, follow the on-screen instructions and select the appropriate region/country.
- Tap [Indoor HD Camera].
- Tap [Add This Mobile Device].
- When prompted, press the MSETUPN button on the back of the camera.
- The camera registers your mobile device.
- When prompted, enter the password required to access the camera.
- This password was set during initial setup.
- When prompted, enter a name for your mobile device and then tap [OK].
- This setting allows you to change the name assigned to your device. It can help you identify your mobile device when performing certain operations, such as deregistering a mobile device.
- A list of all cameras registered to the app is displayed when registration is complete.
Resetting the camera
Use this procedure if you have trouble setting up the camera.
- Plug in the camera.
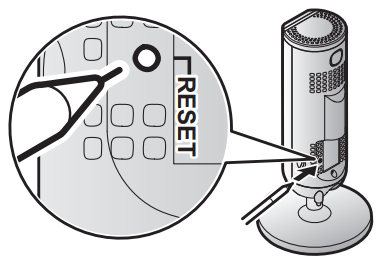
- Using an object with a thin tip, press and hold the reset button on the back of the camera for about 10 seconds, then release the button when the camera beeps.
- The camera’s settings are reset.
- Wait for the camera’s LED to light in green.
- Note:
After resetting the camera, you cannot use the camera again until it is set up. Refer to the relevant page in this section to set up the camera.
Limited Warranty (ONLY FOR U.S.A.)
Panasonic Products Limited Warranty
Limited Warranty Coverage (For USA Only)
If your product does not work properly because of a defect in materials or workmanship, Panasonic Corporation of North America (referred to as “the warrantor”) will, for the length of the period indicated on the chart below, which starts with the date of original purchase (“warranty period”), at its option either (a) repair your product with new or refurbished parts,(b) replace it with a new or a refurbished equivalent value product, or (c) refund your purchase price. The decision to repair, replacereplace,,e or refund will be made by the warrantor.

- During the “Labor” warranty period,,iod there will be no charge for labor. During the “Parts” warranty period, there will be no charge for parts. This Limited Warranty excludes both parts and labor for non-rechargeable batteries, antennas, and cosmetic parts (cabinet). This warranty only applies to products purchased and serviced in the United States.
- This warranty is extended only to the original purchaser of a new product that was ot sold “as is”.
- Mail-In Service--Online Repair Request
- Online Repair Request
To submit a new repair request and for quick repair status, - When shipping the unit, carefully pack, include all supplied accessories listed in the Owner’s Manual, and send it prepaid, adequately insured,, anwell-packedll in a carton box. When shipping Lithium Ion batteries, please visit our website
as Panasonic is committed to providing the most up-to-date information. Include a letter detailing the complaint, a return address, and provide a daytime phone number where you can be reached. A valid registered receipt is required under the
Limited Warranty.
- IF REPAIR IS NEEDED DURING THE WARRANTY PERIOD, THE PURCHASER WILL BE REQUIRED TO FURNISH A SALES RECEIPT/PROOF OF PURCHASE INDICATING DATE OF PURCHASE, AMOUNT PAID,, ID AND PLACE OF PURCHASE. CUSTOMER WILL BE CHARGED FOR THE REPAIR OF ANY UNIT RECEIVED WITHOUT SUCH PROOF OF PURCHASE.
Limited Warranty Limits and Exclusions
- This warranty ONLY COVERS failures due to defects in materials or workmanship, and DOES NOT COVER normal wear and tear or cosmetic damage. The warranty ALSO DOES NOT COVER damages which occurred in shipment, or failures which
are caused by products not supplied by the warrantor, or failures which result from accidents, misuse, abuse, neglect, mishandling, misapplication, alteratior on, or faulty installation, set-up adjustments, misadjustment of consumer controls, improper maintenance, power line surge, lightning damage, modification, introduction of sand, humidity or liquids, commercial use such as hotel, office, restaurant, or other business r rental use of the product, or service by anyone other than a - Factory Service Center or other Authorized Servicer, or damage that is attributable to acts of God.
- THERE ARE NO EXPRESS WARRANTIES EXCEPT AS LISTED UNDER “LIMITED WARRANTY COVERAGE”.
- THE WARRANTOR IS NOT LIABLE FOR INCIDENTAL OR CONSEQUENTIAL DAMAGES RESULTING FROM THE USE OF THIS PRODUCT, OR ARISING OUT OF ANY BREACH OF THIS WARRANTY.
(As examples, this excludes damages for lost time, travel to and from the servicer, loss of or damage to media or images, data o,,r other memory or recorded content. - The items listed are not exclusive, but for illustration only.)
- ALL EXPRESS AND IMPLIED WARRANTIES, INCLUDING THE WARRANTY OF MERCHANTABILITY, ARE LIMITED TO THE PERIOD OF THE LIMITED WARRANTY.
- Some states do not allow the exclusion or limitation of incidental or consequential damages, or limitations on how long an implied warranty lasts, so the exclusions may not apply to you. This warranty gives you specific legal rights,, and you may also have other rights which vary from state to state. If a problem with this product develops during or after the warranty period, you may contact your dealer or Service Center. If the problem is not handled to your satisfaction, then write to:
- Consumer Affairs Department Panasonic Corporation of North America 661 Independence Parkway Chesapeake, VA 23320
Troubleshooting
Common Problems and Solutions
- Camera Not Connecting to Wi-Fi: Ensure your router is functioning, the camera is within range, and the correct network credentials are entered. Restart both the camera and router if issues persist.
- Motion Alerts Not Working: Check motion detection settings in the app. Adjust sensitivity and ensure motion zones are properly configured.
- No Video Recordings: Verify that a compatible microSD card is inserted and formatted correctly. If recordings are missing, try reinserting the card or using a different one.
- App Errors (e.g., “Server Error”): Update the app to the latest version, restart your device, or reinstall the app if problems continue
- Poor Night Vision: Clean the camera lens and ensure the area is free from obstructions. Adjust camera placement for optimal lighting.
Error Codes and Fixes
Specific error codes are rare, but general app notifications (e.g., “Server Error”) usually relate to connectivity or software issues. Most can be resolved by updating the app, checking your internet connection, or restarting the camera.
Preventive Measures
- Regularly update the camera firmware and mobile app.
- Use a high-quality, high-endurance microSD card for reliable storage.
- Place the camera away from direct sunlight or heat sources to avoid overheating.
Pros & Cons
Advantages
- High-Quality Video: Delivers clear 1080p HD footage with color night vision for detailed monitoring day and night
- Customizable Motion Detection: Set specific zones and adjust sensitivity to reduce false alerts
- Local Storage: Records directly to microSD card, avoiding recurring cloud fees
- Easy Setup: Wireless installation and an intuitive app make it accessible for all users
- Two-Way Audio: Communicate through the camera using your smartphone
- Expandable System: Supports multiple cameras for whole-home coverage
Disadvantages
- No Built-In Cloud Backup: Relies on local storage, which may be less secure than encrypted cloud options.
- Battery-Powered Models Require Recharging: Some models need regular battery maintenance
- Limited Advanced AI Features: Lacks person/vehicle detection compared to some competitors.
- App Interface Could Be Modernized: Some users find the app functional but dated.
Value for Money
The Panasonic Home Monitoring Indoor Camera offers strong value with reliable performance, essential smart features, and no mandatory subscription. It’s a solid choice for users prioritizing simplicity and local storage over advanced AI analytics.
Comparison with Alternatives
Compared to brands like Arlo or Nest, Panasonic cameras are more affordable and offer local storage, but may lack some cutting-edge smart features. For users seeking a straightforward, budget-friendly indoor security camera, Panasonic is a compelling option.
Customer Reviews
User feedback for the Panasonic Home Monitoring Indoor Camera is generally positive, with many praising its easy installation, clear video quality, and reliable motion alerts. The pre-recording feature, which captures footage before motion is detected, is frequently highlighted as a standout benefit, ensuring no crucial moments are missed..
Common praises include the camera’s compact design, privacy mode for added security, and the ability to monitor multiple areas with expandable systems . Some users mention minor complaints about the app interface and occasional connectivity hiccups, but overall satisfaction remains high.
Star ratings typically range from 4 to 4.5 out of 5, with users recommending the camera for basic home monitoring needs. Frequent purchase recommendations emphasize its value for money and reliability for pet or child monitoring. If you need advanced smart features or cloud storage, consider researching alternatives, but for most households, the Panasonic Home Monitoring Indoor Camera delivers dependable performance at a reasonable price.
SEO Optimization Notes
This manual naturally integrates primary keywords like Panasonic Home Monitoring Indoor Camera, along with related terms such as “indoor security camera,” “home surveillance,” “motion detection camera,” and “smart home monitoring.” Long-tail keywords like “best indoor camera for pet monitoring” and “how to set up Panasonic indoor camera” are included in headings and content for enhanced search visibility. Semantic keywords such as “HD video,” “two-way audio,” “local storage,” and “expandable system” further improve SEO performance, making this guide optimized for featured snippets and voice search queries.
Faqs
How do I set up the Panasonic Home Monitoring Indoor Camera for the first time?
What should I do if the Panasonic Home Monitoring Indoor Camera is not connecting to Wi-Fi?
Can I use the Panasonic Home Monitoring Indoor Camera without the HomeHawk app?
What are the key features of the Panasonic Home Monitoring Indoor Camera?
How often should I maintain the Panasonic Home Monitoring Indoor Camera?
Is the Panasonic Home Monitoring Indoor Camera compatible with other smart home devices?
How do I troubleshoot issues with motion detection on the Panasonic Home Monitoring Indoor Camera?
Can I use the Panasonic Home Monitoring Indoor Camera in extreme temperatures?
More panasonic manuals
- Setup: Panasonic Home Monitoring Shelf Camera KX-HNC810 Instruction Guide
- Usage: Panasonic Home Network System Indoor Camera KX-HNC210 Instruction Guide
- Setup: Panasonic Home Network System HD Camera KX-HNC805C User Guide
- Usage: Panasonic Home Monitoring Window Camera KX-HNC500 Instruction Guide
- Usage: Panasonic Home Network System HD Camera KX-HNC800 Instruction Guide
- Usage: Panasonic Home Monitoring Window Camera KX-HNC505C Instruction Guide
Leave a Comment