
Usage: Panasonic Home Network System HD Camera KX-HNC800 Instruction Guide
Content
Panasonic Home Network System HD Camera KX-HNC800
Introduction
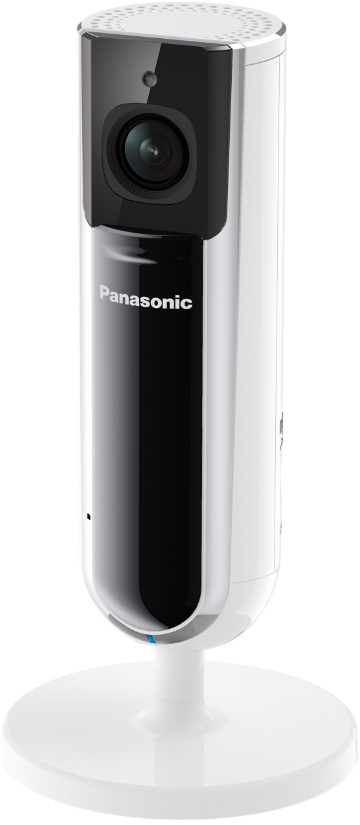
The Panasonic Home Network System HD Camera KX-HNC800 is a high-performance indoor surveillance camera designed for comprehensive home monitoring. Featuring a 2.0 megapixel CMOS image sensor, this camera delivers stunning Full HD (1920 x 1080) video at 30 frames per second, ensuring crystal-clear live viewing and recordings. It supports multiple resolutions,, including HD (1280 x 720) and WVGA, allowing flexibility based on network conditions and storage needs.
Key benefits include a built-in IR filter for enhanced image quality, a privacy shutter for user control, and a high-capacity MicroSD card slot for local video storage. Its dual-band Wi-Fi compatibility (2.4 GHz and 5 GHz) and support for encryption standards like WPA2-PSK ensure stable and secure wireless connectivity. Users can simultaneously access the camera feed from up to three devices, with the ability to register up to 32 cameras per mobile device, making it ideal for smart home integration.
This camera suits homeowners seeking a reliable indoor monitoring solution—whether to check on babies, pets, or general home security. The device's compact, bullet-style design fits seamlessly in any room setting. The Panasonic KX-HNC800 typically falls in the mid-range price segment, offering strong value given its feature set, and is widely available through online retailers and electronics stores.
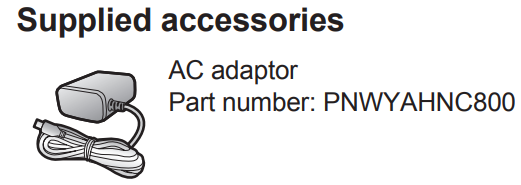
Accessory information
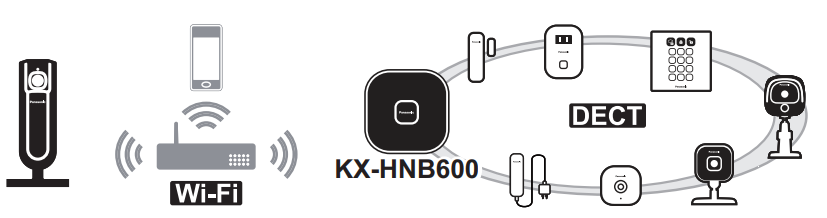
What other devices are available?
- Activity detection sensors, such as motion sensors and window/door sensors
- Smart plugs, which can turn electric devices on when triggered by a sensor or according to a schedule
- and more!
Setup
Part names and functions
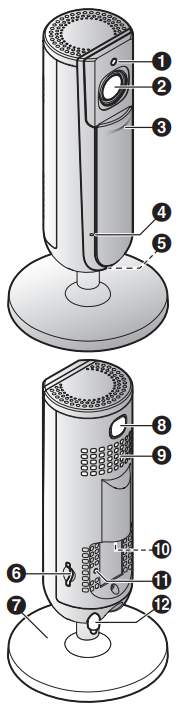
- Brightness sensor
Allows the camera to switch automaticallyto night vision mode in low-light conditions. - Lens
- Privacy shutter
Prevents others from monitoring live camera images or sound when the shutteris closed. - Microphone
- LED indicator
- microSD card slot
- Stand
- MSETUPN Used when performing initial setup.
- Speaker
- micro-USB connector
Used to connect the AC adaptor to the camera. - Reset button
Used to reset the camera’s settings. - Temperature sensor
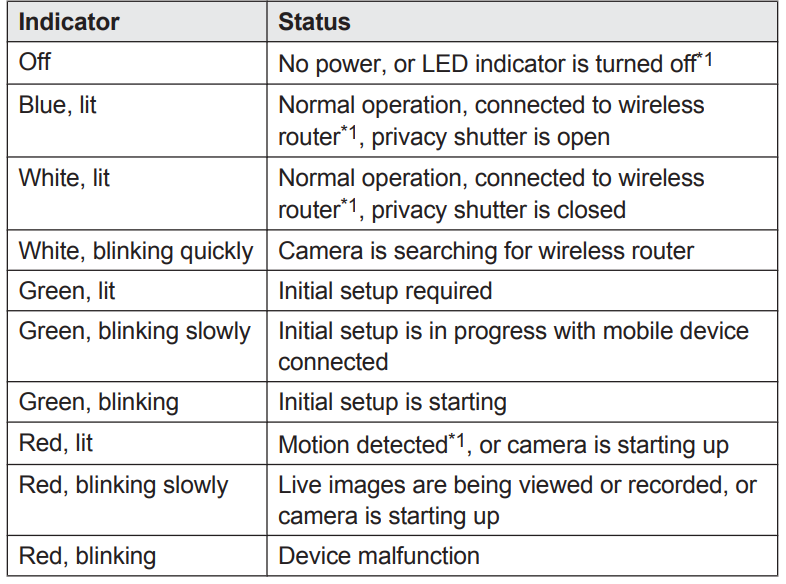
LED indicator
You can use the LED indicator to confirm the camera’s status.
Connections
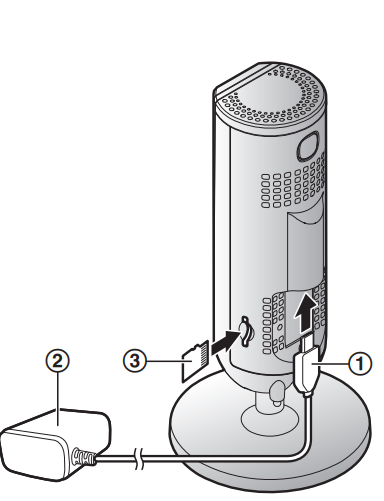
- Insert the AC adaptor plug (A) firmly into the camera’s micro-USB connector.
- Connect the AC adaptor (B) to the power outlet.
- Insert a microSD card (user-supplied; C) into the camera’s microSD card slot. (This is not necessary if you do not want to record camera images.)
Setup overview
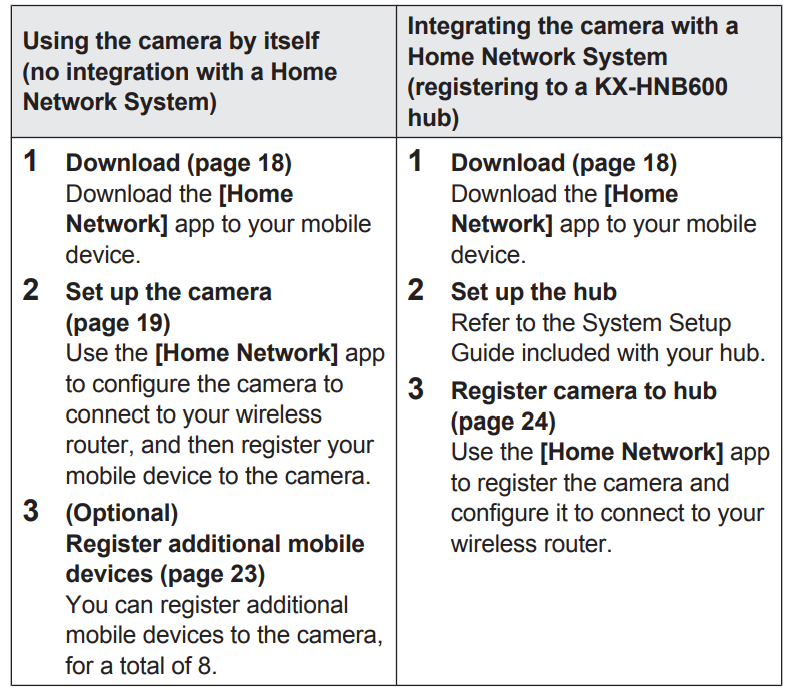
After you have connected your camera, here is what you will need to do in order to access it from your mobile device. Each procedure is explained in this chapter.
Setting up the camera (initialsetup)
Confirm the following before you begin.
- Make sure you have installed the [Home Network] app on your mobile device
- Make sure the camera is located within range of your wireless router
- Make sure your mobile device is connected to your wireless router
- Make sure your mobile device can connect to the Internet
- Make sure you know the network name (SSID) and password assigned to your wireless router
Initial setup (for iPhone, iPad users)
- Do not perform this procedure if you want to integrate the camera with your Home Network System. Use the procedure on page 24.
- If your mobile device is already registered to a hub and you want to use your camera by itself, see Information for current hub users”, page 22.
- Plug in the camera and wait about 1 minute for the camera’s LED to light in green. R If the LED does not light in“ green, or if you experience trouble during this procedure, reset the camera (page 25) and then repeat this procedure.
- Start the [Home Network] app.
- If prompted, follow the on-screen instructions and select the appropriate region/country.
- Tap [HD Camera].
- Tap [Set up the HD Camera]. 5 When prompted, press the SETUP button on the back of the camera, and then tap [Next].
- The LED indicator blinks in green.
- Change your mobile device’s Wi-Fi setting temporarily so that it connects to the camera directly.
- Open your mobile device’s [Settings] app, tap [Wi-Fi], select
- “KX-HNC800_Panasonic”, enter “00000000” as the password, and then tap [Join].
- If more than 1 item named “KX-HNC800_Panasonic” is displayed, wait approximately. 10 minutes and perform this procedure from the beginning.
- Start the [Home Network] app again.
- If necessary, enter the password required to connect to your wireless router and then tap [Next].
- The camera and your mobile device connect to your wireless router.
- If prompted, follow the on-screen instructions and connect your mobile device to your wireless router, start the app again, and then tap [Add This Mobile Device].
- If you enter the wrong password, an erroris displayedd. Repeat the initialsetup procedure from the beginning.
- When prompted, press the SETUP button on the back of the camera.
- The camera registers your mobile device.
- When prompted, set the password that will be used to access the camera.
- When prompted, enter a name for your mobile device and then tap [OK].
- This setting allows you to change the name assigned to your device. It can help you identify your mobile device when performing certain operations, such as deregistering a mobile device.R A list of all cameras registered to the app is displayed when initial setup is complete.
Initial setup (for Android device users)
- Do not perform this procedure if you want to integrate the camera with your Home Network System. Use the procedure on page 24.
- If your mobile device is already registered to a hub and you want to use your camera by itself, see “Information for current hub users”, page 22.
- Plug in the camera and wait about 1 minute for the camera’s LED to light in green.
- If the LED does not light in green, or if you experiencetrouble during this procedure, reset the camera (page 25) and then repeat this procedure.
- Start the [Home Network] app.
- If prompted, follow the on-screen instructions and select the appropriate region/country.
- Tap [HD Camera].
- Tap [Set up the HD Camera].
- When prompted, press the SETUP button on the back of the camera.
- The LED indicator blinks in green.
- The app temporarily changes your mobile device’s Wi-Fi settings so that it connects to the camera directly.
- If necessary, enter the password required to connect toyour to your router and then tap [Next].
- The camera and your mobile device connect to your wireless router.
- If you enter the wrong password, an error is displayed. Repeat the initial setup procedure from the beginning.
- When prompted, press the SETUP button on the back of the camera.
- The camera registers your mobile device.
- When prompted, set the password that will be used to access the camera.
- When prompted, enter a name for your mobile device and then tap [OK].
- This setting allows you to change the name assigned to your device. It can help you identify your mobile device when performing certain operations, such as deregistering a mobile device.
- A list of all cameras registered to the app isdisplayed when initial setup is complete. Information for current hubusers If your mobile device is already registered to a hub and you want to use your camera by itself (i.e., you do not want to integrate the camera with your Panasonic Home Network System), perform the following.
- Plug in the camera and wait about 1 minute for the camera’s LED to light in green.
- If the LED does not light in green, or if you experience trouble during this procedure, reset the camera (page 25) and then repeat this procedure. 2 Start the [Home Network] app.
- From the [Home Network] app home screen, tap[Settings]
- Tap [Device Registration] ® [Registration] ® [HD Camera] ® [Method 2].
- 5 iPhone, iPad users.. Continue from step 4 of the initial setup procedure on page 19.
- Android device use,r, continue from step 4 of the initial setup procedure on page 21
- Registering additional mobile devices to the camera
- Do not perform this procedure if the camera is integrated with your Home Network System.
- Use the procedure found in the System Setup Guide included with your hub and register the additional mobile device to your hub.
- After you set up the camera, you can register additional mobile devices. You can register up to 8 mobile devices to a camera. Each mobile device can be registered to up to 32 cameras.
- Confirm the following before you begin..
- Make sure you have completed the initial setup procedure
- Make sure your mobile device can connect to the Internet
- Make sure your wireless router and the camera are turned on
- Make sure your mobile device and the camera are connected to the same wireless router
- Using the mobile device that you want to register, download the [Hom Network] app and then start the app.
- If prompted, follow the on-screen instructions and select the appropriate region/country.
- Tap [HD Camera].
- Tap [Add This Mobile Device].
- When prompted, press the SETUP button on the back of the camera.
- The camera registers your mobile device.
- When prompted, enter the password required to access the camera.
- This password was set during initial setup.
- When prompted, enter a name for your mobile device and then tap [OK].
- This setting allows you to change the name assigned to your device. It can help you identify your mobile device when performing certain operations, such as deregistering a mobile device.
- A list of all cameras registered to the app is displayed when registration is complete..
- Registering the camera to your hub.. Do not perform this procedure if you are using the camera by itself (i.e., you do not have a KX-HNB600 hub). Use the initial setup procedure (page 19).
- If you want to integrate your HD camera with a Panasonic Home Network System, you must register the camera with the hub.
- Registering the camera:: Confirm the following before you begin.
- Make sure you can use your mobile device to access the hub
- Make sure the hub’s firmware is up to date and that you are using the latest version of the
- [Home Network] app. For more information, refer to the System Setup Guide included with your hub and the User’s Guide (page 31).
- 1 Plug in the camera and wait about 1 minute for the camera’s LED to light in green.
- If the LED does not light in green, or if you experience trouble during this procedure, reset the amera (page 25) and then repeat this procedure.
- Start the [Home Network] app.
- From the [Home Network] app home screen, tap [Settings].4 Tap [Device Registration] ® [Registration] ® [HD Camera] ® [Method 1].
- When prompted, press the SETUP button on the back of the camera.
- The camera registers your mobile device.
- The app’s home screen is displayed when registration is complete.
- Follow the on-screen instructions. When prompted, set the password that will be used to access the camera.
Note:- When registration is complete, the hub sounds one long beep.
- If registration fails, the hub sounds several short beeps.
Resetting the camera
- Use this procedure if you have trouble setting up the camera.
- Plug in the camera.
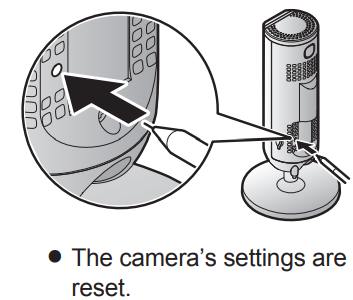
- Using an object with a thin tip, press and hold the reset button on the back of the camera for about 10 seconds, then release the button when the camera beeps.
- The camera’s settings are reset.
- Wait for the camera’s LED to light in green.
- Note:
- After resetting the camera, you cannot use the camera again until it is set up. Refer to the relevant page in this section to set up the camera.
Specifications
- Standards
IEEE 802.11a/b/g/n - Frequency range
2.412 GHz – 2.462 GHz (channels 1–11
5.180 GHz – 5.320 GHz (channels 36–64)
5.500 GHz – 5.700 GHz (channels 100–140)
5.745 GHz – 5.825 GHz (channels 149–165) - RF transmission power
100 mW (peak transmission power) - Encryption
WPA2™-PSK (TKIP/AES), WPA™-PSK (TKIP/AES), WEP (128/64 bit) - Power source
120 V AC, 60 Hz - Power consumption
Standby: approx. 2.3 W
Maximum: approx. 3.8 W - Operating conditions
0 °C – 40 °C (32 °F – 104 °F) 20 % – 80 % relative air humidity (dry) - Image sensor
2.0 megapixel CMOS - Minimum illuminance required*1
0 lx - Focal length
Fixed (0.2 m (8 inches) – infinity) - Angular field of view
Horizontal: approx. 121°
Vertical: approx. 67° - Motion detection method
Visual sensor - Adjustable mounting angles*
2Vertical: facing forward - facing down, approx. 130° - Dimensions
(including stand) (height × width × depth) Approx. 142 mm ´ 68 mm ´ 68 mm (5 19/32 inches ´ 2 11/16 inches ´ 2 11/16 inches) - Mass (weight) (including stand)
Approx. 210 g (0.46 lb)- The infrared LEDs that surround the camera lens will illuminate in low-light conditions.
- Adjustable when mounting
Panasonic Products Limited Warranty
Limited Warranty Coverage (For USA Only)
If your product does not work properly because of a defect in materials or workmanship, Panasonic Corporation of North America (referred to as “the warrantor”) will, for the length of the period indicated on the chart below, which starts with the date of original purchase (“warranty period”), at its option either (a) repair your product with new or refurbished parts,(b) replace it with a new or a refurbished equivalent value product, or (c) refund your purchase price. The decision to repair, replace, cancel, cease, or refund will be made by the warrantor.

During the “Labor” warranty period,, there will be no charge for labor. During the “Parts” warranty period, there will be no charge for parts. This Limited Warranty excludes both parts and labor for non-rechargeable batteries, antennas, and cosmetic parts (cabinet). This warranty only applies to products purchased and serviced in the United States.
This warranty is extended only to the original purchaser of a new product that was sold as is”. Mail-In Service--Online Repair Request
Online Repair Request
To submit a new repair request and for quick repair status,, visit our website..
When shipping the unit, carefully pack, include all supplied accessories listed in the Owner’s Manual, and send it prepaid, adequately insured,, and packed well in a carton box. When shipping Lithium Ion batteries,, please visit our website ..
Panasonic is committed to providing the most up-to-date information. Include a letter detailing the complaint, a return address,, and provide a daytime phone number where you can be reached. A valid registered receipt is required under the Limited Warranty
IF REPAIR IS NEEDED DURING THE WARRANTY PERIOD, THE PURCHASER WILL BE REQUIRED TO FURNISH A SALES RECEIPT/PROOF OF PURCHASE INDICATING DATE OF PURCHASE, AMOUNT PAID, AND PLACE OF PURCHASE. CUSTOMER WILL BE CHARGED FOR THE REPAIR OF ANY UNIT RECEIVED WITHOUT SUCH PROOF OF PURCHASE.
Limited Warranty Limits and Exclusions
- This warranty ONLY COVERS failures due to defects in materials or workmanship, and DOES NOT COVER normal wear and tear or cosmetic damage. The warranty ALSO DOES NOT COVER damages which occurred in shipment, or failures which re caused by products not supplied by the warrantor, or failures which result from accidents, misuse, abuse, neglect, mishandling, misapplication, alteration, faulty tallation, set-up adjustments, misadjustment of consumer controls, improper maintenance, power line surge, lightning damage, modification, introduction of sand, humidity or liquids, commercial use such as hotel, office, restaurant, or other business or ental use of the product, or service by anyone other than a Factory Service Center r other Authorized Servicer, or damage that is attributable to acts of God.
- THERE ARE NO EXPRESS WARRANTIES EXCEPT AS LISTED UNDER “LIMITED WARRANTY COVERAGE”.
- THE WARRANTOR IS NOT LIABLE FOR INCIDENTAL OR CONSEQUENTIAL DAMAGES RESULTING FROM THE USE OF THIS PRODUCT, OR ARISING OUT OF ANY BREACH OF THIS WARRANTY.
(As examples, this excludes damages for lost time, travel to and from the servicer, loss of or damage to media or images, data o,,r other memory or recorded content. - The items listed are not exclusive, but for illustration only.)
- ALL EXPRESS AND IMPLIED WARRANTIES, INCLUDING THE WARRANTY OF MERCHANTABILITY, ARE LIMITED TO THE PERIOD OF THE LIMITED WARRANTY.
- Some states do not allow the exclusion or limitation of incidental or consequential damages, or limitations on how long an implied warranty lasts, so the exclusions may not apply to you. This warranty gives you specific legal rights,, and you may also have other rights which vary from state to state. If a problem with this product develops during or after the warranty period, you may contact your dealer or Service Center. If the problem is not handled to your satisfaction, then write to:
- Consumer Affairs Department Panasonic Corporation of North America 661 Independence Parkway Chesapeake,e VA 23. . ..0
Troubleshooting Common Issues with Panasonic Home Network System HD Camera KX-HNC800
Users may encounter common issues such as connectivity problems, motion detection failures, or error messages like "Connection unsuccessful." To resolve connection issues, ensure the camera is within the Wi-Fi range and the network credentials are correctly entered. Resetting the camera and router can often restore connectivity. For motion detection not activating, verify sensor settings in the HomeHawk app and ensure no obstructions or lighting conditions impair sensor function.
Error codes are generally communicated via the app interface; following app prompts or consulting Panasonic’s official support documentation is recommended for precise fixes. Preventive measures include regular firmware updates through the HomeHawk app and keeping the camera firmware current to ensure optimal performance and security.
Panasonic provides warranty coverage for the KX-HNC800, typically one year, with customer support accessible online or via phone. For support and service queries, contacting Panasonic’s official helpline or visiting their support website is advised.
Pros & Cons of the Panasonic Home Network System HD Camera KX-HNC800
- Pros:
- High-quality Full HD video recording with 30 fps for smooth, clear images.
- Dual-band Wi-Fi support ensures reliable wireless performance.
- Privacy shutter enhances user control over the camera's active status.
- Expandable storage via MicroSD card for local video backups.
- Allows simultaneous multi-device access and supports multiple cameras per device.
- Cons:
- No pan and tilt functionality; fixed lens limits field of view adjustment.
- Not waterproof, restricting use to indoor environments only.
- Some users report occasional motion detection sensitivity issues requiring calibration.
- Setup can be complex for users unfamiliar with network devices.
Compared to similar indoor cameras, the KX-HNC800 offers strong video quality and security features at a competitive price, but lacks the advanced motorized control found in some alternatives.
Customer Reviews of Panasonic Home Network System HD Camera KX-HNC800
Users generally praise the Panasonic Home Network System HD Camera KX-HNC800 for its clear, high-definition video quality and reliable wireless connectivity. Many appreciate the privacy shutter and ease of local recording via MicroSD. Star ratings average around 4.5 out of 5, highlighting satisfaction with image clarity and multi-device access.
Common complaints revolve around initial setup complexity and occasional false motion alerts, suggesting room for improved sensor calibration. Some users mention the fixed camera angle as a limitation, recommending additional cameras for full-room coverage. Despite these, most reviewers recommend the camera for home monitoring due to its balance of features and affordability.
Leave a Comment