
Setup: Panasonic Lumix Digital Camera DMC-FZ330 User Manual
Content
Panasonic Lumix Digital Camera DMC-FZ330
Introduction
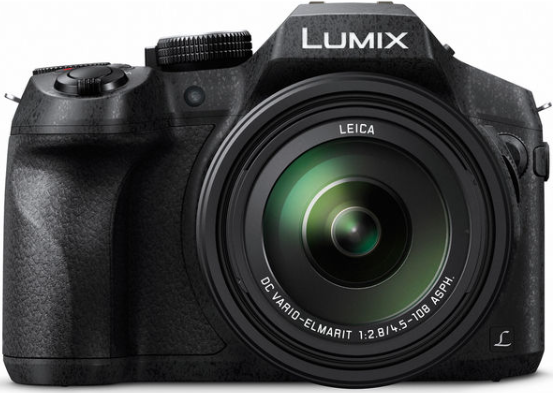
The Panasonic Lumix DMC-FZ330 is a versatile and powerful bridge camera designed to meet the needs of both amateur and professional photographers. Launched in 2015, this camera is part of Panasonic's renowned FZ series, known for its high zoom range and advanced features. The DMC-FZ330 boasts a 12.1-megapixel 1/2.3-inch MOS sensor and a LEICA DC VARIO-ELMARIT lens with a 24-600mm equivalent focal length, making it ideal for capturing a wide range of subjects from landscapes to wildlife.
The camera is equipped with a vari-angle LCD screen and an electronic viewfinder, providing users with flexible viewing options. It also features 4K video recording capabilities, ensuring high-quality video capture. The estimated price of the Panasonic Lumix DMC-FZ330 at launch was around $600, making it an affordable option for those seeking advanced features without the hefty price tag of DSLR cameras.
Specifications
- Digital Camera: Information for your safety
- Power Source
- DC 8.4 V ( 8.4 V)
- Power Consumption
- 2.1 W (When recording with monitor)
- 2.4 W (When recording with view viewfinder)
- 1.6 W (When playing back with the monitor)
- 1.6 W (When playing back with the viewfinder)
- Camera effective pixels
- 12,100,000 pixels
- Image sensor
- 1/2.3″ MOS sensor, total pixel number 12,800,000 pixels, Primary colour filter
- Lens
- Optical 24x zoom
- f=4.5 mm to 108 mm
- (35 mm film camera equivalent: 25 mm to 600 mm) Max. Wide: F2.8 to F8.0
- (When recording motion pictures: F2.8 to F11) Max. Tele: F2.8 to F8.0
- (When recording motion pictures: F2.8 to F11) Filter diameter Φ52 mm
- Image Stabiliser
- Optical method
- Focus range
- AF: 30 cm (0.98 feet) (Max. Wide) / 2 m (6.6 feet) (Max. Tele) to AF Macro / MF / Intelligent Auto / Motion picture: 1 cm (0.033 feet) (Max. Wide) / 1 m (3.3 feet) (Max. Tele) to
- Shutter system
- Electronic shutter + Mechanical shutter
- MinimumIllumination
- Approx. 9 lx (when i-Low light is used, the shutter speed is 1/25th of a second)
Shutter speed
Still picture:
- B (Bulb) (Max. approx. 60 seconds), 60 seconds to 1/4000th of a second, when the mechanical shutter is used),1 second to 1/16000th of a second (When the electronic shutter is used)
- Motion picture:
- 1/25th of a second to 1/16000th of a second,
- 1/2 second to 1/16000th of a second (When [M] is selected in Creative Video Mode, MF)
- Exposure (AE)
- Programme AE (P) / Aperture-priority AE (A) / Shutter-priority AE (S) / Manual exposure (M) / AUTO Exposure Compensation (1/3 EV steps, -3 EV to +3 EV)
- Metering Mode
- Multiple/Centre weighted/Spot
- Monitor
- 3.0″ TFT LCD (3:2) (Approx. 1,040,000 dots) (field of view ratio about 100%)
- Touch screen
- Viewfinder
- 0.39″ OLED Live Viewfinder (4:3) (Approx. 1,440,000 dots) (field of view ratio about 100%) [Magnification approx. 3.88x, 0.7x (35 mm film camera equivalent), with 50 mm lens at infinity; -1.0 m-1] (with diopter adjustment -4.0 to +4.0 diopter)
- Flash
- Built-in pop-up flash
- AUTO, AUTO/Red-Eye Reduction, Forced ON, Forced ON/Red-Eye Reduction, Slow Sync., Slow Sync./Red-Eye Reduction, Forced OFF
- Microphones
- Stereo
- Speaker
- Monaural
- Recording media
- SD Memory Card / SDHC Memory Card / SDXC Memory Card UHS- UHS Speed Class 3
- Recording file format: Still picture
- RAW/JPEG (based on Design rule for Camera File system, based on Exif 2.3 standard / DPOF corresponding)
- Motion picture
- AVCHD Progressive / AVCHD / MP4
- Audio compression format
- AVCHD: Dolby® Digital (2 ch) MP4: AAC (2 ch)
- Interface Digital
- USB 2.0 (High Speed)
- Data from the PC can not be written to the camera using the USB connection cable.
- Analogue video
- NTSC / PAL Composite (Switched by menu)
- Audio line output (Monaural)
- Terminal [REMOTE] Φ2.5 mm jack
- [HDMI] MicroHDMI Type D [AV OUT/DIGITAL] Dedicated jack (8 pin) [MIC] Φ3.5 mm jack
- Dimensions
- Approx. 131.6 mm (W) x 91.5 mm (H) x 117.1 mm (D) [5.18″ (W) x 3.60″ (H) x 4.61″ (D)] (excluding the projection part)
- Mass
- With card and battery: Approx. 691 (1.52 lb) Excluding card and battery: Approx. 640 (1.41 lb)
- Operating
- 0 °C to 40 °C (32 °F to 104 °F)
- Operating humidity
- 10%RH to 80%RH
- Dust-proof and splash-proof
- Yes
Names and Functions of Main Parts
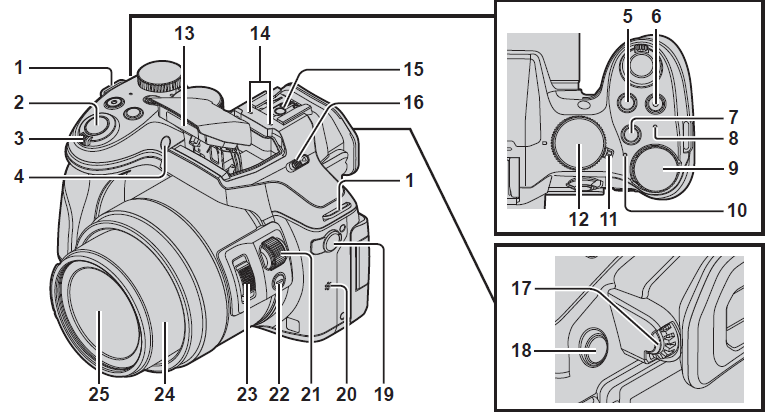
- Shoulder strap eyelet (→13)
- Shutter button (→18)
- Zoom lever (→18)
- Self-timer indicator /AF Assist Lamp
- (Exposure Compensation) button / [Fn1] button (→24)
- Motion picture button (→34)
- [Fn2] button (→24)
- Wi-Fi® connection lamp
- Rear dial (→20)
- Status indicator (→17)
- Camera [ON/OFF] switch (→17)
- Mode dial (→19) Use this to select the recording mode.
- Flash
- Stereo microphone: Be careful not to cover the microphone with your finger. Doing so may make it sound difficult to record.
- Hot shoe
- Flash open lever. The flash opens, and recording with the flash becomes possible.
- Diopter adjustment dial (→22)
- [LVF] button (→22) / [Fn4] button (→24)
- [MIC] socket.. An external microphone (optional) can record higher-quality audio than the built-in microphone.
- Speaker: Be careful not to cover the speaker with your finger. Doing so may make sound difficult to hear.
- Side dial (→20)
- Side button (→21)
- Side lever (→18)
- Lens barrel
Lens
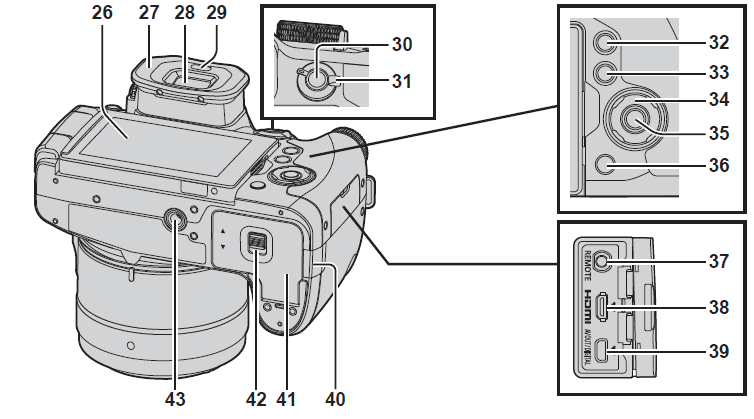
- Touch screen/monitor (→17, 22, 48)27 Eye cup
- Viewfinder (→22)
- Eye sensor (→22)
- [AF/AE LOCK] button
- Focus mode lever (→19)
- (Playback) button (→36)
- [DISP.] button: Use this to change the display.
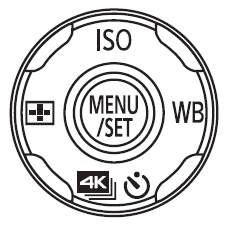 Cursor button
- Selection of items or setting of values, etc., is performed.
- In this manual, the button that is to be used is indicated by.


- [ ISO] (ISO sensitivity) (
 )
) - [WB] (White Balance) (
 )
) - [
 ] (Drive Mode) (
  ) (→30)
 - [+] (AF Mode) (
 )
)
- [ ISO] (ISO sensitivity) (
- [MENU/SET] button
- [Q.MENU ] (Delete/Cancel) button (→24, 38) / [Fn3] button (→24)
- [REMOTE] socket
- [HDMI] socket
- [AV OUT/DIGITAL] socket
- DC coupler cover (→15):
- Always use a genuine Panasonic AC adaptor (DMW-AC10E: optional).
- When using an AC adaptor, ensure that the Panasonic DC coupler (DMWDCC8: optional) and AC adaptor (DMW-AC10E: optional) are used.
- When using an AC adaptor, use the AC mains lead supplied with the AC adaptor.
- Card/Battery door (→15)
- Release lever (→15)
- Tripod mount: Do not attach this unit to tripods that have screws with a length of 5.5 mm (0.22 inch) or more. Doing so may damage this unit, or the unit may not be secured properly on the tripod.
Standard accessories
Check that all the accessories are supplied before using the camera. Part numbers are as of July 2015. These may be subject to change.
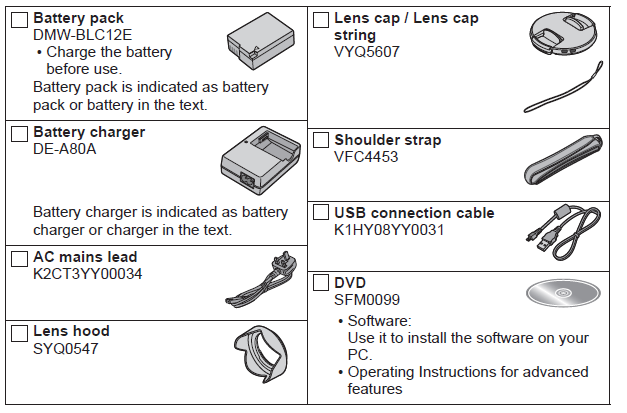
- Cards are optional.
- SD Memory Card, SDHC Memory Card,, and SDXC Memory Card are indicated as cards in the text.
- Consult the dealer or your nearest Service Centre if you lose the supplied accessories. (You can purchase the accessories separately.)
- Please dispose of all packaging appropriately.
- Keep small parts in a safe place out of the reach of children.
- The illustrations and screens in this manual may differ from the actual product.
List of monitor/viewfinder displays
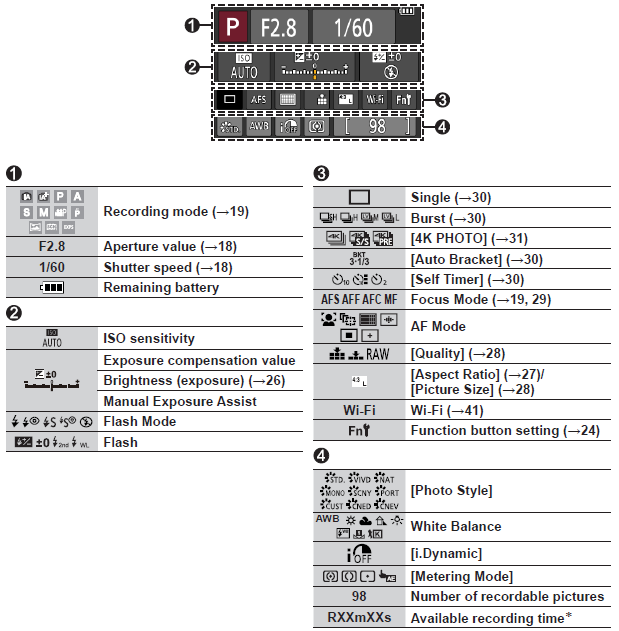
- The following images are examples of when the display screen is set to (monitor style) in the monitor.
In recording
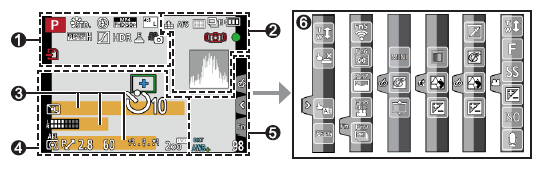
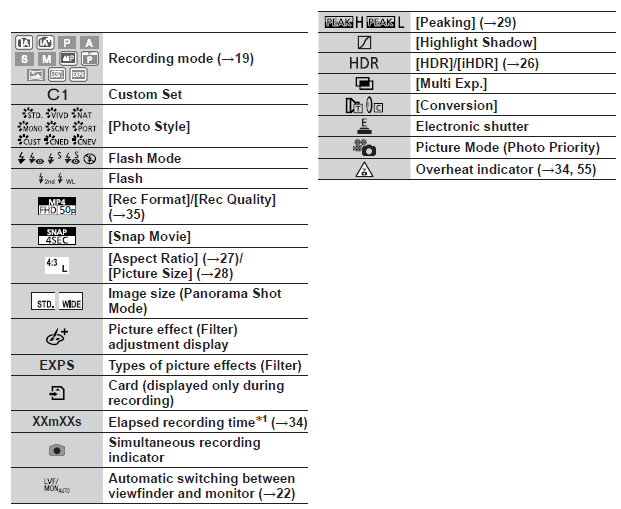
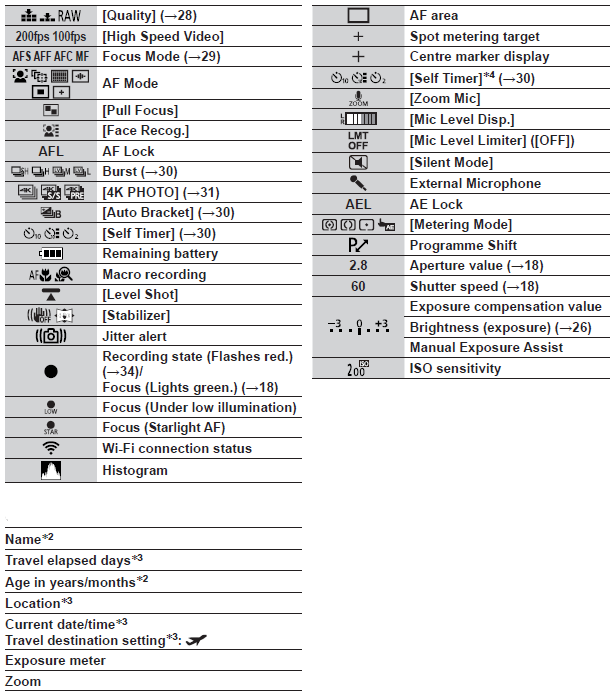
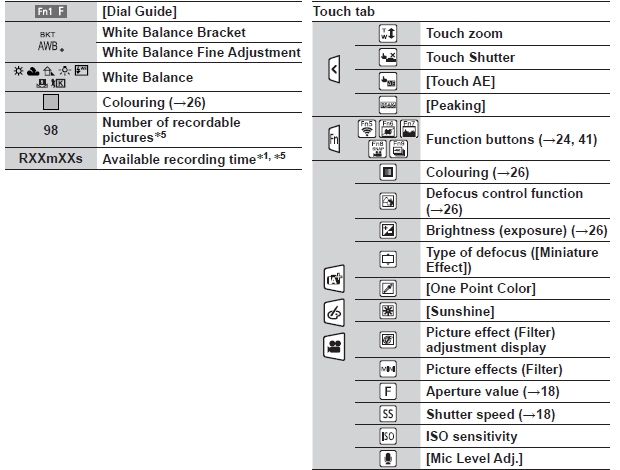
- [m] and [s] indicate “minute” and “second”.
- This is displayed for about 5 seconds when the camera is turned on if the [Profile Setup] setting is set.
- This is displayed for about 5 seconds when the camera is turned on, after setting the clock,, and after switching from Playback Mode to Recording mode.
- This is displayed during the countdown.
- It is possible to switch the display between the number of recordable pictures and available recording time with the [Remaining Disp.] setting in the [Custom] menu.
On-monitor recording information
Preparations
Attaching the Lens Hood
- Do not hold the lens hood in such a way that it will be bent.
- Make sure that the camera is turned off.
- Be sure to close the flash beforehand.
- Align the mounting mark on the lens hood a little above the mounting mark on the tip of the lens..
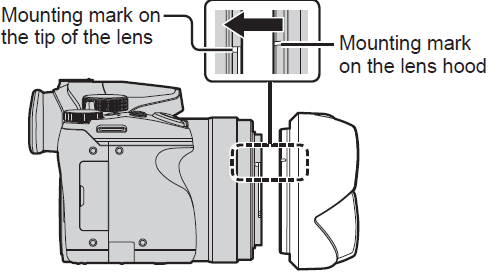
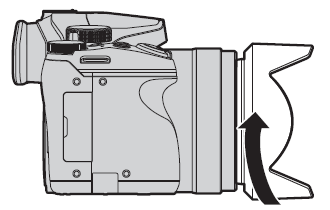
- Turn the lens hood in the direction of the arrow to secure it
- Turn the lens hood until it clicks, and align the mounting mark on the lens hood with the mark at the bottom of the camera
Make sure the lens hood is secured properly and its reflection does not fall on the mages.
Attaching the Lens Cap
Cover the lens with the lens cap to protect it when you are not taking pictures.
- Do not hang or swing around the camera with the lens cap string.
- Make sure to detach the lens cap when turning this unit on.
- Be careful that the lens cap string does not become entangled with the shoulder strap.
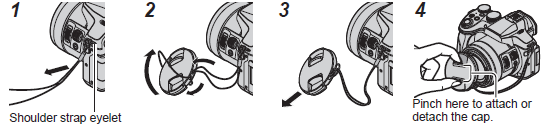
- Pass the string through the hole in the camera..
- Pass the string through the lens cap, and then pass the lens cap through the loop formed by the string..
- Fasten the string
- Attach the lens cap
Attaching the Shoulder Strap
We recommend attaching the shoulder strap when using the camera to prevent it from dropping.
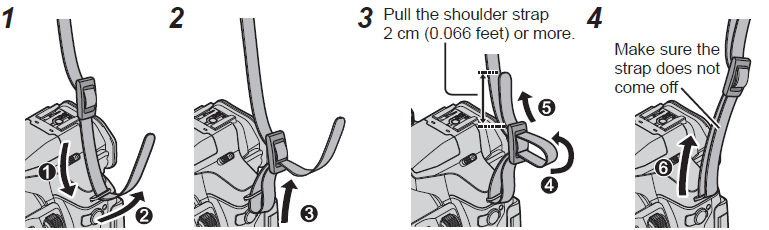
- Perform steps 1 to 4 and then attach the other side of the shoulder strap.
- Use the shoulder strap around your shoulder.
- Do not wrap the strap around your neck. It may result in injury or accident.
- Do not leave the shoulder strap where an infant can reach it.
- It may result in an accident by mistakenly wrapping around the neck.
Charging the battery
The battery that can be used with this unit is DMW-BLC12E.
The battery is not charged when the camera is shipped. Charge the battery before use.
- Use the dedicated charger and battery.
- Attach the battery, paying attention to the direction of the battery
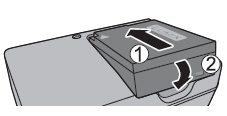
Connect the charger to the electrical outlet
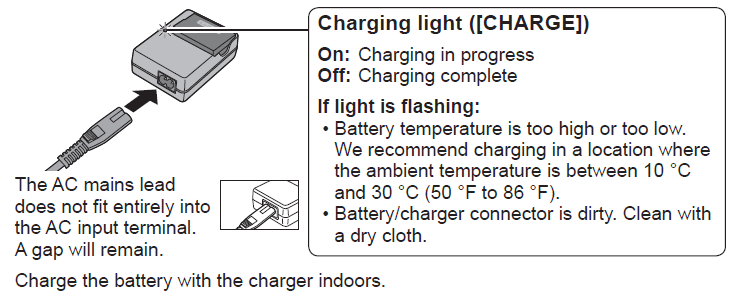
- Detach the battery after charging is completed
Notes on charging time
Charging time: Approx. 140 min
The charging time indicated above is the time required for charging in case when the battery is completely used up. The time required for charging differs depending on the conditions of battery usage. Charging takes longer in cases when temperatures are either high or low and when the battery has not been used for a long period of time.
Inserting and removing the battery/the card (optional)
- Always use genuine Panasonic batteries (DMW-BLC12E).
- If you use other batteries, we cannot guarantee the quality of this product.
- Make sure that the camera is turned off.
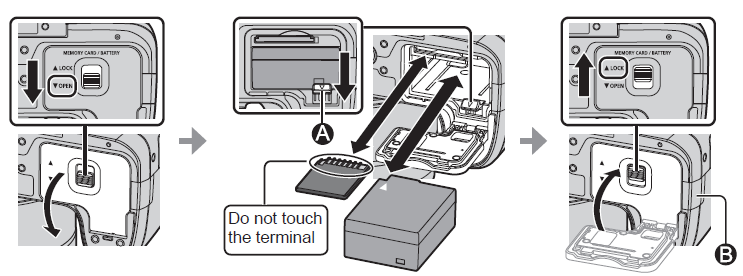
- Battery:
Insert the battery all the way firmly until a locking sound is heard, and check that the lever hooks over the battery.
Move the lever in the direction of the arrow to remove the battery. - Card:
Insert the card all the way firmly until it clicks.
To remove the card, push the centre of the card until it clicks, then pull the card out upright. - DC coupler cover ( ):
Make sure the DC coupler cover is securely closed, and then close the card/battery door.
About the Card
The following SD standard-based cards (Panasonic brand recommended) can be used.
Type of Card | Capacity | Notes |
SDMemory Cards | 512 MB –2 GB |
|
SDHC Memory Cards | 4GB – 32 GB | |
SDXC Memory Cards |
48 GB – 128 GB |
Keep the Memory Card out of reach of children to prevent swallowing.
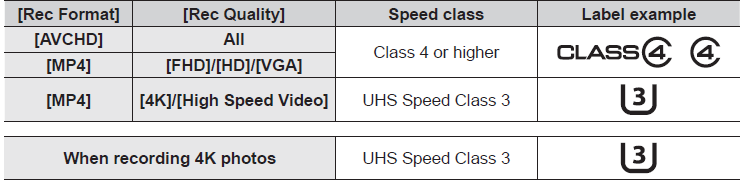
About motion picture/4K photo recording and speed class ratings
- According to the [Rec Format] (→35) and [Rec Quality] (→35) of a motion picture, the required card differs. To record 4K photos, you need a card with a speed class rating that supports 4K photo recording. Use a card that meets the following ratings of the SD Speed Class or UHS Speed Class.
- SD Speed Class and UHS Speed Class are the speed standards regarding continuous writing. Confirm the SD speed by checking the card label or other card-related materials.
Formatting the card (initialisation)
Format the card before recording a picture with this unit. Since data cannot be recovered after formatting, make sure to back up necessary data in advance.
Set the menu (→23)

Opening the Monitor

- Place your finger in the cleft on the right side of the monitor and open the monitor toward the left side (maximum 180°)
- It can be rotated 180° to the direction of the lens
- Return the monitor to its original position
- Only rotate the monitor after opening it wide enough, and be careful not to use excessive force. Doing so may cause damage to this unit.
- When not using the monitor, it is recommended that you close it with the screen facing inward to prevent dirt and scratches.
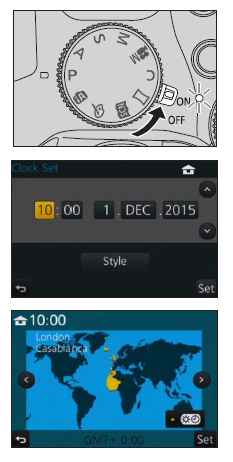
Setting the clock
The clock is not set when the camera is shipped.
- Turn the camera on
- The status indicator lights up when you turn this unit on.
- Press [MENU/SET]
- Press to select the items (year, month, day, hour, minute), and press to set
- Press [MENU/SET]
- When [The clock setting has been completed.] is displayed, press [MENU/SET]
- When [Please set the home area] is displayed, press [MENU/SET]
- Press to set your home area and press [MENU/SET]
Digital Camera Accessory System
Description | Accessory# |
Battery pack | DMW-BLC12 |
AC adaptor*1 | DMW-AC10 |
DC coupler*1 | DMW-DCC8 |
Lens adaptor | DMW-LA7 |
Tele conversion lens*2 | DMW-LT55 |
Close-up lens*2 | DMW-LC55 |
MCprotector | DMW-LMC52 |
NDfilter | DMW-LND52 |
PLfilter (Circular type) | DMW-LPL52 |
Flash | DMW-FL360L / DMW-FL580L |
LEDvideo light | VW-LED1 |
Shutter remote control | DMW-RSL1 |
Stereo shotgun microphone | DMW-MS2 |
Stereo microphone | VW-VMS10 |
AVcable | DMW-AVC1 |
USBconnection cable | DMW-USBC1 |
- Part numbers are as of July 2015. These may be subject to change.
- Some optional accessories may not be available in some countries.
Troubleshooting
If you encounter any issues with your Panasonic Lumix DMC-FZ330, here are some common problems and solutions:
- Performing [Reset] in the [Setup] menu may resolve the issue.
- Further information is provided in the “Operating Instructions for advanced features (PDF format)”. Check it together with the information in this section.
The camera does not work even if the camera is turned on. The camera switches off as soon as the camera is turned on.
- The battery needs recharging.
- If you leave the camera on, the battery will be exhausted.
- Turn the camera off frequently by using the [Economy], etc.
This unit is turned off automatically.
- [Economy] is activated.
- The linked operation of VIERA Link (HDMI) is enabled.
- If you are not using VIERA Link (HDMI), set [VIERA Link] to [OFF].
The battery runs down quickly.
- The drive mode is set to [4K PHOTO] and [4K PHOTO] is set to ([4K Pre-Burst]).
- When ([4K Pre-Burst]) has been selected, the battery drains faster.
- Select ([4K Pre-Burst]) only when recording.
Cannot record pictures. The shutter will not operate immediately when the shutter button is pressed.
- When the drive mode is set to [4K PHOTO] and [4K PHOTO] in the [Rec] menu is set to ([4K Pre-Burst]), the camera temperature rises. In some cases, the camera may display , switch to ([4K Burst]),, and stop the recording to protect itself. Wait until the camera cools down.
Focus is not aligned correctly.
- Subject outside of focus range.
- Caused by jitter or subject movement.
- [Focus/Release Priority] is set to [RELEASE]. (→53)
- [Shutter AF] is set to [OFF]. (→53)
- AF Lock is set inappropriately.
- Recorded pictures are blurred. The stabiliser function is ineffective.
- Shutter speed is slower in dark locations, and the stabiliser function is less effective.
- Hold the amera firmly with both hands, keeping your arms close to your body.
- Use a tripod and the self-timer when using a slower shutter speed.
- If you take a picture of a moving subject using the electronic shutter, the subject in the picture may be skewed in some cases.
The subject appears skewed in pictures.
- If you take a picture of a moving subject in the electronic shutter mode, motion picture recording mode, or 4K photo recording mode, the subject in the picture may be skewed in some cases. This is characteristic of sensors,,s which serve as the camera’s pickup sensors. This is not a malfunction.
Striping or flicker may appear under lighting such as fluorescent lighting and LED lighting fixtures.
- This is characteristic of MOS sensors,, which serve as the camera’s pickup sensors. This is not a malfunction.
- If you are taking still pictures using the electronic shutter, the striping may be reduced by setting a slower shutter speed.
- When noticeable flicker or striping is seen under lighting such as a fluorescent or LED lighting fixture in the motion picture recording mode, you can reduce the flicker or striping by setting up [Flkr Decrease] (→52) and fixing the shutter speed. It is possible to select a shutter speed from [1/50], [1/60], [1/100], or [1/120]. You can set the shutter speed manually in the Creative Video Mode. (→27)
The brightness or colouring of the recorded picture is different from real life.
- When recording under fluorescent or LED lighting fixtures,,e etc., increasing the shutter speed may introduce slight changes to brightness and colour. These are a result of the characteristics of the light source and do not indicate a malfunction..
- When recording subjects in extremely bright locations or recording under fluorescent lighting, LED lighting fixture, mercury lamp, sodium lighting,, etc., the colours and screen brightness may change,, or horizontal striping may appear on the screen.
4K photo recording stops before finishing.
Always refer to the user manual for detailed troubleshooting instructions and safety precautions.
- When the ambient temperature is high or recording with ([4K Burst]) or ([4K Burst(S/S)]) of the 4K Photo function is performed continuously, the camera may display nd stop the recording to protect itself. Wait until the camera cools down.
Cannot record motion pictures.
- When a large capacity card is used, you may not be able to take a picture for a while after you turn on the camera.
Motion picture recording stops midway.
- When the ambient temperature is high, the action picture is recorded automatically, and the camera may display and stop the recording to protect itself. Wait until the camera cools down.
The screen turns momentarily black, or noise is recorded.
- While motion pictures are being recorded, the screen may momentarily turn black or noise may be recorded due to static electricity or strong electromagnetic waves (radio transmitters, high-voltage lines, etc.) under some environmental conditions.
Sometimes,, focus adjustment with Auto Focus mode is difficult while recording 4K motion pictures.
- This may occur when taking a picture by reducing the Auto Focus speed in order to adjust the focus with high precision. This is not a malfunction.
Pictures cannot be transmitted to the computer.
- If a firewall is enabled by the OS or security software, this unit may be unable to connect to the computer.
Transmission of the image fails midway. There is an image that could not be transmitted.
- The image cannot be transmitted when the battery indicator is flashing red.
- Is the size of the image too large?
- Divide the motion picture using [Video Divide]. (→53)
- Reduce the image size at [Size], and then send.
- The file format of the picture that can be sent differs depending on the destination.
- The capacity or number of images in the WEB service is full.
- Log in to “LUMIX CLUB”, and check the status of the destination on the WEB service link settings.
Cannot play motion pictures on The card is inserted into the TV.
- Connect with A an A/V cable (optional) or an HDMI micro cable and play on the camera.
The lens makes a clicking noise.
- When the camera is turned on or off, the lens is moved, or an aperture operation is performed, such a noise may be heard. This is not a malfunction.
- When the brightness changes after a zooming operation or moving the camera, the lens may make a noise while adjusting the aperture. This is not a malfunction.
Zooming stops instantaneously.
- When using the Extra Optical Zoom, the zooming action will stop temporarily. This is not a malfunction.
The camera is hot.
- The camera may become a little warm during use, but this does not affect performance or quality. The clock is incorrect.
- If you do not use the camera for a long time, the clock may be reset.
- Reset the clock (→17).
Pros & Cons
Pros:
- High zoom range with 60x optical zoom
- 4K video recording capabilities
- Dust and splash-proof design
- Vari-angle LCD screen and electronic viewfinder
- Fast autofocus system
- Affordable price point compared to DSLRs
Cons:
- Smaller sensor size (1/2.3-inch),, which can affect image quality in low light
- No RAW image capture in all modes
- Limited manual controls compared to DSLRs
- No built-in GPS
Customer Reviews
Customers praise the Panasonic Lumix DMC-FZ330 for its versatility, particularly its extensive zoom range and 4K video capabilities. Many users appreciate the camera's ergonomic design and intuitive interface. However, some users have noted that the camera's small sensor size can result in reduced image quality in low-light conditions.
Common Complaints
Some common complaints include the lack of RAW image capture in all modes and limited manual controls. A few users have also reported issues with Wi-Fi connectivity and battery life, especially when using advanced features like 4K video recording.
Faqs
What is the sensor size of the Panasonic Lumix DMC-FZ330?
Does the Panasonic Lumix DMC-FZ330 support 4K video recording?
What is the zoom range of the LEICA DC VARIO-ELMARIT lens on the DMC-FZ330?
Is the Panasonic Lumix DMC-FZ330 weather-sealed?
Can I capture RAW images with the Panasonic Lumix DMC-FZ330?
How do I connect my Panasonic Lumix DMC-FZ330 to my smartphone?
What is the continuous shooting speed of the Panasonic Lumix DMC-FZ330?
Does the Panasonic Lumix DMC-FZ330 have a vari-angle LCD screen?
Is there a built-in GPS in the Panasonic Lumix DMC-FZ330?
What is the estimated battery life of the Panasonic Lumix DMC-FZ330?
Leave a Comment