
Setup: Panasonic VACUUM CLEANER MC-UL675 Instruction Manual
Content
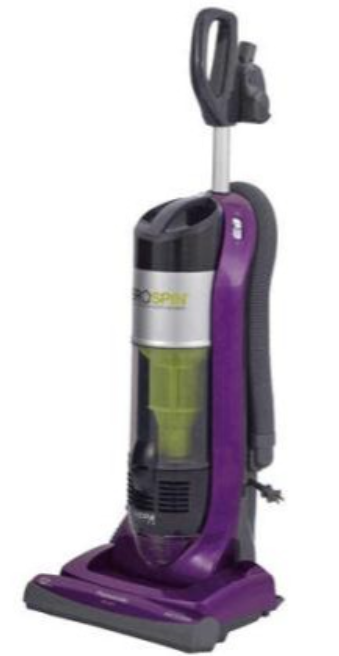
Panasonic Vacuum Cleaner MC-UL675
Introduction
The Panasonic Vacuum Cleaner MC-UL675 is a powerful and versatile bagless upright vacuum designed to provide efficient cleaning solutions for various home environments. This model features AeroSpin technology, which ensures constant suction power by removing dirt from the filter every time it is plugged in[8]. The MC-UL675 is ideal for those seeking a reliable and easy-to-use vacuum for daily cleaning tasks, offering automatic carpet height adjustment and a floating nozzle for even surface coverage[3]. Targeted at homeowners and apartment dwellers alike, this vacuum offers a great balance of performance and convenience.
The MC-UL675 is generally priced in the range of other mid-range upright vacuums, making it an affordable option for those looking to upgrade their cleaning equipment without breaking the bank. It is available at various online retailers and electronics stores. Key benefits include its lightweight design, powerful 12-amp motor, and a wide 15-inch cleaning path, making it suitable for both hard floors and carpets..
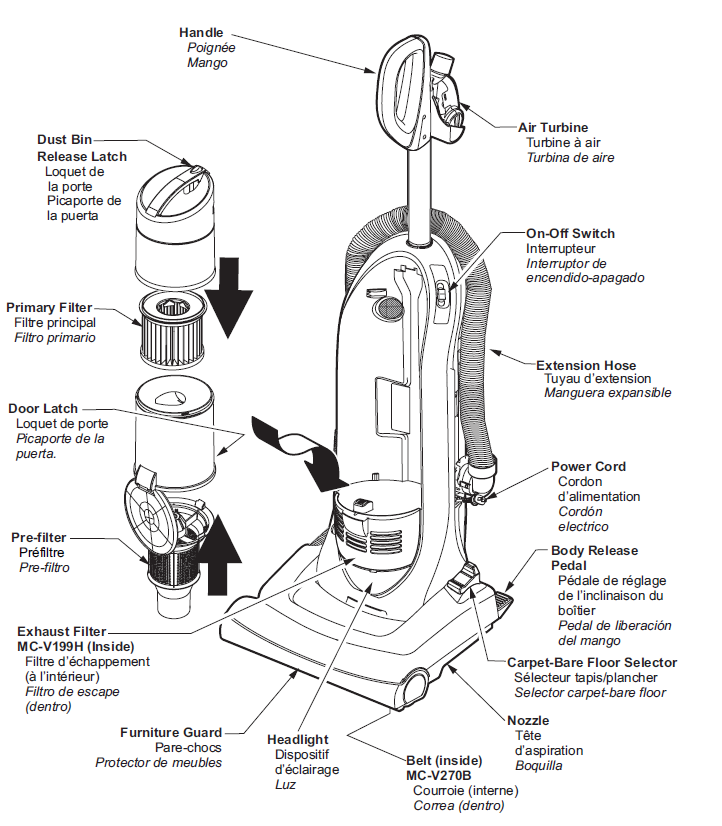
PARTS IDENTIFICATION
ASSEMBLY
Attaching Components
CAUTION
DO NOT plug in until assembly is complete.
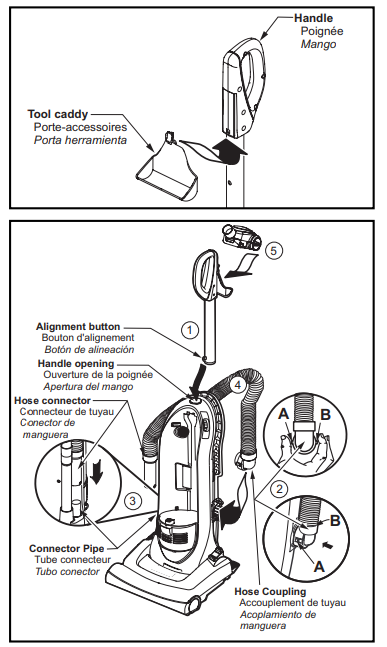
Slide the tool caddy into the handle slots and push upward until a locking click is produced.
- Insert t the adjustable handle assembly as illustrated.
- Attach the hose end to the vacuum cleaner as illustrated.
- Insert the hose into the connector pipe.
- Place the extension hose on the hose holder.
- Insert the air turbine into the holder on the vacuum cleaner handle as indicated.
Using Cord Reel
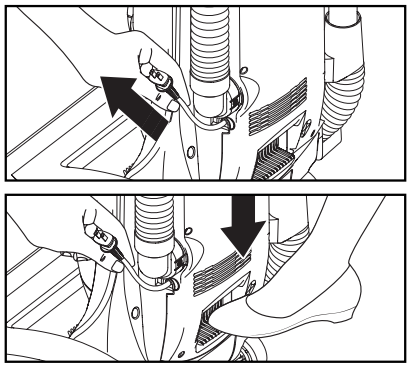
- Pull the cord out of the cord reel until the end is reached.
- Do not use a vacuum cleaner without the cord pulled out all the way.
- To prevent injury or damage, hold the plug head while rewinding the cord.
- Push the cord retract pedal down to rewind.
Cleaning Exterior and Tools
- Unplug the cord from the wall outlet.
- Clean exterior using a clean, soft cloth that has been dipped in a solution of mild liquid detergent and water and wrung dry.
- DO NOT drip water on the vacuum cleaner and wipe dry after cleaning.
- DO NOT clean tools in the dishwasher or clothes washer.
- Wash tools in warm,, soapy water, rinse, se and air dry.
- DO NOT use tools if they are wet.
FEATURES
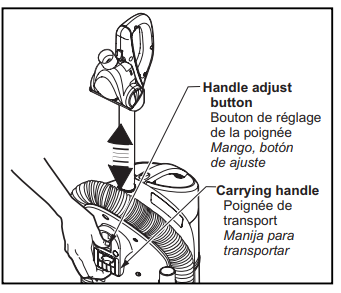
Adjustable HandlPress the Handle Adjust button and raise the handle to a comfortable operating position. You should hear a click to ensure the handle is secure in position.
- CAUTION DO NOT carry the vacuum cleaner by the adjustable handle or dust bin handle. Use ONLY the carrying handle located on the back of the vacuum cleaner.
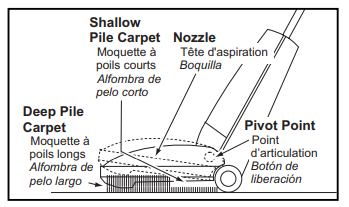
Automatic Self-Adjusting Nozzle
- The nozzle of your Panasonic vacuum cleaner automatically adjusts to any carpet pile height.
- The feature allows the nozzle to float evenly over carpet pile surfaces.
- No manual adjustments required.
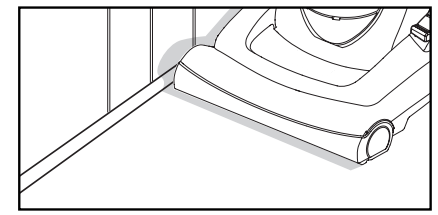
Edge Cleaning
- Edge cleaning feature enables improved cleaning of carpets near walls and furniture.
Replacing Headlight Bulb
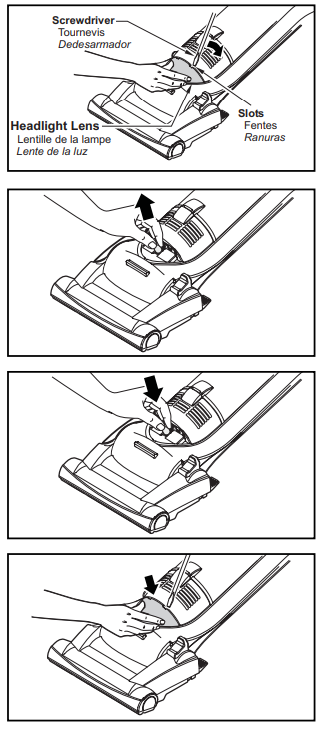
- Disconnect the power cord from the electrical outlet. Lower the body to lay the vacuum cleaner flat.
- Pry out the light lens at the slots by inserting a screwdriver into the slot, pushing down on the lens,, and rotating the screwdriver handle toward the vacuum cleaner.
- Remove the light bulb by pulling straight out.
- To replace the light bulb,, carefully insert it curiously into the slot. Replace the lens cover.
- Do not use a bulb rated over 9W (13V). During extended use, heat from the bulb could overheat surrounding plastic parts..
- Replace the lens cover by inserting the bottom tab of the lens into the slot,, then applying pressure to the top tabs.
- A “popping” sound indicates the lens is snapped properly in place.
Filter Cleaning System
Your Panasonic vacuum cleaner is equipped with the latest technology.
- Filter Cleaning System is activated by the cord reel.
- Each time the power cord is pulled out,, the filter is cleaned.
- Before use, pull the power cord out until the end is reached
- DO NOT use a vacuum cleaner if the power cord is not pulled out to the end.
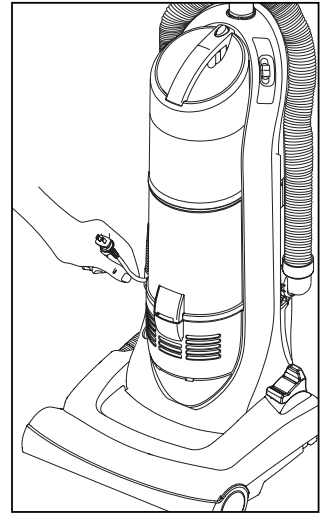
Cord Hook
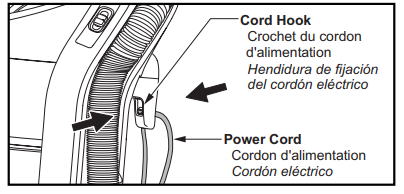
- Make sure the power cord is placed into the cord hook as shown.
- Note: This helps keep the power cord out from under the vacuum cleaner agitator.
Replacing Belt
- Replace the belt whenever a burning rubber smell caused by excessive slippage occurs.
- Place carpet-bare floor selector in CARPET position.
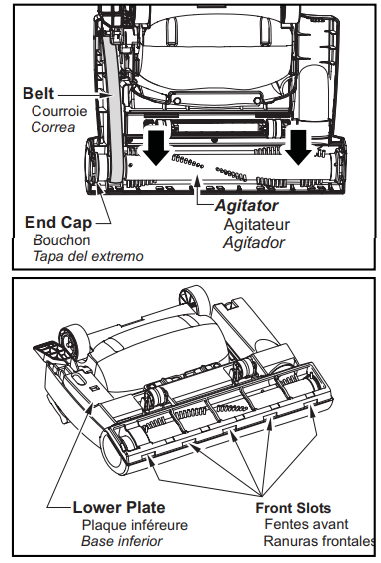
- Remove the lower plate.
- Remove the agitator by carefully lifting it out.
- Remove worn or broken belt.
- Loop the new belt around the motor shaft and brush pulley; see the illustration for correct belt routing.
- Clean the agitator and reinstall the two (2) end caps.
- Reinstall the agitator back into the nozzle housing grooves.
- After reinstalling the agitator, turn it by hand to make sure the belt is not twisted or pinched and that all rotating parts turn freely.
- Reinstall the lower plate. Ensure tabs are locked into slots.
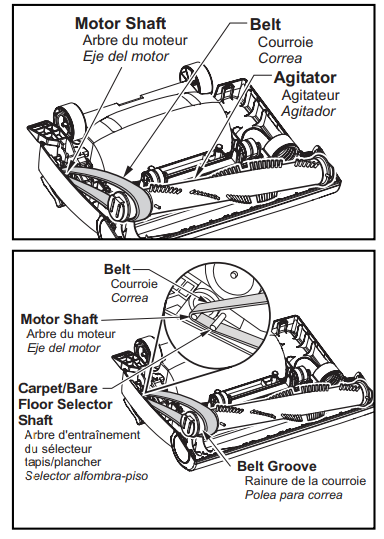
ROUTINE CARE OF VACUUM CLEANER
Performing the following tasks will keep your new Panasonic vacuum cleaner operating at peak performance levels and will ensure these high levels for years to come. Check the BEFORE REQUESTING SERVICE section in this manual for recommendations on performing some of these tasks to help solve various problems that may occur.
WARNING: Electrical Shock or Personal Injury Hazard
Disconnect the electrical supply before servicing or cleaning the vacuum cleaner. Failure to do so could result in electrical shock or personal injury from a vacuum cleaner suddenly starting.
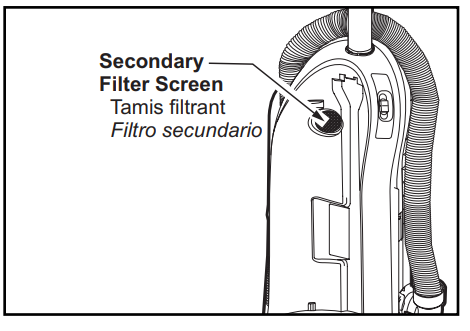
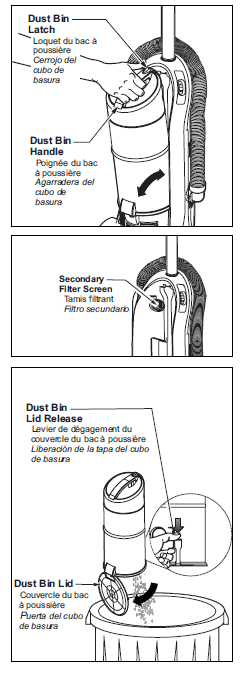
Cleaning Secondary Filter Screen
- The secondary filter screen protects the motor.
- Always check the filter screen when cleaning the dust bin.
- If dirty or clogged, remove debris from the filter screen.
Attachments
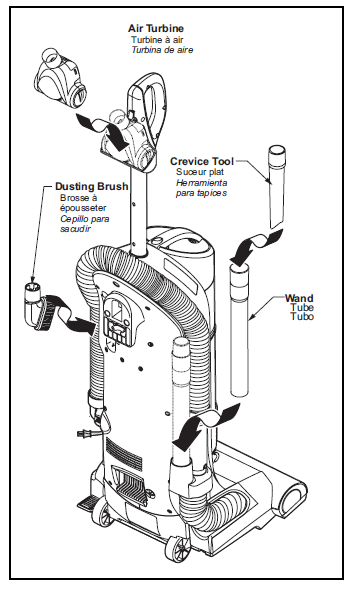
- Identify each of the attachments shown.
- Note: The motor protector may open when using attachments or when cleaning new carpet, due to reduced airflow by the attachments themselves or by new carpet lint filling the dust bin quickly.
- Note: When using attachments,, make sure the vacuum cleaner is in the upright position and the Carpet/ Bare Floor selector is in the BARE FLOOR position.
- Remove the upper end of the hose that is attached to the connector pipe by grasping the hose connector, twisting,, and pulling straight out. The attachments can now be added to the hose.
- Remove the dusting brush from the vacuum cleaner. Place back in its appropriate storage location.
- Remove the extension wand from the side of the vacuum cleaner. Place back in its appropriate storage location.
- Remove the crevice tool from inside of the wand. Place back in its appropriate storage location.
- Remove the Air Turbine from the vacuum cleaner. Place back in its appropriate storage location.
Motor Protector
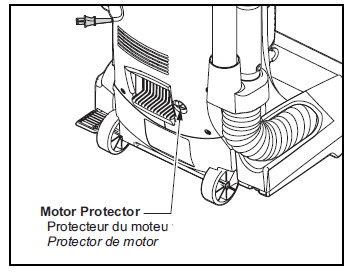
- Automatically opens to provide cooling air to the motor when a clog occurs or when the dust bin needs emptying.
- The motor protector may open when using tools.
- Check the operation by placing your hand over ethe nd of the hose.
- If the motor protector opens, the vacuum cleaner will make a slightly different sound.
- Do not block the motor protector.
Dirt Sensor
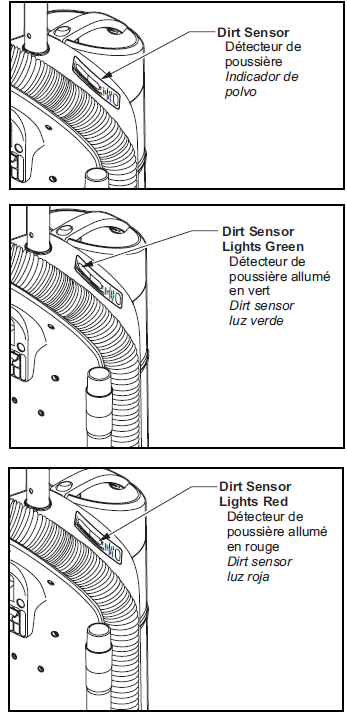
- The electronic dirt sensor is a feature that will detect particles as they pass through the vacuum cleaner.
- The dirt sensor indicator is located on the front of the vacuum cleaner,, as illustrated.
- When there is little or no dirt present,,nt the dirt sensor is green.
- When there is dirt present,t the dirt sensor is red.
To Clean the Pre-filter
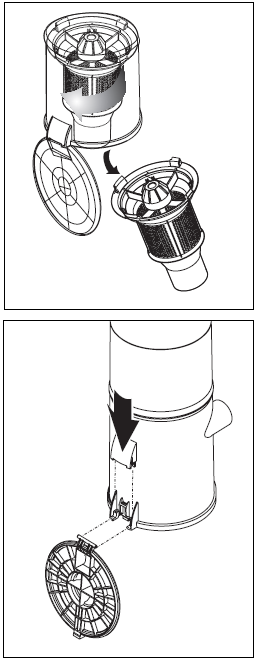
- Turn clockwise and pull the pre-filter. Clean by gently tapping over a trash container.
- Return the pre-filter to the dust bin, aligning the pre-filter tabs to the lower dust bin slots, then turn counter-clockwise to the lock position.
- After the dust bin is empty of debris, firmly close the door. Make sure you hear a “click” sound to indicate that the door is fully latched.
- Reassemble the upper and lower dust bins. Place the dust bin unit back into the vacuum cleaner by inserting the bottom first and tilting it back.
- A retention clip is located on the hinge area of the dust bin.
- This clip may release when the dust bin door is opened to prevent damage to the door or the dust bin.
- To reassemble, slide the tabs on the dust bin door into the slots on the dust bin.
- Secure in place using the retention clip.
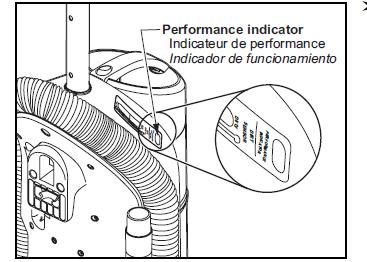
Performance Indicator
- When the vacuum cleaner is running with normal air flow, the light on the performance indicator is off. The light comes on whenever the airflow becomes blocked. If that occurs, check the dust bin clean/replace clogged filters, and check other possible clog locations shown in CLOG REMOVAL. The light may also come on when using attachments, due to reduced airflow through the attachment. In some cases, the performance indicator light may not come on if the motor protector has opened.
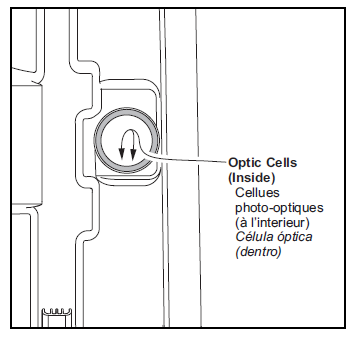
To Clean Dirt Sensor Optics
- The dirt sensor optics consist of two optical cells located inside the suction inlet. Occasionally, it may become necessary to clean the two optic cells to ensure maximum performance.
- Clean optic cells:
- When dirt or dust adheres to the optic cells. Whenever the dust bin is cleaned.
- To clean the dirt sensor optics, remove the dust bin.
- With the dust bin removed,, you can insert a cloth into the suction inlet opening.
- Wipe the optic cells with a soft, dry cloth.
- Never use cleaners or liquids,, as they can help speed the recoating of the optic cells and make it necessary to clean them much sooner than normal.
Filter Changing and Cleaning
- Check the primary filter frequently and clean it when dirty.
- To remove the primary filter, open the upper dust bin lid assembly. Turn the upper dust bin to the unlock position as shown.
- While holding the primary filter over a trash container,, grasp the filter, push sideways,, and remove the filter from the upper dust bin.
- Clean the primary filter by gently tapping over a trash container. Tap on several sides to ensure e the best cleaning.
- Rinse with water only as needed. Do not use any detergent or soap.
- Allow the filter to dry for 24 hours before putting it back into the vacuum cleaner.
- When cleaning the filter no longer restores the vacuum cleaner's suction to full power ,, you need to replace the filter.
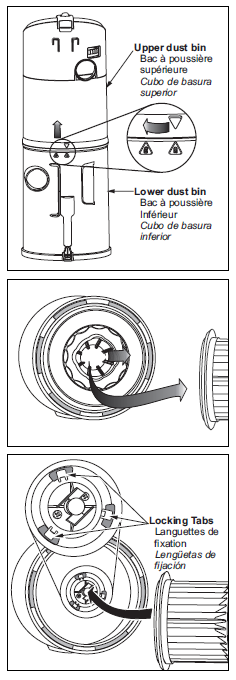
TO REPLACE PRIMARY FILTEWith the slot side of the filter facing the dust bin, slide the filter’s opening over the cleaning cam, and then push the filter until it locks onto tabs in the dust bin.
Note: Under normal use and care, your filter can be expected to last up to 5 years.
Dust Bin Cleaning
- Always empty the dust bin when the dirt level reaches the “MAX” line.
- Grasp the handle on the top of the dust bin. Push the dust bin latch down. Pull out and up to remove the dust bin from the vacuum cleaner.
- Remove any clogs that might be located in the filter screen.
- Be sure to hold the dust bin over a proper trash container before releasing the door of the dust bin.
- Press the dust bin lid release,, and the dust bin will open.The debris will fall out.
Specifications of the Panasonic Vacuum Cleaner MC-UL675
Below are the detailed specifications of the Panasonic MC-UL675:
- Type of Vacuum: Upright
- Motor Power: 12 amps
- Cleaning Path Width: 15 inches
- Bagless Technology: Yes
- Automatic Height Adjustment: Yes, for carpet pile surfaces
- Filter Type: HEPA filter compatible (MC-V199H)
- AeroSpin Technology: Removes dirt from the filter to maintain suction power.
Compared to similar models like the Panasonic MC-UL671, the MC-UL675 offers comparable performance with its powerful motor and advanced filtration system, making it a strong contender in the market for mid-range upright vacuums..
Panasonic Canada Inc
PANASONIC PRODUCT -
LIMITED WARRANTY
Panasonic Canada Inc. warrants this product to be free from defects in material and workmanship and agrees to remedy any such defect for a period as stated below from the date of original purchase. Vacuum Cleaner - One (1) year, parts and labour LIMITATIONS AND EXCLUSIONS This warranty does not apply to products purchased outside Canada or to any product which has been improperly installed, subjected to usage for which the product was not designed, misused or abused, damaged during shipping, or which has been altered or repaired in any way that affects the reliability or detracts from the performance, nor does it cover any product which is used commercially. Parts such as disposable dust bags, filters, belts, light bulbs,, and agitator brushes are also excluded from coverage under this warranty. A purchase receipt or other proof of the date of original purchase is required before warranty service is performed. THIS EXPRESS, LIMITED WARRANTY IS INSTEAD OF ALL OTHER WARRANTIES, EXPRESS OR IMPLIED, INCLUDING ANY IMPLIED WARRANTIES OF MERCHANTABILITY AND FITNESS FOR A PARTICULAR PURPOSE. IN NO EVENT WILL PANASONIC CANADA INC. BE LIABLE FOR ANY SPECIAL, INDIRECT, OR CONSEQUENTIAL DAMAGES. In certain instances, some jurisdictions do not allow the exclusion or limitation of incidental or consequential damages, or the exclusion of implied warranties
Troubleshooting and Maintenance
Common issues with the Panasonic MC-UL675 can often be resolved through simple maintenance and troubleshooting steps:
- Loss of Suction: Check if the filter is clogged or if the dust cup is full. Clean or replace the filter and empty the dust cup as needed.
- No Power: Ensure the vacuum is properly plugged in and the power cord is not damaged.
- Blockages: Check for blockages in the vacuum's intake or hoses.
For more detailed assistance, refer to your user manual or contact Panasonic support. The MC-UL675 typically comes with a standard warranty covering parts and labor.
Pros and Cons of the Panasonic Vacuum Cleaner MC-UL675
Pros
- Powerful Suction: The 12-amp motor provides strong cleaning performance.
- Easy Maintenance: Bagless design and automatic filter cleaning make maintenance simple.
- Adjustable Height: Automatically adjusts to different carpet pile heights for efficient cleaning.
Cons
- No Energy Star Certification: This might be a concern for environmentally conscious buyers.
- Filter Replacement: Requires regular replacement of HEPA filters for optimal performance.
Overall, the Panasonic MC-UL675 offers excellent value for money, balancing performance with ease of use. However, it may not be the best choice for those prioritizing energy efficiency.
Customer Reviews and Feedback
Customers generally appreciate the Panasonic MC-UL675 for its reliability and ease of use. Many users praise its powerful suction and the convenience of the bagless design. However, some note that the filter requires regular cleaning and replacement. Overall, the MC-UL675 has received positive reviews for its performance and value.
For those looking for a reliable and affordable upright vacuum, the Panasonic MC-UL675 is a solid choice. It is recommended for those who value ease of use and powerful cleaning capability.
Faqs
How do I set up the panasonic VACUUM CLEANER MC-UL675 for first-time use?
What should I do if the panasonic VACUUM CLEANER MC-UL675 suction power is weak?
Can I use the panasonic VACUUM CLEANER MC-UL675 on both hard floors and carpets?
How do I replace the headlight bulb on the panasonic VACUUM CLEANER MC-UL675?
What maintenance is required to keep the panasonic VACUUM CLEANER MC-UL675 running efficiently?
Why does the panasonic VACUUM CLEANER MC-UL675 motor overheat and shut off during use?
Is the panasonic VACUUM CLEANER MC-UL675 compatible with additional Panasonic attachments?
How can I optimize the cleaning performance of my panasonic VACUUM CLEANER MC-UL675 for pet hair removal?
Leave a Comment