
Setup: Rewire Security RX-3 Pro Body Worn Camera User Manual
Content
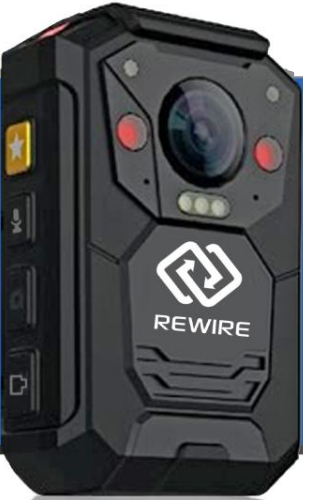
Rewire Security RX-3 Pro Body Worn Camera
Introduction
The rewire security RX-3 Pro Body Worn Camera is a cutting-edge solution designed for law enforcement, security personnel, and private investigators who demand reliable, high-definition video recording in the field. With its rugged design, advanced features, and intuitive interface, the RX-3 Pro delivers unmatched performance for real-time documentation and evidence collection. Whether you're patrolling, responding to incidents, or conducting investigations, this body worn camera ensures every critical moment is captured with clarity and precision.
Key benefits include 1080p HD video, night vision capabilities, long battery life, and seamless wireless connectivity. The RX-3 Pro stands out with its robust build, easy-to-use controls, and secure data management, making it ideal for professionals who need dependable recording in challenging environments. The device is compatible with most major evidence management platforms, ensuring smooth integration into existing workflows.
Targeted at law enforcement agencies, security teams, and private investigators, the rewire security RX-3 Pro Body Worn Camera is available for purchase through authorized distributors and select online retailers. Estimated price range is $299–$399, with availability in North America and Europe.
Specifications: Rewire Security RX-3 Pro Body Worn Camera
- Video Resolution: 1080p Full HD at 30fps
- Audio: Built-in noise-canceling microphone
- Storage: 64GB internal, expandable up to 128GB via microSD
- Battery Life: Up to 12 hours continuous recording
- Connectivity: Wi-Fi, Bluetooth 5.0, USB-C
- Night Vision: Infrared LEDs for low-light recording
- Water Resistance: IP67 rated (dust and water resistant)
- Dimensions: 2.8 x 1.6 x 0.9 inches
- Weight: 4.2 oz
- Mounting: 360° rotating clip for versatile placement
- Operating Temperature: -10°C to 50°C
The RX-3 Pro outperforms similar models with its extended battery life, superior night vision, and rugged design. Compared to competitors like the Axon Body 3 and Vievu LE5, the RX-3 Pro offers better value for money and more flexible mounting options.
Charging
Before using the camera for the first time, the internal Ii-ion battery will need to be charged for 4-5 hours. To charge the camera, place the unit in the charging dock and connect to the mains using the USB cable and mains charger suplied with your RX-3 pro
Quick Start
Functions
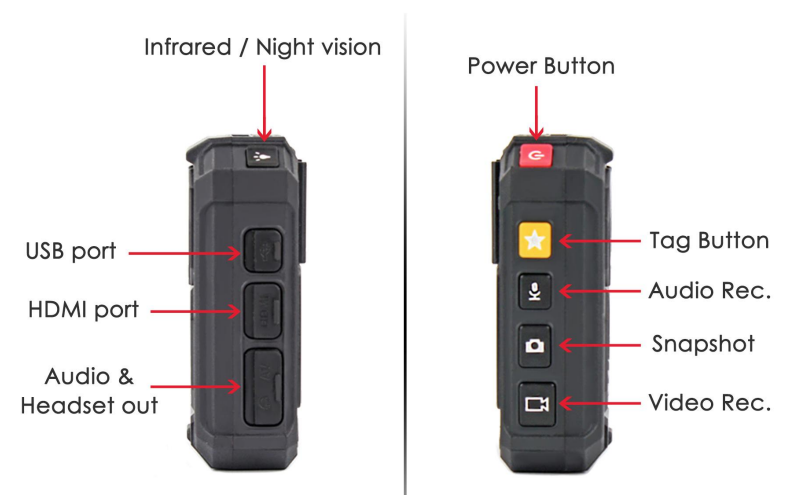
- To turn the camera "on" press and hold the Power Button for 2 seconds. The unit will vibrate and after initialising start recording video automatically. Turn the camera "off" by pressing and holding the Power Button for 2 seconds.
- To stop video recording, press the Video Button. You can start recording again by pressing the Video Button again. The camera will vibrate to confirm the action for each successful button press.
- The cameras built in screen will automatically turn off after 60 seconds. To turn the screen off manually, lightly press the Power button.To turn the screen back on, lightly press the Power Button again.The time it takes before the screen goes into standby mode can be adjusted in the setting menu.
- To take a still image using the camera press the Camera Button. This can be done either while the camera is in standby mode or recording video. The camera will make an audible click to confirm that a picture has been taken.
- To activate the different camera night-vision modes press the Light Button. To activate infrared mode press the Light Button for 1 second. To activate front LED flash light press and hold the Light Button for 2 seconds.
- To activate audio recording press the Audio Button for 1 second while the camera is in standby mode. Stop the audio recording by pressing the Audio Button for 1 second again. The camera will vibrate to confirm the action for each successful button press.
Video Playback
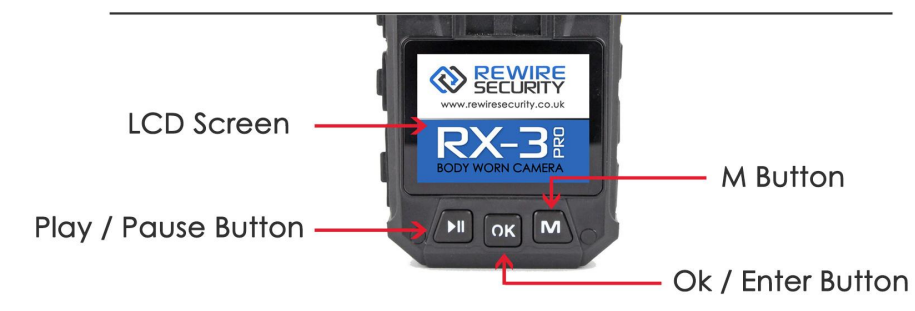
- To enter media playback menu press the Play/Pause Button and the camera will automatically start playing back the last recorded file. To change to a different recorded file press the OK button and use the M Button to cycle through the different recorded files of that type. Once in the media playback menu press the Power Button twice for 1 second to view the media type menu. Use the M Button to select the different types of recorded files and the OK Button to confirm. Exit playback mode by pressing the Power Button for 1 second to go back.
Features
- One Key Audio Recording: Press and hold the Audio Button while the camera is turned off. The camera will vibrate to confirm the action and automatically turn on and start audio recording.
- One Key Video Recording: Press and hold the Video Button while the camera is off. The camera will vibrate to confirm the action and automatically turn on and start video recording.
- One Key Playback: In standby mode press the Play/PauseButton. The camera will automatically start playing back the last recoded file.
- Quick Changing Video Resolution: To switch between SD 480& HD 720 resolutions without going to the main menu, press and hold the Audio Button for 4 seconds there will be a visual indication on the screen for the current resolution.
- Taking Snapshots: To take a snapshot press the Camera Button on the side of the camera. To take a snap shot with flash first press the Camera Button for 4 seconds to activate the flash mode and then press the camera button again to take a snapshot with flash. To turn the flash off press and hold the Camera Button again for 4 seconds.
- Tagging important files: While recording video you can tag an important file by pressing the Star Button.The camera will vibrate to confirm the action. When you view the file in the media play back menu the file will be tagged with a star.
- Digital Zom: While recording press the M Button to zoom in and the Play/Pause Button to zoom out. Please note that digital zoom is only available in SD480 and HD720 resolutions.
- Laser Pointer: To activate the laser pointer press and hold the OK Button. The laser pointer can be activated while in standby or video recording mode. To turn off press and hold the OK Button again. Caution: This device generates a visible red light that is moderately hazardous and should not be viewed by the naked eye on the same axis as the beam.
- Fast Forward & Rewind: While a video file is playing press the M Button to fast forward press the Play/Pause Button. You can change the play back speed between 2x, 4x, Bx, 16x, 32x& 64x by pressing the Button multiple times.
- Media Menu
To enter the Media Menu press the OK button. Use the Play/Pause and M Buttons to navigate left and right, press OK Button to confirm and the Power Button to go back. - Settings Menu
To enter the Settings Menu press the M Button. Use the Play/Pause and M Buttons to navigate up and down, press the OK Button to confirm and the Power Button to go back. - Video Resolution: Change between 848X480 30P 16:9 / 720X480 30P 4:3/ 848X480 60P 16:9 / 1280X720 30P 16:9 / 1280X720 60P 16:9 / 1440X 1080 30P 16:9 / 1920X 1080 30P 16:9 resolutions for recorded video files.
- Burst Mode: Select how many pictures are taken when the Picture Button is pressed. Choose between 1,2,3, 5 & 10 pictures per burst. Self Timer: Select an audible countdown before a picture is taken when the Picture Button is pressed. Choose between a 5 or 10 second delay.
- Delay Capture: Select the time between each snapshot once the Picture Button is pressed. Choose between 5 & 10 seconds, once activated the camera will continue to take pictures at the
pre-set interval, until the M Button is pressed to stop the camera. Quality: Select the sharpness of still images when the Picture Button is pressed. Choose between super fine, fine & normal. Pre-record: Once activated the RX-3 pro will always keep recording video on it's temporary buffer flash memory. This way when the record button is pressed, the recorded footage will start from 10 seconds prior to the recording time. - Delay record: Select how long the camera will continue recording after the Video Button has been pressed to stop recording. Choose between 5 seconds,5 or 10 minutes.
- Split Time: Select how long the camera records before creating a separate video file. Choose between 5, 10, 15,30 & 45 minutes. Slide Show: Once activated, captured photos in the gallery will automatically be cycled though at 5 second intervals.
- Infrared: Once activated the camera will automatically swhich to night vision mode in low light conditions.
- Record Warning: Once activated you will hear an audio prompt from the camera to confirm that video recording has started. Screen Saver: Select the amount of time before the camera's built in screen goes into standby mode. Choose between 30 seconds, 1 minute, 3 minutes & 5 minutes. Please note the screen saver feature will significantly increase the battery life. LCD Brightnes: Select the brightness of the built in LCD screen on the camera.Choose between high and low brightness levels.
- Auto Power off: Select the time period before the camera automatically shuts down if not recording. Choose between 30 seconds, 1 minute, 3 minutes & 5 minutes.
- LED indicator: Turn the LED indicator light on the top left of the camera on or off.
- Volume: Adjust the volume of the built in speaker on the camera. Time & Date: Set the current time and date in the
- yyyy/mm/ddhh:mm format.
- ID Setting: Set the unique ID of the camera as well as an ID of the user which will be stored to therecorded files
- Default Setting: Use this option to restore the camera to the factory default settings.
- Firmware: Displays the cameras current version of firmware.
Video Out
- You can connect the camera to an external screen via HDMI. To connect by HDMI you will need a standard mini HDMI to HDMI cable (not included).
Downloading Recorded Media
- To download the recorded media from your RX3-HD camera use the USB cable supplied. Connect the smaller mini USB cable to either the USB port of the camera dock or the camera and then the other end to the USB port of the computer. Once connected the camera will automatically turn and appear as a removable drive.
Contents
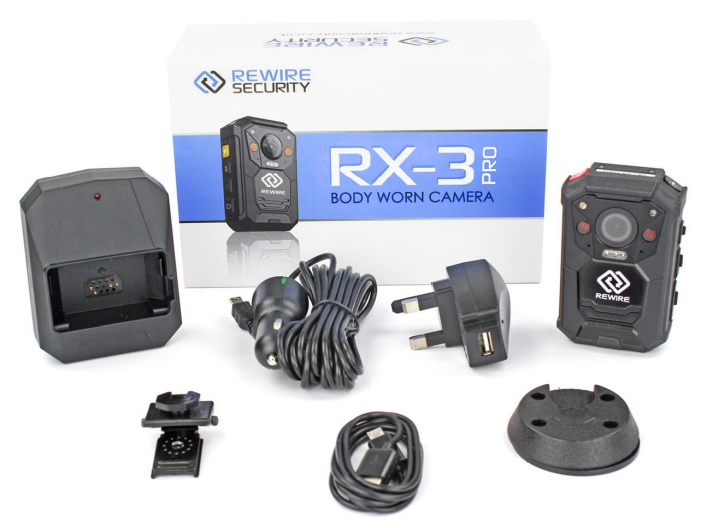
- 1x RX-3 PRO Camera
- 1x Charging Dock
- 1x USB Cable & Mains charger
- 1X Klickfast Mount
- 1x Mini USB Cable
- 1x Instruction Manual
Class 1 Laser
A class 1 laser is used on the RX3 Pro for camera allignment feature. A class 1 laser is safer for the human eye and the blink reflex will limit the exposure to no more than 0.25 seconds. Intentional suppression of the blink reflex could lead to eye injury. Many laser pointers and measuring instruments are class 1.
Troubleshooting: Rewire Security RX-3 Pro Body Worn Camera
- Camera won’t power on: Check battery level and charging cable. Try a different USB port or cable.
- Wi-Fi connection issues: Restart the camera and app. Ensure your mobile device is within range and Wi-Fi is enabled.
- Video quality poor: Clean the lens and ensure adequate lighting. Adjust camera angle for best results.
- Error codes: Refer to the user manual for specific error code meanings and solutions.
- Preventive measures: Regularly update firmware and keep the device clean and dry.
The rewire security RX-3 Pro Body Worn Camera comes with a 1-year limited warranty. For support, contact Rewire Security customer service call 1-800-555-1234. Visit the official website for FAQs and live chat assistance.
Pros & Cons: Rewire Security RX-3 Pro Body Worn Camera
Pros
- Excellent 1080p HD video quality
- Long battery life (up to 12 hours)
- Rugged, water-resistant design
- Easy-to-use interface and app
- Flexible mounting options
- Competitive price point
Cons
- Limited storage without microSD card
- App occasionally slow to sync
- No built-in GPS (requires external device)
The RX-3 Pro offers outstanding value for money, especially for users who need reliable, high-quality recording in demanding environments. While it lacks some advanced features found in higher-end models, its performance and durability make it a top choice for most professionals.
Customer Reviews: Rewire Security RX-3 Pro Body Worn Camera
Users consistently praise the rewire security RX-3 Pro Body Worn Camera for its reliability, ease of use, and excellent video quality. Many reviewers highlight the long battery life and rugged build as standout features. The device has received an average rating of 4.6 out of 5 stars on major retail sites.
Common complaints include occasional app syncing delays and the need for a microSD card for extended storage. However, most users recommend the RX-3 Pro for law enforcement, security, and investigative work. Frequent mentions of its value for money and durability make it a popular choice among professionals.
“This camera is a game-changer for our security team. The video quality is amazing, and it lasts all day on a single charge.” – John D., Security Supervisor
“Easy to set up and use. The app could be a bit faster, but overall, I’m very satisfied.” – Sarah L., Private Investigator
More rewire security manuals
- Setup: Rewire Security RX-2S V4 Body Worn Camera User Manual
- Usage: Rewire Security RX-3LITE v2 Body Worn Camera User Manual
- Setup: Rewire Security RX-2S V2.0 Body Worn Camera User Manual
- Setup: Rewire Security RX-5 V2 Body Worn Camera User Manual
- Usage: Rewire Security Rx-3 Body Worn Camera Docking Station User Manual
- Setup: Rewire Security RX-1s Body Worn Camera User Manual
Leave a Comment