
Setup: Rewire Security RX-5 V2 Body Worn Camera User Manual
Content
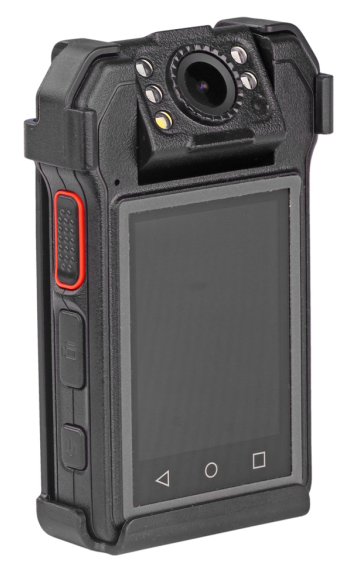
Rewire Security RX-5 V2 Body Worn Camera
Introduction
The Rewire Security RX-5 V2 Body Worn Camera is a rugged, high-performance solution designed for law enforcement, security personnel, and first responders. Engineered for reliability in demanding environments, this body camera delivers crystal-clear video and audio recording, ensuring transparency and accountability in every situation. With advanced features like real-time streaming, GPS tracking, and robust encryption, the RX-5 V2 sets a new standard for body-worn camera technology.
Key benefits include a durable, weather-resistant design, long battery life, and seamless integration with cloud-based evidence management systems. The RX-5 V2 is ideal for police departments, private security firms, and emergency services seeking a dependable, easy-to-use recording device. Its intuitive interface and customizable settings make it suitable for both novice and experienced users.
Available for purchase through authorized distributors and online retailers, the Rewire Security RX-5 V2 Body Worn Camera typically retails between $299 and $399, offering excellent value for its feature set and professional-grade build quality.
Specifications: Rewire Security RX-5 V2 Body Worn Camera
- Video Resolution: 1080p Full HD at 30fps
- Audio Recording: Dual noise-canceling microphones
- Storage: 64GB internal, expandable via microSD (up to 256GB)
- Battery Life: Up to 12 hours continuous recording
- Connectivity: Wi-Fi, Bluetooth 5.0, USB-C
- GPS: Built-in for real-time location tracking
- Encryption: AES-256 for secure data protection
- Water Resistance: IP67 rated
- Dimensions: 75 x 50 x 25 mm
- Weight: 120g
The RX-5 V2 outperforms competitors with its superior battery life, rugged design, and seamless cloud integration, making it a top choice for professionals who demand reliability and security.
Charging
- The camera should only be charged using the cable and charger supplied with the camera. We recommend charging the camera via the supplied charging dock. charge the camera place the camera into the charging dock with the USB cable and plug connected. A full charge can take up to 5 hours depending on the camera's batteries current charge state.
- Note- It is recommended to charge the camera before use and long periods of storage.
Camera Overview
Button Operation
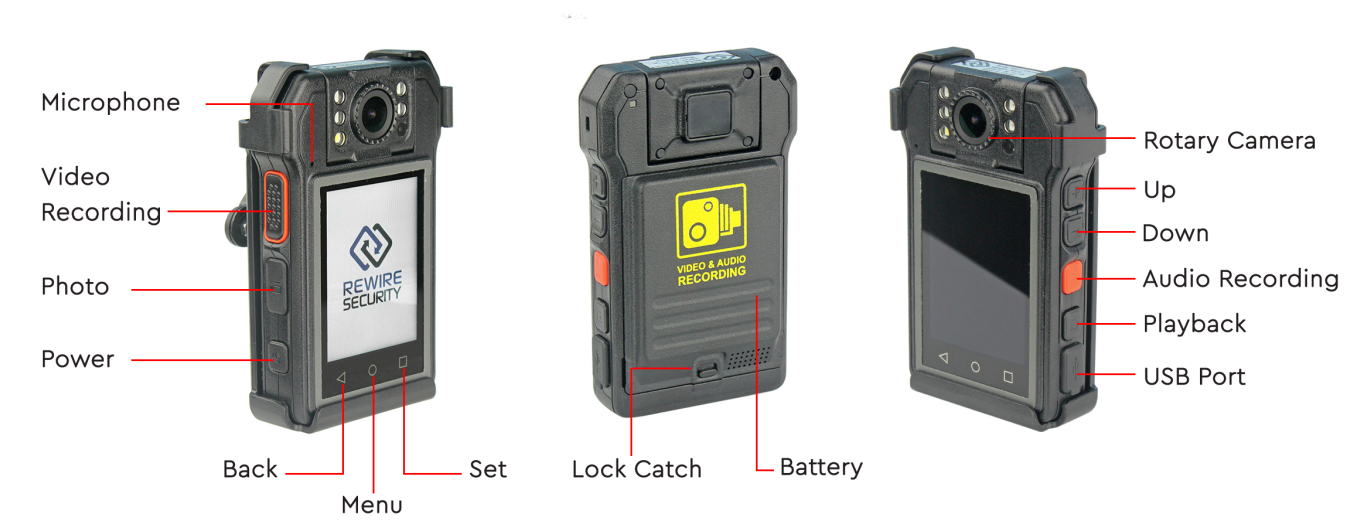
Video Recording Button
- Press to start or stop recording from standby mode.
- Press and hold to enable and disable the cameras laser aliment tool from standby mode.
- Press and hold from off to switch on the camera and automatically start recording.
- Photo Snap Button
- Press once to capture photos while in standby mode or recording video.
Power
- Press and hold to switch the camera on and off.
Back
- Tap to navigate back to the previous menu when in the settings or playback menu.
Menu
- Tap to enter the playback menu from standby mode or to confirm a selection in the settings or playback menu
Set
- Tap to enter the settings menu from standby mode.
Up
- Press and hold when in standby mode to enable or disable LED illumination.
- Press once to navigate up when in the settings or playback menu.
Down
- Press and hold to enable or disable infra-red night-vision when set to manual mode in the settings menu.
- Press once to navigate down when in the settings or playback menu.
Audio Record
- Press once to record audio only when in standby mode.
- Press and hold to switch on and automatically start recording audio only from off.
Playback
- Press once to enter the playback menu.
Passwords
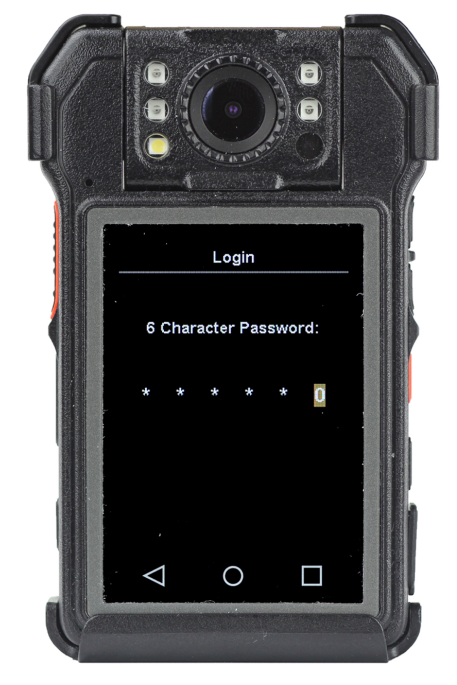
- The camera is supplied password protected by default. This is designed to prevent unauthorised access to recorded data and the cameras settings. The default password is '000000'.
- Use the Up and Down buttons to select a character and the 'Menu' button to confirm.
- The camera's password can be changed in the cameras settings menu.
Playback Menu
- The camera has the ability to playback recorded footage directly on the camera via its in-built screen, this is done in the cameras playback menu. To enter the playback menu tap the 'Menu' button and enter the cameras password using the Up and
- Down buttons to select a character and the 'Menu' button to confirm. Recorded data in the playback menu is automatically sorted into three categories
- Use the 'Up' and 'Down' buttons to select a category and 'Menu' button to confirm.
- Files are sorted in date order with the newest files first.
Video Category
- Use the 'Up' and 'Down' buttons to cycle through the files and the 'Menu' button to select a file for playback. Tap the 'Back' button to go back to the previous menu.
- When playing back a video use the 'Down' button to fast forward and the 'Up' button to rewind. The 'Menu' button is used to pause. Tap the 'Back' button to go back to the previous menu.
Photo Category
- Use the 'Up' and 'Down' buttons to cycle through images and the 'Menu' button to enlarge an image. Tap the 'Back' button to go back to the previous menu.
Photo Category
- Use the 'Up' and 'Down' buttons to cycle through the files and the 'Menu' button to select a file for playback. Tap the 'Back' button to go back to the previous menu.
- When playing back an audio file use the 'Down' button to fast forward and the 'Up' button to rewind. The 'Menu' button is used to pause.
Settings Menu
- To enter the settings menu tap the 'Set' button on the back of the camera while in standby mode. When prompted enter the cameras password using the Up and Down buttons to select a character and the 'Menu' button to confirm each one. While in the cameras settings menu use the Up and Down buttons to navigate through the different options and 'Menu' button to confirm and the Back button.
- Resolution
Select the quality the camera records video in when the Video Recording Button is pressed. Choose between:- 1296P30
- 1080P30
- 720P30
- 720P60
- 480P30
- Photo Size
Select the quality of still images captured by the camera when the Photo Button is pressed. Choose between:- 8M
- 12M
- 14M
- 34M
- Photo Button
Choose how many still images are captured when the Photo Button is pressed. When Off is selected one image will be captured per press. Choose between.- OFF
- 3P
- SP
- 10P
- 20P
Pre - Record
When On is selected the camera will buffer 15 seconds of footage at all times. When active a 'Blue Dot Icon' will be displayed on the cameras screen.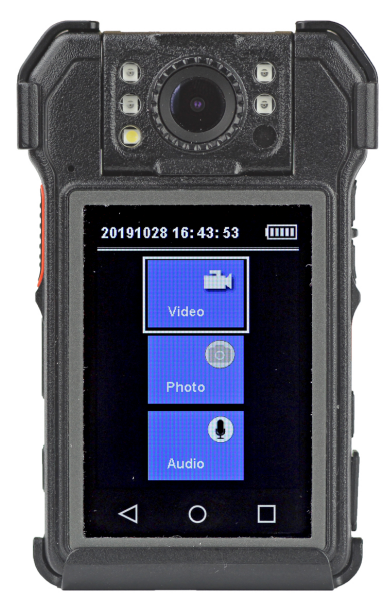
Post Record
Select how long the camera continues to record for after the Video Recording Button is pressed to stop recording. When Off is selected the camera will stop recording as soon as the Video Recording Button is pressed.
- OFF
- 5 sec
- 30 sec
- 1 min
- 5 min
Video Quality
Select the bit-rate of the recorded video footage. When High is selected the recorded footage will be of a higher quality but will take more space on the camera memory.
Loop Recording
When On, the camera will record on a continuous loop and automatically record over the oldest data first.
Video Split Time
Select how long the camera records for before saving a new file.
- 5 min
- 10 min
- 15 min
- 20 min
- 30 min
LCD Auto Off
Select how long the camera screen is kept on in standby mode. When Off is selected the cameras screen will always stay on.
- OFF
- 30sec
- 60sec
LCD Brightness
Select the brightness of the cameras built in screen. Choose between High and Low.
Auto Power Off
Select how long the camera stays on when not recording and in standby mode. When Off is selected the camera will stay on until switch off manually using the Power Button.
- 1 min
- 3 min
- 5 min
- OFF
Please note: When Motion Detection or Pre-Record are active the Auto Power Off feature will be over-ridden and the camera will stay on until switched of manually using the Power Button.
Key Tone
Enable/Disable audible button press tones
Vibration Reminder
Enable/Disable vibration feedback.
Mute Recording
When On the camera will record video without audio when the Video Recording Button is pressed.
Device Volume
Set the volume of the cameras in-built speaker.
- Low
- Medium
- High
Vechicle Mode
When On the camera starts recording when the cameras USB port is connected to power and stops automatically when power is disconnected.
File Manager
Set how recorded media is displayed in the Media Playback Menu.
- Photo Mode- Recorded media is displayed as thumbnails.
- File Mode- Recorded media is displayed in list form.
Password
Enable/Disable the cameras password protection.
Change Passwords
Set a custom 6 character password for the camera. Use the Up/Down buttons to select a character and the Menu Button to confirm.
Change Super Password
Only used by Rewire Security engineers.
Night Vision
Switch between the cameras two night vision modes.
Manual- Infra-red night-vision is manually Enabled/Disabled by pressing and holding the
Down Button.
- Automatic- The camera will automatically switch on infra-red night-vision in low light levels. When infra-red night-vision is active the 'IR' icon will be displayed on the cameras screen.
- Please note: When infra-red night-vision is active the camera will record in black and white
Default Settings
Reset the camera back to factory settings.
Date & Time
Set the time and date watermarked to recorded media.
- DD/MM/YYYY
- HH:MM:SS
- Use the Up/Down Buttons to select a character and the Menu Button to confirm.
- Please note: The time is set in 24hr format
Officer ID
- Set a unique ID for the cameras operator.
- Use the Up/Down buttons to select a character and the Menu Button to confirm.
- Please note: This ID will be watermarked to all recorded videos and photos.
Officer ID
- Set a unique ID for the cameras operator.
- Use the Up/Down buttons to select a character and the Menu Button to confirm.
- Please note: This ID will be watermarked to all recorded videos and photos.
Downloading To A PC
Recorded data from the camera can be downloaded to a PC or Mac via the charging dock. Only the original cable provided with the camera should be used. It is recommended to download all recorded data between uses.
To download data from the camera please follow the steps below:
- Connect the camera dock to a computer using the USB cable provided. The LED status light on the dock will light up green.
- Place the camera into the dock while switched off. The status LED will turn red and the camera will switch on.
- Enter the cameras password via the cameras screen using the Up/Down buttons to select a character and the Menu Button to confirm
- The camera will now appear as a removable drive on the computer. The files from the camera can now be downloaded from the camera for archiving.
- Once finished it is important to safely eject the camera before disconnecting to avoid damage to the cameras memory. This is done by right clicking the cameras drive icon and selecting 'Eject'.
Troubleshooting: Rewire Security RX-5 V2 Body Worn Camera
Common issues include connectivity problems, battery drain, and storage errors. For Wi-Fi issues, restart the camera and router. If battery life is shorter than expected, check for background apps or update firmware. For storage errors, format the microSD card using the camera’s menu.
Error codes such as E01 (low battery) and E02 (storage full) are displayed on the LCD screen. Preventive measures include regular cleaning, firmware updates, and proper storage when not in use.
The RX-5 V2 comes with a 1-year warranty. For support, contact Rewire Security visit their official website.
Pros & Cons: Rewire Security RX-5 V2 Body Worn Camera
Pros
- Excellent video and audio quality
- Long battery life and durable design
- Seamless cloud integration and encryption
- Easy setup and user-friendly interface
Cons
- Higher price point compared to basic models
- Limited third-party app compatibility
- MicroSD card not included
The RX-5 V2 offers outstanding value for professionals needing a reliable, secure body camera with advanced features.
Customer Reviews: Rewire Security RX-5 V2 Body Worn Camera
Users consistently praise the RX-5 V2 for its durability, clear video, and ease of use. Many highlight its long battery life and robust build, making it ideal for extended shifts. Common complaints include the need for a microSD card and occasional Wi-Fi connectivity issues.
With an average rating of 4.6 stars, customers recommend the Rewire Security RX-5 V2 Body Worn Camera for law enforcement and security teams seeking a dependable, feature-rich solution.
More rewire security manuals
- Usage: Rewire Security RX-3LITE v2 Body Worn Camera User Manual
- Setup: Rewire Security RX-1s Body Worn Camera User Manual
- Setup: Rewire Security RX-3 Pro Body Worn Camera User Manual
- Setup: Rewire Security 102 Nano GPS Tracker User Manual
- Setup: Rewire Security RX-2S V4 Body Worn Camera User Manual
- Usage: Rewire Security E-Bike GPS Tracker User Manual
Leave a Comment