
Setup: Beurer Blood Pressure Monitor BM 26 User Manual
Content
Introduction — beurer Blood Pressure Monitor BM 26 Overview
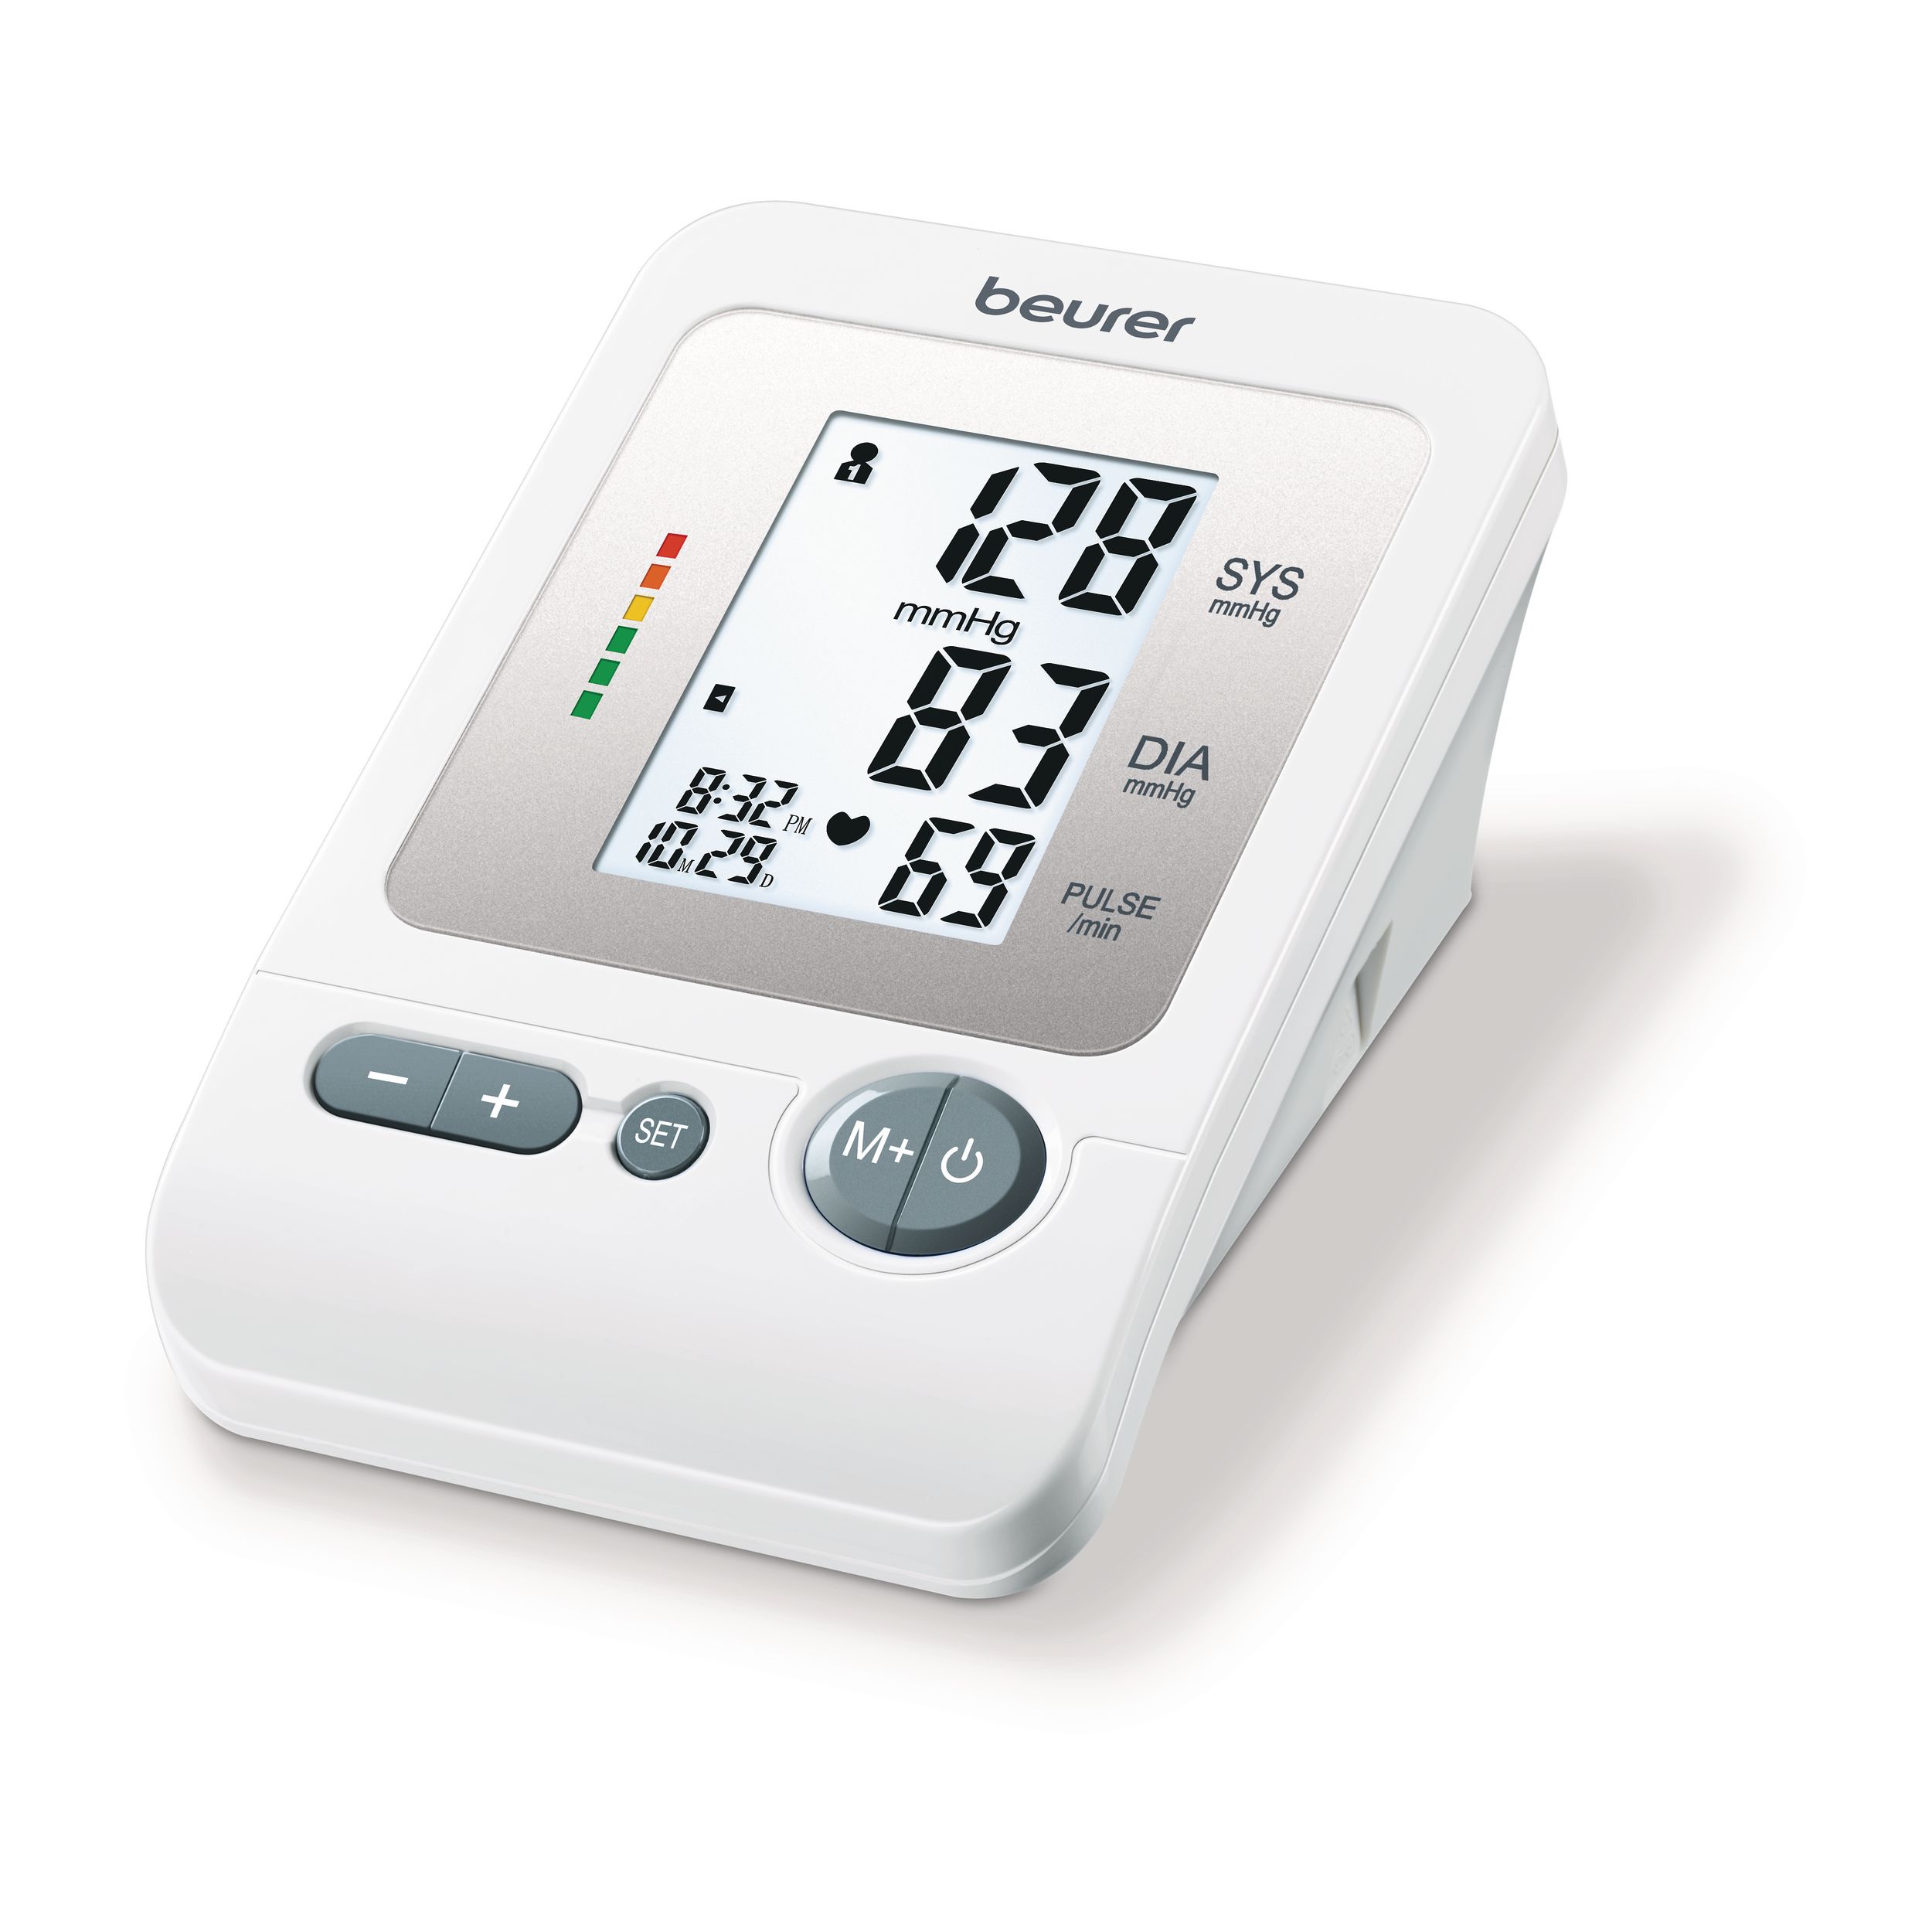
The beurer Blood Pressure Monitor BM 26 is a compact, upper‑arm digital blood pressure monitor designed for reliable home and light clinical use, offering clinical‑grade measurement functions with user‑friendly features and multi‑user memory storage. The BM 26 provides automatic systolic/diastolic and pulse readings, visual risk classification with a coloured scale, and irregular heart rhythm (arrhythmia/AFib) detection, making it suitable for people who need regular self‑monitoring, families sharing a device, and health professionals needing a simple portable monitor.
Key benefits include a large, easy‑to‑read LCD, storage for up to 4 users with 30 readings each, automatic averaging of recent measurements, and a supplied upper‑arm cuff (22–35 cm) and storage pouch for immediate use. The BM 26 emphasizes ease of use — one‑button operation and automatic pressure preselection/deflation — and is marketed as a medical device meeting recognized testing standards. Typical use cases include daily blood pressure tracking, remote hypertension management, and early detection of irregular heartbeats during routine checks.
Estimated price range (retail) is approximately €35–€50 / $40–$55 depending on retailer, regional taxes and promotions; availability is broad through Beurer’s online shop and major retailers worldwide. The BM 26 appeals to adults monitoring hypertension, caregivers managing multiple users, and purchasers seeking good value for money with clinically oriented features and simple app connectivity options via Beurer’s HealthManager ecosystem in some markets.
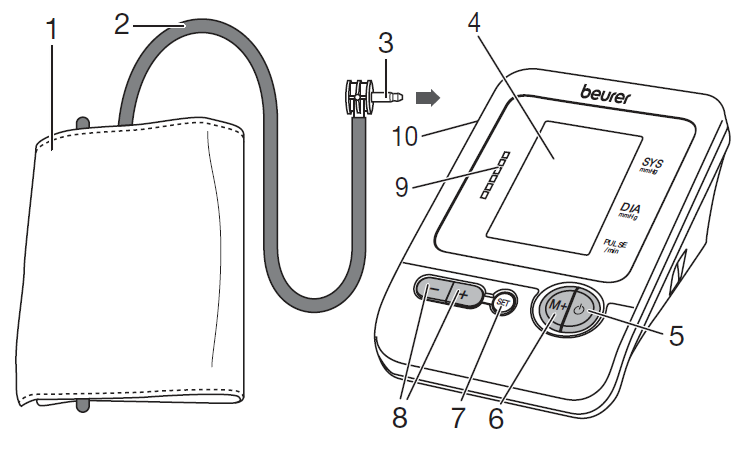
Parts
- Cuff
- Cuff Line
- Cuff Connector
- Display
- START/STOP Button
- Memory Button M+
- Setting Button SET
- Function Buttons -/+
- Risk Indicator
- Connection for Cuff Connector (Left-Hand Side)
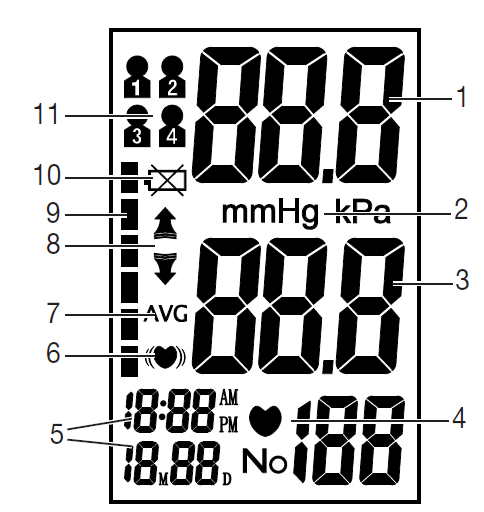
Information on the display:
- Systolic pressure
- Unit in mmHg
- Diastolic pressure
- Pulse symbol
 and calculated pulse value
 - Time and date
- Cardiac arrhythmia symbol

- Average values of the 3 most recent measurements AVG
- Inflate, release air

- Risk indicator
- Battery replacement symbol

Symbol for user

Specifications — Technical details and feature list
- Measurement type: Fully automatic upper-arm blood pressure and pulse measurement.
- Measurement range: Systolic 60–280 mmHg; Diastolic 30–200 mmHg; Pulse 30–180 bpm.
- Accuracy: Pressure ±3 mmHg; Pulse ±5% (manufacturer specification).
- Memory: 4 user profiles × 30 measurements each (total 120 readings); average of last three readings and morning/evening 7-day averages.
- Cuff: Standard cuff for 22–35 cm arm circumference (8.6"–13.8"); XL cuff (30–42 cm) available separately.
- Display & Indicators: Large LCD with time/date, risk category coloured scale, irregular heartbeat indicator, average indicator and battery level.
- Power: 4 × AA batteries (included); mains adapter compatible on some versions.
- Dimensions & Weight: ~155 × 110 × 70 mm; ~395 g without batteries.
- Extras: Storage bag, blood pressure record booklet; some packages include a quick start manual and app compatibility (Beurer HealthManager Pro / Scan & Save) for digital logging.
- Certifications: Marketed as a medical device; clinically tested to ESH guidance and listed by Beurer and several retailers.
- Performance benchmarks: Measurement speed: automatic preselection and deflation with typical measurement cycles under a minute; memory and averaging functions comparable to competitors in the same price class.
- Comparison with similar products: Compared with entry-level upper arm monitors (e.g., basic single-user devices), the BM 26 adds 4-user memory, arrhythmia detection and a coloured risk scale; compared to higher-end Bluetooth-enabled models the BM26 may lack native wireless sync in some retail packages but supports Scan & Save workflow in some regions via Beurer’s app.
Initial use
Inserting the Batteries
- Remove the battery compartment lid on the rear of the device.
- Insert four 1.5 V AA (alkaline type LR6) batteries. Make sure that the batteries are inserted correctly according to the polarity markings. Do not use rechargeable batteries.
Carefully close the battery compartment lid.
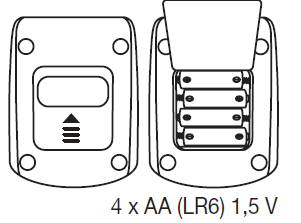
If four warning tones sound and the battery warning symbol appears simultaneously on the display, measurements can no longer be performed, and all batteries must be replaced. Once the batteries have been removed from the device, the time must be set again. Any saved measurement values are retained.
Setting the Date and Time
It is essential to set the date and time correctly. Otherwise, measured values cannot be saved or retrieved with the correct date and time. The device uses a 12-hour time format. For example, 13:00 is displayed as 01:00 PM.
To set the date and time, proceed as follows:
- Press the SET button twice.
- The month flashes on the display. Use the -/+ function buttons to select the desired month, then confirm by pressing the SET button.
- The day flashes on the display. Use the -/+ function buttons to set the day, then confirm with the SET button. Follow the same procedure to set the time, confirming each setting with the SET button.
Usage
Ensure that the device is at room temperature before taking a measurement. Measurements can be performed on either the left or right arm.
Attaching the Cuff
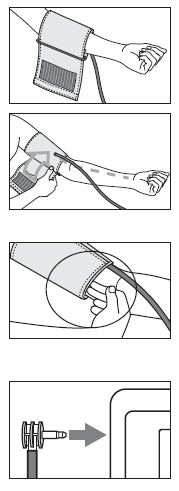
- Place the cuff around the bare upper arm. Make sure that blood circulation is not restricted by tight clothing or similar obstructions.
- Position the cuff on the upper arm so that its bottom edge is approximately 2–3 cm above the elbow and directly above the artery. The cuff line should point toward the centre of the palm.
- Tighten the free end of the cuff and secure the hook-and-loop fastener. Ensure that the cuff is snug but not excessively tight. Two fingers should fit comfortably beneath the cuff.
Insert the cuff line into the connection for the cuff connector on the device.
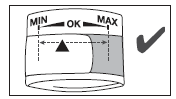
- The cuff is correctly fitted if the index mark is within the OK range after fastening. Ensure that your arm is not pressing against the cuff line. Blood pressure may vary between the right and left arms, resulting in different measurement values. Always perform measurements on the same arm. If the readings differ significantly between the two arms, consult your doctor to determine which arm should be used for future measurements. Important: The device must only be operated with the original cuff. The standard cuff is suitable for upper arm circumferences of 22–35 cm. A larger cuff for upper arm circumferences of 30–42 cm is available from specialist retailers or through the manufacturer's service department under order number 162.973.
Adopting the Correct Posture
Before every measurement, relax for approximately 5 minutes. Failure to rest beforehand may affect measurement accuracy.
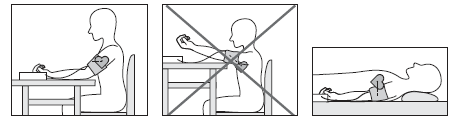
- You can take measurements while sitting or lying down. Always ensure that the cuff is positioned at heart level.
To measure your blood pressure while sitting, adopt a comfortable position with your back and arms properly supported. Do not cross your legs, and keep both feet flat on the floor.
- Remain still and avoid speaking during the measurement to prevent inaccurate readings.
Wait at least 1 minute before taking another measurement.
Selecting the Memory
Press the SET button. Select the desired memory space using the -/+ function buttons. The device provides four separate user memories, each capable of storing 30 measurements. These memories can be used to store readings for four different individuals or to separate measurements taken at different times, such as morning and evening. Confirm your selection by pressing the START/STOP button.
Performing the Blood Pressure Measurement
- Attach the cuff and adopt the correct measurement posture as described above.
- Start the measurement by pressing and holding the START/STOP button. The device performs a display check, during which all display segments illuminate. The cuff then inflates automatically. During inflation, the device estimates the required inflation pressure. If the pressure is insufficient, the device automatically increases it.
- The cuff pressure is gradually released while the device detects the pulse.
- Once the measurement is complete, the remaining air pressure is released quickly. The systolic blood pressure, diastolic blood pressure, and pulse rate appear on the display.
The measurement can be cancelled at any time by pressing the START/STOP button.
- If a higher inflation pressure is consistently required, you can bypass the additional inflation process by pressing and holding the M+ button shortly after inflation begins until the desired cuff pressure is reached. The pressure should be approximately 30 mmHg above the expected systolic blood pressure.
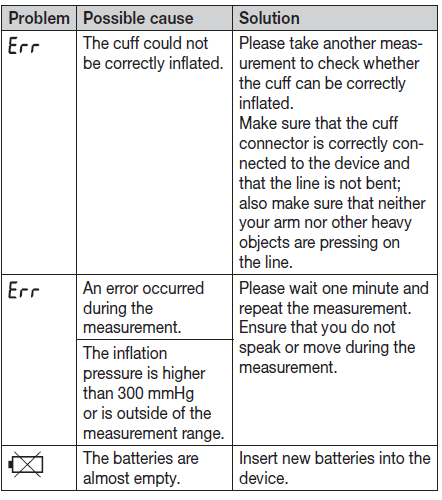
- If the measurement cannot be performed correctly, an error symbol appears on the display. Refer to the troubleshooting section of the instructions for use and repeat the measurement.
- The device switches off automatically after approximately 3 minutes.
Evaluating the results
Cardiac arrhythmia:
This device can identify potential disruption of the heart rhythm when measuring and, if necessary, indicates this after the measurement with the symbol . This can be an indicator for arrhythmia. Arrhythmia is an illness in which the heart rhythm is abnormal because of flaws in the bioelectrical system that regulates the heartbeat. The symptoms (skipped or premature heartbeats, pulse being slow or too fast) can be caused by factors such as heart disease, age, physical make-up, excess stimulants, stress, or lack of sleep. Arrhythmia can only be determined through an examination by your doctor.
If the symbol is shown on the display after the measurement has been taken, repeat the measurement. Please ensure that you rest for 5 minutes beforehand and do not speak or move during the measurement. If the symbol appears frequently, please consult your doctor. Self-diagnosis and treatment based on the measurements can be dangerous. Always follow your doctor’s instructions.
Risk indicator:
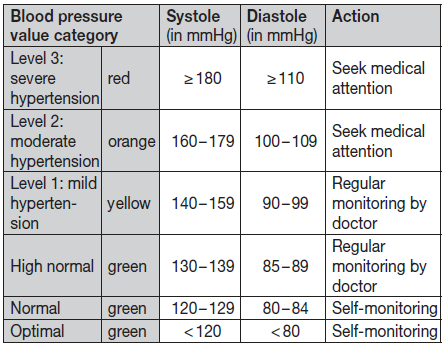
The measurements can be classified and evaluated in accordance with the following table. However, these standard values serve only as a general guideline, as the individual blood pressure varies in different people and different age groups, etc. It is important to consult your doctor regularly for advice. Your doctor will tell you your individual values for normal blood pressure as well as the value above which your blood pressure is classified as dangerous. The classification on the display and the scale on the device show which category the recorded blood pressure values fall into. If the values of systole and diastole fall into two different categories (e.g., systole in the 'High normal' category and diastole in the 'Normal' category), the graphical classification on the device always shows the higher category; for the example given, this would be 'High normal'.
Saving, Accessing and Deleting Measured Values
- The results of every successful measurement are automatically stored together with the date and time. If more than 30 measurements are recorded in a user memory, the oldest measurements are automatically deleted to make room for new readings.
- Press the SET button and use the -/+ function buttons to select the desired user memory. Confirm your selection by pressing the START/STOP button. Press the M+ button to display the average value (AVG) of the three most recent measurements stored in the selected user memory. Press the + button to view the most recent measurements or the - button to view the oldest measurements.
- The average value (AVG) can only be displayed when at least three measurements have been saved in the selected user memory.
- To delete stored measurements, first select the desired user memory. Press and hold the SET button for approximately 3 seconds. Three short acoustic signals will sound, indicating that all stored measurements in the selected user memory have been deleted.
- To switch between different user memories, refer to the Selecting the Memory section of the instructions.
Cleaning and Maintenance
- Clean the device and cuff carefully using only a slightly damp cloth.
- Do not use cleaning agents, detergents, or solvents, as these may damage the device or cuff.
- Never immerse the device or cuff in water or hold them under running water. Liquid entering the device may damage its internal components and affect its operation.
- When storing the device and cuff, avoid placing heavy objects on them. Remove the batteries if the device will not be used for an extended period. Ensure that the cuff line is not sharply bent, twisted, or compressed during storage.
Troubleshooting — Common problems, error codes and fixes
Common issue: inaccurate or unusually high/low readings. First, confirm correct cuff placement on the upper arm (midline of brachial artery), sitting posture (back supported, feet flat), and that you are relaxed for 5 minutes before measuring; retake two more readings and use the average displayed by the device.
- No power/device will not turn on: Replace or correctly insert the 4×AA batteries and check polarity; try fresh batteries if low battery icon shows; if using a mains adapter, ensure the correct Beurer adapter type is used.
- Error messages/cuff errors (common error codes): If the display shows a cuff error or measurement fails, reapply the cuff snugly (not too tight or loose), remove clothing from the measurement arm, and check the air tube connection. If the error persists, reset the device by removing batteries for 1 minute and retry.
- Irregular heartbeat warning: The BM 26 detects possible arrhythmia and displays an irregular heartbeat indicator — treat this as an alert to consult a healthcare professional rather than a definitive diagnosis.
- Memory issues: If stored readings appear corrupted or user switching fails, clear memory for that user via the SET/M buttons according to the manual and reattempt storing new readings.
- Preventive measures: Calibrate measurement technique: measure at same time each day, avoid caffeine/exercise 30 minutes before reading, and keep a consistent arm position. Have device checked against clinical measurement every 1–2 years or after mechanical shock.
- Warranty & support: Beurer typically offers a manufacturer warranty (varies by country—examples show 2–5 years via retailers); contact Beurer support or your retailer for warranty claims and authorised repairs.
Contact for help: Use Beurer’s official support channels listed on product packaging or the beurer website, or contact the retailer where purchased for after-sales support and returns.
Pros & Cons — Honest assessment and alternatives
- Pros — Easy to use: One-button operation and large LCD make readings fast and accessible for seniors and busy households.
- Pros — Multi-user memory: Stores 4 users × 30 readings (120 total), ideal for families or small clinics tracking multiple patients.
- Pros — Arrhythmia detection & risk scale: Irregular heartbeat indicator and coloured risk classification offer quick clinical context for users.
- Pros — Value for money: Competitive price range while including cuff, batteries, and storage bag — good cost/feature balance versus similarly priced monitors.
- Cons — Limited direct connectivity: Some BM 26 packages do not include Bluetooth; while Scan & Save or app workflows exist in select regions, buyers seeking full wireless sync may prefer higher-end Beurer models with explicit Bluetooth pairing.
- Cons — Cuff fit limits: Standard cuff covers 22–35 cm; users outside that range must buy an XL cuff accessory.
- Cons — Not a medical diagnostic replacement: While clinically tested and suitable for home monitoring, arrhythmia alerts are screening tools only — abnormal findings require professional medical follow-up.
- Alternatives: For buyers wanting Bluetooth app syncing and cloud history, consider Beurer models with built-in Bluetooth or competitors’ Bluetooth-enabled upper-arm monitors; for clinic use, look at devices with broader cuff ranges and validated clinical accuracy records.
Customer Reviews — Real user feedback, ratings and purchasing advice
Users commonly praise the beurer Blood Pressure Monitor BM 26 for its ease of use, clear display and multi‑user memory, often noting that readings are consistent with GP measurements in practice tests. Typical star ratings across retailers average high (most listings show predominantly 4–5 star reviews) with frequent comments about the device’s value and dependable arrhythmia detection.
Common complaints include the absence of Bluetooth in some packages (limiting automatic syncing), occasional difficulty positioning the cuff without a mirror, and requests for larger included cuff sizes for bigger arms. Overall recommendation: a strong buy for users who want a reliable, affordable upper‑arm monitor with multi‑user support and arrhythmia alerts; those who require wireless syncing or advanced telehealth features should compare Bluetooth‑enabled alternatives.
Faqs
How do I set up the beurer Blood Pressure Monitor BM 26 for the first time including date and time?
How do I properly attach the cuff on the beurer Blood Pressure Monitor BM 26 for accurate measurements?
What does the risk indicator on the beurer Blood Pressure Monitor BM 26 mean and how to interpret it?
How do I switch between users and access memory on the beurer Blood Pressure Monitor BM 26?
What should I do if the beurer Blood Pressure Monitor BM 26 shows an error or won't inflate properly?
Can the beurer Blood Pressure Monitor BM 26 connect to an app, and what are the compatibility requirements?
How do I maintain and clean the beurer Blood Pressure Monitor BM 26 to ensure long-term accuracy?
Why does the beurer Blood Pressure Monitor BM 26 sometimes require extra inflation, and how to optimize?
More beurer manuals
- Setup: Beurer Wrist Blood Pressure Monitor BC-51 User Manual
- Setup: Beurer Upper Arm Blood Pressure Monitor BM-81 EasyLock User Manual
- Setup: Beurer Blood Pressure Monitor BM-51 easyClip User Manual
- Setup: Beurer Upper Arm Blood Pressure Monitor BM 27+ User Manual
- Setup: Beurer Upper Arm Blood Pressure Monitor BM-23 User Manual
- Setup: Beurer Upper Arm Blood Pressure Monitor BM 53 User Manual
Leave a Comment