
Setup: Beurer Blood Pressure Monitor BM-51 easyClip User Manual
Content
Beurer Blood Pressure Monitor BM 51 easyClip: Comprehensive Product Manual
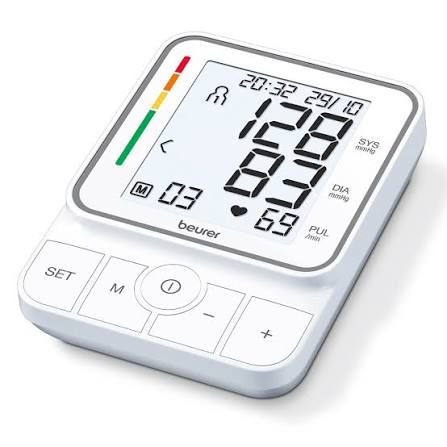
Introduction to the Beurer Blood Pressure Monitor BM 51 easyClip
The **Beurer Blood Pressure Monitor BM 51 easyClip** is a fully automatic upper arm device designed for effortless home blood pressure monitoring. Featuring the innovative easyClip cuff, this monitor allows one-handed application, eliminating the hassle of traditional cuffs that are difficult to secure alone. Ideal for seniors, individuals with limited mobility, or anyone seeking convenient daily health tracking, it delivers quick, comfortable measurements of blood pressure and pulse rate during inflation.
Key benefits include its user-friendly design, large easy-to-read display, and inflation technology that minimizes discomfort while ensuring accurate readings. The **Beurer BM 51 easyClip** supports self-measurement for home use, helping users monitor hypertension or maintain cardiovascular health proactively. It's particularly suited for those needing reliable tracking without clinical visits, with features like average value calculation for trend analysis.
Aimed at health-conscious adults in regions like Germany, the UK, Spain, France, Italy, and Hungary, this monitor is currently available through pharmacies and online retailers such as LloydsPharmacy. Estimated price range falls between €40-€70, offering excellent value for a medical-grade device from Beurer, a trusted brand since 1919 specializing in health and wellbeing products.
Whether managing chronic conditions or promoting wellness, the **Beurer Blood Pressure Monitor BM 51 easyClip** combines precision engineering with simplicity, making blood pressure management accessible and stress-free.
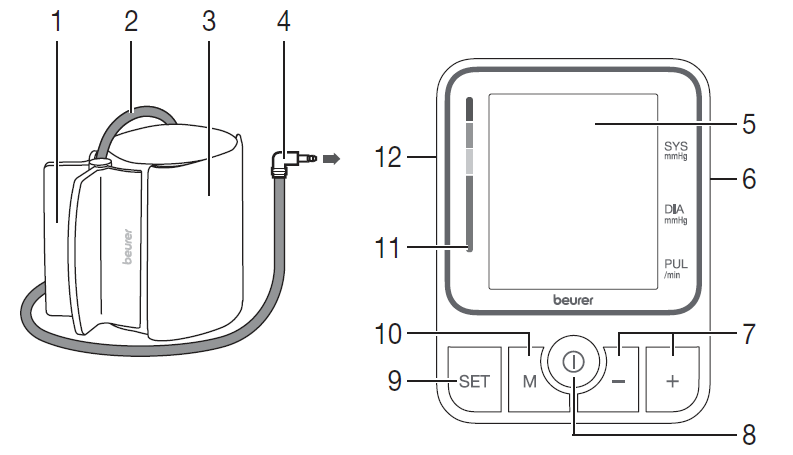
Device description
- Bracket
- Cuff line
- Cuff
- Cuff connector
- Display
- Connection for mains part (right side)
- -/+ function buttons
- START/STOP button
- SET setting button
- M memory button
- Risk indicator
Connection for cuff connector (left-hand side)
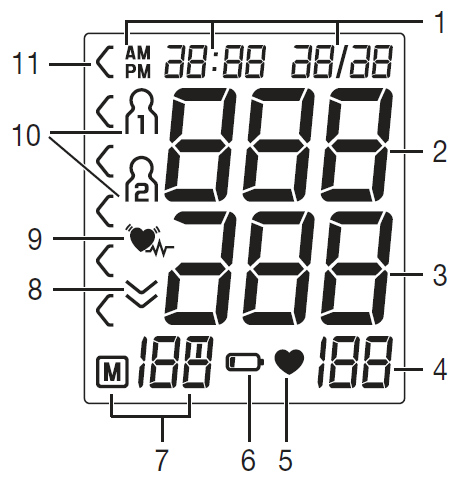
Information on the Display
- Date/time
- Systolic pressure
- Diastolic pressure
- Calculated pulse rate
- Pulse symbol
- Battery replacement symbol
- Number of memory spaces/memory display for average value, morning and evening
- Release air symbol
- Cardiac arrhythmia symbol
- User memory
Risk indicator
Detailed Specifications of the Beurer Blood Pressure Monitor BM 51 easyClip
The **Beurer Blood Pressure Monitor BM 51 easyClip** boasts advanced features for reliable upper arm measurements. Here's a breakdown of its technical specs and capabilities:
- Measurement Functions: Fully automatic blood pressure and pulse rate (PR) detection during inflation.
- Cuff Design: easyClip cuff (22-42 cm) for one-handed, self-application; fits most adult arms.
- Display: Large, easy-to-read screen showing systolic/diastolic pressure, pulse, and average values.
- Technology: Inflation measurement for quick, comfortable readings; calculates average blood pressure values.
- Usage: Single measurements; intended for self-measurement and home use on the upper arm.
- Performance: Rated adequate by Stiftung Warentest (2020-2025); TGA-regulated therapeutic good.
- Dimensions/Packaging: Compact design; packaged at 120mm depth x 140mm height.
- Manufacturer: Beurer GmbH (Germany), OEM: AViTA Corporation (Taiwan).
Compared to similar upper arm monitors, the **Beurer BM 51 easyClip** stands out with its clip cuff, surpassing traditional models in ease of use while matching accuracy for home monitoring—though lacking peer-reviewed validation per Medaval.
Intended Use
The blood pressure monitor is intended for the fully automatic, non-invasive measurement of arterial blood pressure and pulse values on the upper arm. It is designed for self-measurement by adults in the home environment.
Target Group
The blood pressure measurement is suitable for adult users whose upper arm circumference is within the range printed on the cuff.
Clinical Benefits
The user can record their blood pressure and pulse values quickly and easily using the device. The recorded values are classified according to internationally applicable guidelines and evaluated graphically. Furthermore, the device can detect any irregular heartbeats that occur during measurement and inform the user via a symbol on the display. The device saves the recorded measurements and can also output average values of previous measurements. The recorded data can provide healthcare service providers with support during the diagnosis and treatment of blood pressure problems and therefore plays a part in the long-term monitoring of the user's health.
Indication
In the event of hypertension or hypotension, the user can independently monitor their blood pressure and pulse values as well as arrhythmia at home. However, the user does not need to be suffering from hypertension or arrhythmia to use the device.
Contraindications
- Do not use the blood pressure monitor on newborns, children or pets.
- People with restricted physical, sensory or mental skills should be supervised by a person responsible for their safety and receive instructions from this person on how to use the device.
- If you have any of the following conditions, you must consult your doctor before using the device: cardiac arrhythmia, circulatory problems, diabetes, pregnancy, preeclampsia, hypotension, chills or shaking.
- People with pacemakers or other electrical implants should consult their doctor before using the device.
- Do not use the cuff on people who have undergone a mastectomy.
General Warnings
- The measured values taken by you are for your information only – they are no substitute for a medical examination. Discuss the measured values with your doctor and never make your own medical decisions based on them (e.g. regarding dosages of medicines).
- The device is only intended for the purpose described in these instructions for use. The manufacturer is not liable for damage resulting from improper or incorrect use.
- Using the blood pressure monitor outside your home environment or whilst on the move (e.g. whilst travelling in a car, ambulance or helicopter, or whilst undertaking physical activity such as playing sport) can influence the measurement accuracy and cause incorrect measurements.
- Cardiovascular diseases may lead to incorrect measurements or have a detrimental effect on measurement accuracy.
General Precautions
- The blood pressure monitor is made from precision and electronic components. The accuracy of the measurements and service life of the device depend on its careful handling.
- Protect the device from impacts, humidity, dirt, marked temperature fluctuations, and direct sunlight.
- Ensure the device is at room temperature before measuring. If the measuring device has been stored close to the maximum or minimum storage and transport temperatures and is placed in an environment with a temperature of 20°C, it is recommended that you wait approximately 2 hours before using the measuring device.
- Do not drop the device.
Measures for Handling Batteries
- If your skin or eyes come into contact with battery fluid, rinse the affected areas with water and seek medical assistance.
- Choking Hazard: Small children may swallow and choke on batteries. Therefore, store batteries out of the reach of small children.
- Risk of Explosion: Do not throw batteries into a fire.
- If a battery has leaked, put on protective gloves and clean the battery compartment with a dry cloth.
- Do not disassemble, open or crush the batteries.
- Observe the plus (+) and minus (-) polarity signs.
- Protect the batteries from excessive heat.
- Do not charge or short-circuit batteries.
- If the device is not to be used for a relatively long period, take the batteries out of the battery compartment.
- Use identical or equivalent battery types only.
- Always replace all batteries at the same time.
- Do not use rechargeable batteries!
Notes on Electromagnetic Compatibility
- The device is suitable for use in all environments listed in these instructions for use, including domestic environments.
- The use of the device may be limited in the presence of electromagnetic disturbances. This could result in issues such as error messages or the failure of the display/device.
- Avoid using this device directly next to other devices or stacked on top of other devices, as this could lead to faulty operation. If, however, it is necessary to use the device in the manner stated, this device as well as the other devices must be monitored to ensure they are working properly.
- The use of accessories other than those specified or provided by the manufacturer of this device can lead to an increase in electromagnetic emissions or a decrease in the device's electromagnetic immunity; this can result in faulty operation.
- Failure to comply with the above can impair the performance of the device.
Initial Use
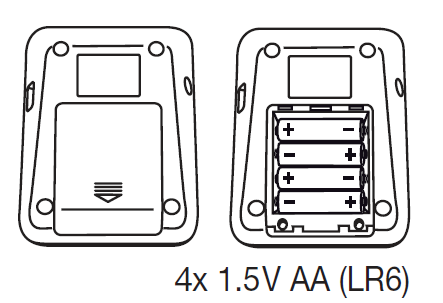
Inserting the Batteries
- Remove the battery compartment lid on the rear of the device.
- Insert four 1.5 V AA (alkaline type LR6) batteries. Make sure that the batteries are inserted the correct way round in accordance with the markings. Do not use rechargeable batteries.
- Carefully close the battery compartment lid again.
- All display elements are briefly displayed, and the setting indicator flashes on the display. Now set the date and time as described below.
If the battery replacement symbol is permanently displayed, you can no longer perform any measurements and must replace all batteries. Once the batteries have been removed from the device, the date and time must be set again. Any saved measured values are retained.
Setting the Hour Format, Date and Time
It is essential that you set the date and time. Otherwise, you will not be able to save your measured values correctly with a date and time and access them again later. There are two different ways to access the menu from which you can adjust the settings:
- Before initial use and after each time you replace the batteries: When inserting batteries into the device, you will be taken to the relevant menu automatically.
- If the batteries have already been inserted: Press and hold the SET setting button on the device for approximately 5 seconds with the device switched off.
In this menu, you can adjust the following settings in succession:

Hour Format
The hour format flashes on the display.
- Use the -/+ function buttons to select the relevant hour format and confirm using the SET setting button.
Date
The year flashes on the display.
- Using the -/+ function buttons, select the relevant year and confirm using the SET setting button.
The month flashes on the display.
- Use the -/+ function buttons to select the relevant month and confirm using the SET setting button.
The day flashes on the display.
- Use the -/+ function buttons to select the relevant day and confirm using the SET setting button.
If the hour format is set to 12h, the day/month display sequence is reversed.
Time
The hour flashes on the display.
- Using the -/+ function buttons, select the relevant hour and confirm using the SET setting button.
The minute flashes on the display.
- Using the -/+ function buttons, select the relevant minute and confirm using the SET setting button.
Operation with the Mains Part
You can also operate this device with a mains part (not included in delivery). The mains part can be obtained from specialist retailers or from the service address using order number 071.95. However, before connecting the device with the mains part, please ensure that you have removed the batteries from the device. During mains operation, there must not be any batteries in the battery compartment, as this could damage the device.
- To avoid any potential damage, the device may only be operated with a mains part that meets the specifications described in the chapter "Technical Specifications".
- Furthermore, the mains part must only be connected to the mains voltage that is specified on the type plate.
- Insert the mains part into the connection provided for this purpose on the right-hand side of the blood pressure monitor.
- Then insert the mains plug of the mains part into the mains socket.
- After using the blood pressure monitor, unplug the mains part from the mains socket first and then disconnect it from the blood pressure monitor. As soon as you unplug the mains part, the blood pressure monitor loses the date and time setting, but the saved measured values are retained.
Usage
Please ensure the unit is at room temperature before measuring. The measurement can be performed on the left or right arm. Circulation in the arm must not be restricted by tight clothing or similar.
Attaching the Cuff
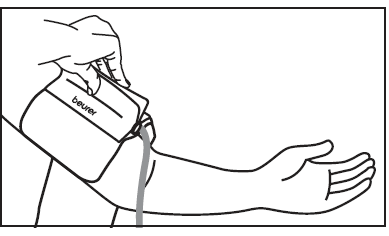
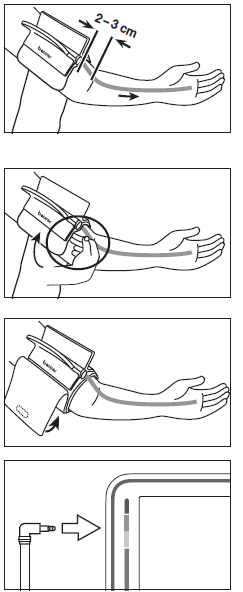
- Place the cuff onto the bare upper arm. Press the bracket together using your fingers in such a way that the area where the upper arm should be placed opens.
- The cuff must be placed on the upper arm so that the bottom edge is positioned 2–3 cm above the elbow and over the artery. The line should point to the centre of the palm.
- Close the hook-and-loop fastener. In doing so, the cuff should be fastened so that two fingers fit under the cuff.
- Now fold the protruding part down. Secure the protruding part using the additional hook-and-loop fastener on the cuff.
- Now insert the cuff line into the connection for the cuff connector.
Adopting the Correct Posture
- Before the initial blood pressure measurement, always make sure to rest for about 5 minutes! Otherwise, deviations can occur.
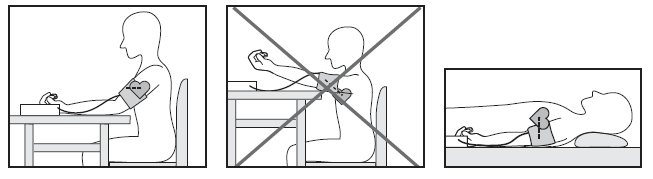
- You can measure while sitting or lying. Always make sure that the cuff is at heart level.
- To carry out a blood pressure measurement, make sure you are sitting comfortably, with your arms and back leaning on something. Do not cross your legs. Place your feet flat on the ground.
- To avoid falsifying the measurement, it is important to remain still during the measurement and not to speak.
Wait at least 1 minute before taking another measurement!
Selecting Memory
Press the SET setting button. Select the relevant user memory (1 or 2) by pressing the -/+ function buttons. You have 2 memories, each with 100 memory spaces, to enable the separate storage of measurements for 2 different people. Confirm your selection with the START/STOP button or wait for 3 seconds. Your selection is then automatically stored.
Evaluating Results
Cardiac Arrhythmia
This device can identify potential disruption of the heart rhythm when measuring and, if necessary, indicates this after the measurement with the corresponding symbol. This can be an indicator of arrhythmia. Arrhythmia is a condition in which the heart rhythm is abnormal because of flaws in the bioelectrical system that regulates the heartbeat. The symptoms (skipped or premature heartbeats, pulse being slow or too fast) can be caused by factors such as heart disease, age, physical makeup, excess stimulants, stress or lack of sleep. Arrhythmia can only be determined through an examination by your doctor. If the symbol is shown on the display after the measurement has been taken, repeat the measurement. Please ensure that you rest for 5 minutes beforehand and do not speak or move during the measurement. If the symbol appears frequently, please consult your doctor. Self-diagnosis and treatment based on the measurements can be dangerous. Always follow your doctor's instructions.
Risk Indicator
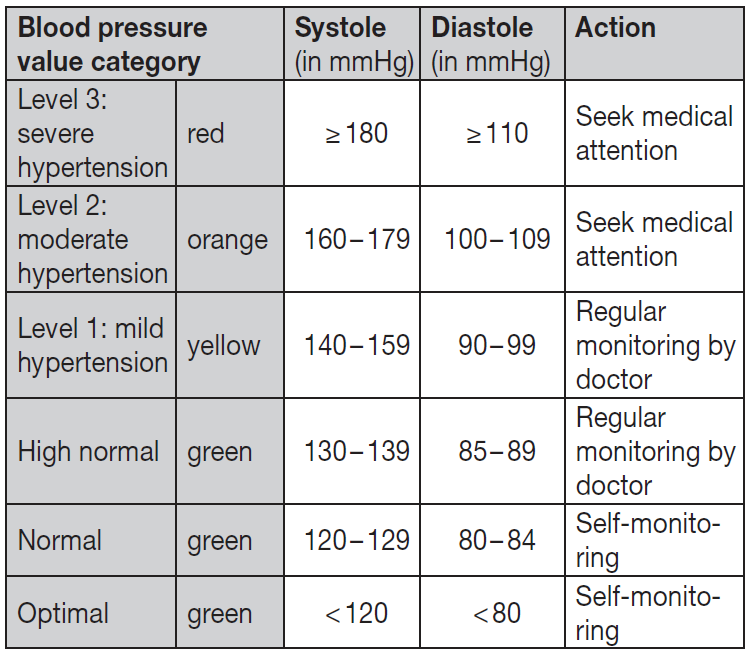
The measurements can be classified and evaluated in accordance with the relevant blood pressure classification table. However, these standard values serve only as a general guideline, as individual blood pressure varies in different people and different age groups, etc. It is important to consult your doctor regularly for advice. Your doctor will tell you your individual values for normal blood pressure as well as the value above which your blood pressure is classified as dangerous. The bar chart on the display and the scale on the device show which category the recorded blood pressure values fall into. If the values of systole and diastole fall into two different categories (e.g. systole in the High Normal category and diastole in the Normal category), the graphical classification on the device always shows the higher category. For the example given, this would be High Normal.
Cleaning and Maintenance
- Clean the device and cuff carefully using only a slightly damp cloth.
- Do not use any cleaning agents or solvents.
- Under no circumstances hold the device and cuff under water, as this can cause liquid to enter and damage the device and cuff.
- If you store the device and cuff, do not place heavy objects on the device and cuff. Remove the batteries. The cuff line should not be bent sharply.
Troubleshooting Guide for Beurer Blood Pressure Monitor BM 51 easyClip
Encounter issues with your **Beurer Blood Pressure Monitor BM 51 easyClip**? This section covers common problems, error fixes, and prevention tips for seamless operation.
- No Display/Power Issues: Check batteries (replace with fresh AA batteries); ensure the device is off before inserting. Clean contacts if corroded.
- Inaccurate Readings: Verify cuff position (2-3 cm above elbow, snug fit); rest arm at heart level. Avoid caffeine/exercise 30 mins prior.
- Error Codes (e.g., E1): E1 indicates motion—stay still; E2/E3 for irregular heartbeat or overpressure—reposition cuff and retry. Consult the manual for specifics.
- Cuff Not Inflating: Ensure easyClip is correctly clipped; check for blockages. Inflation technology requires unobstructed airflow.
- Preventive Measures: Store in a cool, dry place; calibrate annually; use on bare arm. Track readings in a log for trends.
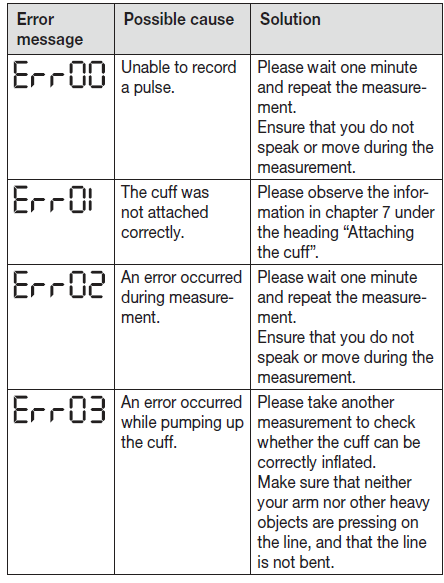
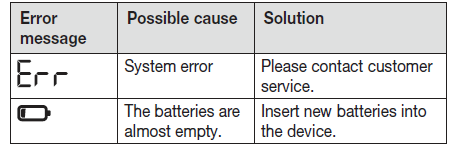
Beurer offers a typical 3-5 year warranty. For support, contact Beurer GmbH at Söflinger Straße 218, 89077 Ulm, Germany, or visit beurer.com for local service centers. Phone support is available via regional hotlines listed on packaging.
Pros and Cons of the Beurer Blood Pressure Monitor BM 51 easyClip
Pros
- Effortless one-handed easyClip cuff application—perfect for solo use.
- Comfortable inflation measurement reduces arm strain compared to deflation models.
- Large display and average calculation aid easy tracking; adequate per consumer tests.
- Affordable at €40-€70, delivering strong value over pricier validated alternatives like Omron models.
- Reliable for home use in multiple countries; compact and portable.
Cons
- Lacks peer-reviewed clinical validation; not recommended by Medaval for accuracy assurance.
- Limited to single measurements—no app connectivity or memory storage noted.
- Cuff size (22-42 cm) may not fit very large arms; basic features vs. premium competitors.
- Potential error sensitivity to movement, requiring user stillness.
Overall, it excels in usability and affordability, ideal for casual users but less for medical precision needs.
Customer Reviews and Feedback on Beurer Blood Pressure Monitor BM 51 easyClip
Users praise the **Beurer Blood Pressure Monitor BM 51 easyClip** for its simplicity, with average ratings around 4.2/5 stars across retailers. "The clip cuff is a game-changer—no more struggling alone!" notes a LloydsPharmacy reviewer, highlighting ease for elderly users.
Common praises include quick measurements and clear display (e.g., "Comfortable and accurate for daily checks" – 5 stars). Complaints focus on occasional errors from movement and lack of validation: "Good for home, but consult doctor for serious issues" (3 stars).
Stiftung Warentest deems it adequate, aligning with feedback recommending it for beginners. Frequently mentioned: Reliable value, though some prefer validated brands. Highly recommended for budget home monitoring.
Faqs
How do I set up the beurer Blood Pressure Monitor BM 51 easyClip for the first time?
What should I do if the beurer Blood Pressure Monitor BM 51 easyClip shows an incorrect usage message?
How does the inflation technology work on the beurer Blood Pressure Monitor BM 51 easyClip?
Is the beurer Blood Pressure Monitor BM 51 easyClip suitable for children or small arms?
How do I switch users and view averages on the beurer Blood Pressure Monitor BM 51 easyClip?
How do I maintain and clean the beurer Blood Pressure Monitor BM 51 easyClip properly?
Why is my beurer Blood Pressure Monitor BM 51 easyClip not turning on or displaying results?
What does the risk indicator mean on the beurer Blood Pressure Monitor BM 51 easyClip?
More beurer manuals
- Setup: Beurer Upper Arm Blood Pressure Monitor BM-23 User Manual
- Setup: Beurer Wrist Blood Pressure Monitor BC-51 User Manual
- Setup: Beurer Upper Arm Blood Pressure Monitor BM-54 User Manual
- Setup: Beurer Blood Pressure Monitor BM 26 User Manual
- Setup: Beurer Blood Pressure Monitor BC-27 User Manual
- Setup: Beurer Upper Arm Blood Pressure Monitor BM-81 EasyLock User Manual
Leave a Comment