
Setup: Beurer Wrist Blood Pressure Monitor BC-51 User Manual
Content
Introduction — beurer Wrist Blood Pressure Monitor BC 51 overview
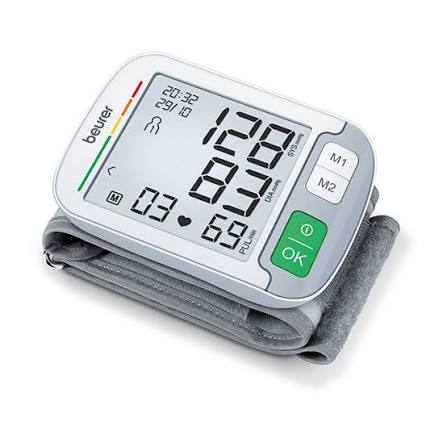
The beurer Wrist Blood Pressure Monitor BC 51 is a compact, extra‑slim wrist sphygmomanometer designed for fast, fully automatic blood pressure and pulse measurement with a large XL display and a position indicator to improve measurement accuracy. The device targets home users who need a portable, easy‑to‑use monitor for daily tracking, travellers who want a lightweight option, and caregivers managing two patients at home; it is also suitable for people who want digital record‑keeping via manual entry or the beurer HealthManager Pro ecosystem (Scan & Save feature). The BC 51 includes arrhythmia detection and a coloured risk indicator to classify readings quickly, plus memory for two users (120 measurements each) and calculation of 7‑day averages, making it useful for routine monitoring and sharing data with clinicians when needed.
Key benefits include inflation measurement technology (measurement during inflation for faster, more comfortable readings), a position indicator that helps align the wrist at heart level, an extra‑flat, travel‑friendly form factor, and a clear XL screen for easy reading. Typical retail price ranges vary by market and retailer but are commonly found in the mid‑range category for consumer blood pressure monitors (roughly comparable to other mid‑tier wrist monitors); many vendors list the BC 51 with a multi‑year warranty (Beurer: 5 years) and it’s widely available from official Beurer channels and major retailers in EMEA and online marketplaces.
Specifications — technical details & key features of beurer Wrist Blood Pressure Monitor BC 51
- Measurement type: Fully automatic wrist blood pressure and pulse measurement using inflation technology (measurement during inflation).
- Cuff/wrist circumference: 12.5–21.0 cm (suitable for most adult wrists).
- Display: Extra‑large (XL) flat display for easy reading; date and time shown.
- Memory: 2 users × 120 measurement slots each (total 240).
- Analysis features: Arrhythmia detection and coloured risk indicator to classify results according to standard risk categories.
- Averages: Average of all stored measurements and average of morning/evening readings for the last 7 days.
- Power: 2 × 1.5 V AAA batteries; low battery indicator.
- Dimensions & weight: Approx. 95 × 70 × 80 mm; ≈105 g device weight (packaged weight ≈0.31 kg.
- Accessories: Protective storage box and a blood pressure record booklet included.
- Regulatory: Classified and sold as a medical device by Beurer; 5‑year warranty in many regions.
- Connectivity: No built‑in Bluetooth or continuous connect feature on BC 51 (data can be recorded via Scan & Save for the beurer HealthManager Pro app workflow where supported).
Comparison with similar products: Compared with cuff‑upper‑arm monitors, wrist monitors like the beurer BC 51 are more portable and convenient but can be more sensitive to positioning; the BC 51 mitigates this with a position indicator and XL display, while matching competitors in memory capacity and arrhythmia detection found in mid‑range consumer wrist monitors.
Device Description
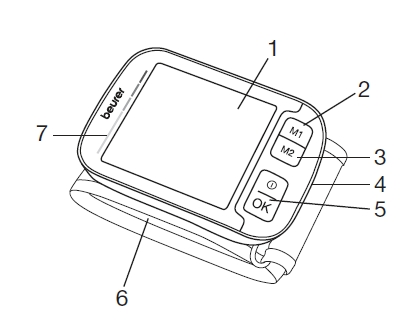
Blood Pressure Monitor and Cuff:
- Display
- Memory Button M1
- Memory Button M2
- Battery Compartment Lid
- START/STOP Button with Integrated Positioning Indicator
- Wrist Cuff
- Risk Indicator
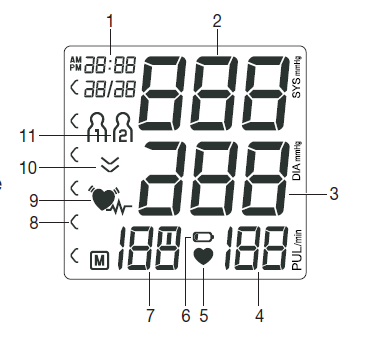
Display:
- Time and Date
- Systolic Pressure
- Diastolic Pressure
- Calculated Pulse Rate
- Pulse Symbol
- Battery Indicator
- Memory Space Number/Memory Display for Average Value, Morning, Evening
- Risk Indicator
- Cardiac Arrhythmia Symbol
- Release Air
User Memory
Proper Use
Intended Use
The blood pressure monitor is intended for the fully automatic, non-invasive measurement of arterial blood pressure and pulse values on the wrist.
Target Group
It is designed for self-measurement by adults in the home environment and is suitable for users whose wrist circumference is within the range printed on the cuff.
Indication/Clinical Benefits
The user can record their blood pressure and pulse values quickly and easily using the device. The recorded values are classified according to internationally applicable guidelines and evaluated graphically. Furthermore, the device can detect any irregular heartbeats that occur during measurement and inform the user via a symbol on the display. The device saves the recorded measurements and can also output average values of previous measurements. The recorded data can provide healthcare service providers with support during the diagnosis and treatment of blood pressure problems, and therefore plays a part in the long-term monitoring of the user’s health.
Warnings and Safety Notes
Contraindications
- Do not use the blood pressure monitor on newborns, children or pets.
- People with restricted physical, sensory or mental skills should be supervised by a person responsible for their safety and receive instructions from this person on how to use the device.
- If you have any of the following conditions, you must consult your doctor before using the device: cardiac arrhythmia, circulatory problems, diabetes, pregnancy, pre-eclampsia, hypotension, chills, shaking.
- People with pacemakers or other electrical implants should consult their doctor before using the device.
- The blood pressure monitor must not be used in connection with a high-frequency surgical unit.
- Do not use the cuff on people who have undergone a mastectomy.
- Do not place the cuff over wounds as this may cause further injury.
- Make sure that the cuff is not placed on an arm in which the arteries or veins are undergoing medical treatment, e.g. intravascular access or intravascular therapy, or an arteriovenous (AV) shunt.
General Warnings
- The measurements taken by you are for your information only – they are no substitute for a medical examination! Discuss the measured values with your doctor and never make your own medical decisions based on them (e.g. regarding dosages of medicines).
- The device is only intended for the purpose described in these instructions for use. The manufacturer is not liable for damage resulting from improper or incorrect use.
- Using the blood pressure monitor outside your home environment or whilst on the move (e.g. whilst travelling in a car, ambulance or helicopter, or whilst undertaking physical activity such as playing sport) can influence the measurement accuracy and cause incorrect measurements.
- Cardiovascular diseases may lead to incorrect measurements or have a detrimental effect on measurement accuracy.
- Do not use the device at the same time as other medical electrical devices (ME equipment). This could lead to a malfunction of the measuring device and/or an inaccurate measurement.
- Do not use the device outside of the specified storage and operating conditions. This could lead to incorrect measurements.
General Precautions
- The blood pressure monitor is made from precision and electronic components. The accuracy of the measurements and service life of the device depend on its careful handling.
- Protect the device from impacts, moisture, dirt, marked temperature fluctuations and direct sunlight.
- Ensure the device is at room temperature before measuring. If the measuring device has been stored close to the maximum or minimum storage and transport temperatures and is placed in an environment with a temperature of 20°C, it is recommended that you wait approx. 2 hours before using the measuring device.
- Do not drop the device.
Measures for Handling Batteries
- If your skin or eyes come into contact with battery fluid, rinse the affected areas with water and seek medical assistance.
- Choking hazard! Small children may swallow and choke on batteries. Therefore, store batteries out of the reach of small children.
- Risk of explosion! Do not throw batteries into a fire.
- If a battery has leaked, put on protective gloves and clean the battery compartment with a dry cloth.
- Do not disassemble, open or crush the batteries.
- Observe the plus (+) and minus (-) polarity signs.
- Protect batteries from excessive heat.
- Do not charge or short-circuit batteries.
- If the device is not to be used for a long period of time, remove the batteries from the battery compartment.
- Use identical or equivalent battery types only.
- Always replace all batteries at the same time.
- Do not use rechargeable batteries.
Notes on Electromagnetic Compatibility
- The device is suitable for use in all environments listed in these instructions for use, including domestic environments.
- The use of the device may be limited in the presence of electromagnetic disturbances. This could result in issues such as error messages or the failure of the display/device.
- Avoid using this device directly next to other devices or stacked on top of other devices, as this could lead to faulty operation. If, however, it is necessary to use the device in the manner stated, this device as well as the other devices must be monitored to ensure they are working properly.
- The use of accessories other than those specified or provided by the manufacturer of this device can lead to an increase in electromagnetic emissions or a decrease in the device’s electromagnetic immunity; this can result in faulty operation.
Initial Use
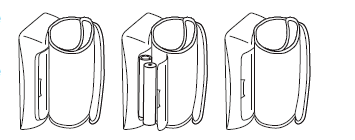
Inserting the Batteries
- Remove the battery compartment lid on the right side of the device.
- Insert two 1.5 V AAA micro (alkaline type LR03) batteries. Make sure that the batteries are inserted the correct way round in accordance with the markings. Do not use rechargeable batteries.
- Close the battery compartment lid again carefully.
- All display elements are briefly displayed, and the setting indicator flashes on the display. Now make the settings as described below.
If the battery replacement symbol flashes, you can no longer perform any measurements and must replace all batteries. Once the batteries have been removed from the device, the date and time must be set again. Any saved measured values are retained.
Making Settings
You must make sure that the device has the correct settings before use in order to be able to make full use of all functions. Only by doing so can your measurements with associated date and time be saved and accessed later by you.
There are two different ways to access the menu from which you can adjust the settings:
- Before initial use and after each time you replace the battery: When inserting batteries into the device, you will be taken to the relevant menu automatically.
- If the batteries have already been inserted: With the device switched off, press and hold the START/STOP button for approx. 5 seconds.
In this menu, you can adjust the following settings in succession:

Hour Format
The hour format flashes on the display.
- Select the desired hour format using the M1 or M2 memory button and confirm with the START/STOP button.
Date
The year flashes on the display.
- Select the desired year using the memory button M1 or M2 and confirm with the START/STOP button.
The month flashes on the display.
- Select the desired month using the memory button M1 or M2 and confirm with the START/STOP button.
The day flashes on the display.
- Select the desired day using the memory button M1 or M2 and confirm with the START/STOP button.
If the hour format is set to 12-hour format, the day/month display sequence is reversed.
Time
The hours flash on the display.
- Select the desired hour using the memory button M1 or M2 and confirm with the START/STOP button.
The minutes flash on the display.
- Select the desired minute using the memory button M1 or M2 and confirm with the START/STOP button.
The device then switches itself off automatically.
Usage
General Rules When Measuring Blood Pressure Yourself
- In order to generate as informative a profile of the progression of your blood pressure as possible and ensure that the measured values can be compared, you should measure your blood pressure regularly and always at the same times of day. It is recommended that you measure your blood pressure twice a day: once in the morning after getting up and once in the evening.
- You should always carry out the measurement when you are sufficiently physically rested. You should therefore avoid taking measurements during stressful periods.
- Do not measure within 30 minutes of eating, drinking, smoking or exercising.
- Before the initial blood pressure measurement, make sure always to rest for about 5 minutes.
- Furthermore, if you want to take several measurements in succession, make sure always to wait for at least 1 minute between the individual measurements.
- Repeat the measurement if you are unsure of the measured value.
Attaching the Cuff
- Fundamentally, blood pressure can be measured on both arms. Certain deviations between the measured blood pressure on the right arm and left arm are due to physiological causes and completely normal. You should always measure the arm with the highest blood pressure values. Before starting self-measurement, consult your doctor in this regard. From this point on, always take measurements on the same arm.
- The device may only be operated with the cuff attached when supplied. Before using the device, the user should check the fit of the cuff and, in doing so, ensure that their wrist circumference is within the range printed on the cuff.
- Uncover your wrist. Ensure that the circulation of the arm is not hindered by tight clothing or similar.
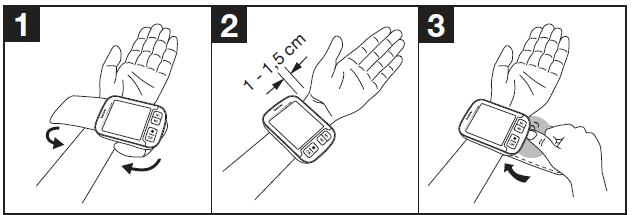
- Now place the cuff on the wrist so that the palm of your hand and the device display are facing upwards.
- Position the cuff so that there is a distance of 1.0–1.5 cm between it and the heel of your hand.
Now fasten the cuff tightly around your wrist using the hook-and-loop fastener. Make sure that it is tight but that it does not cut into your wrist.
Adopting the Correct Posture
- To carry out a blood pressure measurement, make sure you are sitting upright and comfortably. Lean back and place your arm on a surface. Do not cross your legs. Place your feet next to each other flat on the floor.
- Always make sure that the device is at heart level during the measurement. Otherwise, significant measurement deviations can occur due to physiological causes. To do so, place your elbow on a table to support your arm. In order to make the measurement even more comfortable for you, you can place your lower arm on a suitable object (e.g. the storage box).
- Relax your arm and the palm of your hand.
To avoid distorting the measurement, you should remain as still as possible during the measurement and not speak.

Positioning Indicator
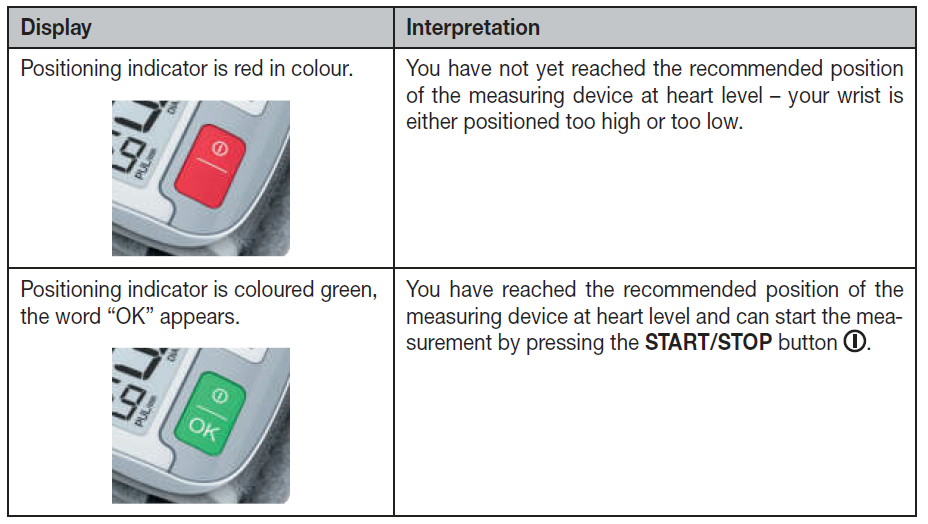
As an additional application aid, the device has a positioning indicator built into the START/STOP button. This is intended to help you determine the correct measuring position of the instrument at heart level and depends on the angle of observation. If the positioning indicator does not match the level of the heart, use your own judgement. You can also start the measurement in these cases at any time by pressing the START/STOP button.
Selecting the User
This device has 2 user memories with 120 memory spaces each so you can save measurements from 2 different people separately from each other. If multiple people are using the device, make sure that the relevant user is set before each measurement. To select the relevant user memory, press the memory button M1 (for user 1) or M2 (for user 2) when the device is switched off. Then confirm your selection by pressing the START/STOP button.
Performing the Blood Pressure Measurement
- Press the START/STOP button to start the blood pressure monitor. All display elements are briefly displayed.
- The blood pressure monitor will begin the measurement automatically after approx. 3 seconds.
- The cuff inflates automatically while the actual measuring process starts. As soon as a pulse is found, the pulse symbol is displayed.
You can cancel the measurement at any time by pressing the START/STOP button.
- The remaining air is released quickly once the measurement is complete.
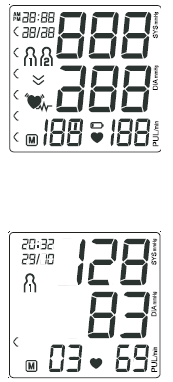
- Systolic pressure, diastolic pressure and pulse measurements are displayed.
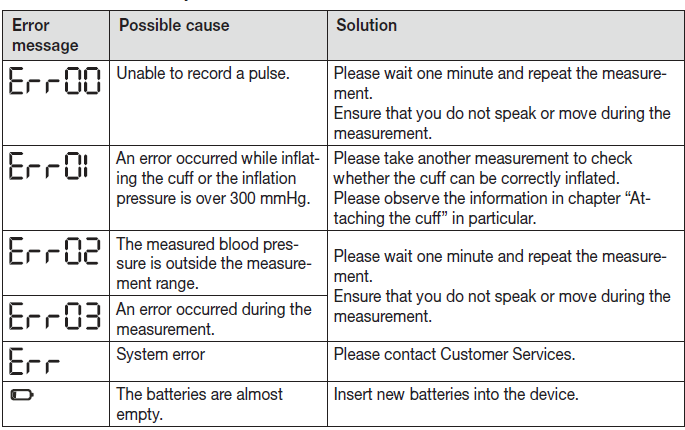
An error symbol appears if the measurement could not be performed properly. In this case, please read the section "What if there are problems?".
Press the START/STOP button to switch off the blood pressure monitor. The measurement is then stored in the selected user memory.
Evaluating the Results
General Information About Blood Pressure
- Blood pressure is the force with which the bloodstream presses against the arterial walls. Arterial blood pressure constantly changes in the course of a cardiac cycle.
- Blood pressure is always stated in the form of two values:
- The highest pressure in the cycle is called systolic blood pressure. This arises when the heart muscle contracts and blood is pumped into the blood vessels.
- The lowest is diastolic blood pressure, which is when the heart muscle has completely stretched back out, and the heart fills with blood.
- Fluctuations in blood pressure are normal. Even during repeat measurements, considerable differences between the measured values may occur. One-off or irregular measurements therefore do not provide reliable information about the actual blood pressure. Reliable assessment is only possible when you perform the measurement regularly under comparable conditions.
Risk Indicator
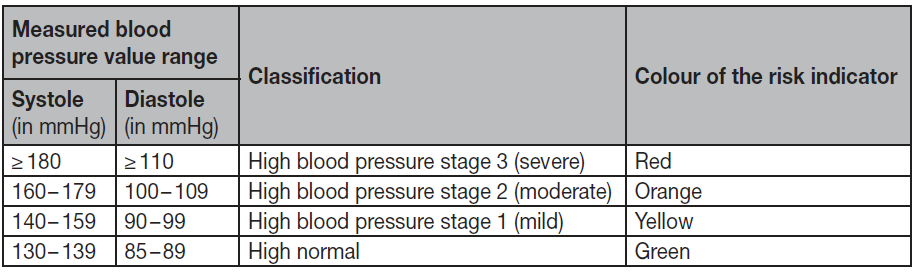
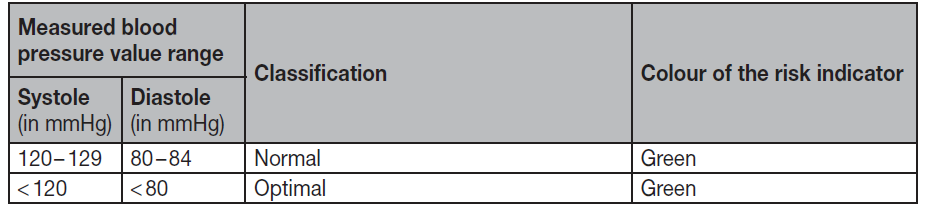
The World Health Organization (WHO) has defined the internationally recognised classification for the evaluation of measured blood pressure values listed in the table below: The risk indicator (the arrow in the display and the associated scale on the device) shows which category the recorded blood pressure values fall into. If the measured values are in two different classifications (e.g. systole in the high normal category and diastole in the normal category), the risk indicator then always shows you the higher category – "high normal" in the example described.
Please be aware that these standard values can only serve as a general guideline, as the individual blood pressure varies in different people and different age groups, etc. Furthermore, it must be noted that measurements taken yourself while at home are generally lower than those that are taken by the doctor. For this reason, you must regularly consult your doctor for advice. Only they can give you your personal target values for controlled blood pressure – in particular if you receive medicinal therapy.
Cardiac Arrhythmia
This device can identify any cardiac rhythm disturbances as part of the analysis of your recorded pulse signal during blood pressure measurement. In this case, after the measurement, the device will indicate any irregularities in your pulse by displaying the symbol on the display. This can be an indicator for arrhythmia. Arrhythmia is an illness in which the heart rhythm is abnormal because of flaws in the bioelectrical system that regulates the heartbeat. The symptoms (skipped or premature heartbeats, pulse being slow or too fast) can be caused by factors such as heart disease, age, physical disposition, excess alcohol and tobacco, stress or lack of sleep. If the symbol appears on the display after the measurement, the measurement must be repeated as the measurement accuracy may be impaired. To assess your blood pressure, only use the results that have been recorded without corresponding irregularities in your pulse. If the symbol appears frequently, please consult your doctor. Only they can establish the existence of an arrhythmia during a checkup, using their means of diagnosis.
Cleaning and Care
- Clean the device and cuff carefully using a slightly damp cloth only.
- Do not use any cleaning agents or solvents.
- Under no circumstances hold the device and cuff under water, as this can cause liquid to enter and damage the device and cuff.
Troubleshooting — common problems, error codes, and fixes for BC 51
- No power/display blank: Replace the two AAA batteries and ensure correct polarity; low battery indicator may appear before full shutdown.
- Err or error messages / incorrect usage: Reposition the cuff at heart level using the position indicator; sit quietly with back supported and feet flat; ensure the cuff fits 12.5–21 cm wrist circumference—restart measurement.
- Unstable or unusually high/low readings: Repeat measurement after 5 minutes, avoid talking/moving, do not measure over clothing, and confirm cuff at heart level; compare with an upper‑arm monitor or consult a clinician if discrepancies persist.
- Arrhythmia symbol appears: The device detects irregular heartbeat patterns and flags them; note and consult a healthcare professional for follow‑up—BC 51’s arrhythmia detection is a screening aid, not a diagnostic tool.
- Memory not recording: Verify user slot selection (user 1 or 2) and that memory is not full; delete old entries per manual and retry.
- Preventive measures: Calibrate user technique (use position indicator), replace batteries annually or when low, store in protective case, and keep device clean and dry
- Warranty & support: Beurer generally provides a 5‑year warranty—refer to the included manual and Beurer regional support pages for warranty terms and service.
Contact for help: Use official Beurer support channels listed in the manual or regional Beurer websites and retailer support where purchased.
Pros & Cons — balanced assessment of beurer Wrist Blood Pressure Monitor BC 51
- Pros — Portability & ease of use: Extra‑slim, lightweight design and XL display make the BC 51 convenient for travel and seniors who need clear readings.
- Pros — Comfortable & fast measurement: Inflation technology measures during inflation for faster, more comfortable readings versus some traditional deflation‑only devices.
- Pros — Useful features: Arrhythmia detection, 2 × 120 memory slots, risk indicator, and 7‑day averaging provide actionable home monitoring features common in mid‑range monitors.
- Cons — Wrist monitor limitations: Wrist devices are position‑sensitive; accuracy depends on correct positioning at heart level, making them less forgiving than validated upper‑arm monitors in some clinical settings.
- Cons — Limited connectivity: No native Bluetooth data sync on the BC 51 model (dependent on Scan & Save workflows where available), so automated cloud tracking is limited compared with some smart monitors.
- Value for money: For users seeking a portable, feature‑rich wrist monitor with good memory and arrhythmia screening, the BC 51 offers solid value, especially with Beurer’s multi‑year warranty; users prioritizing maximal clinical accuracy should compare with validated upper‑arm models.
Customer reviews & real‑world feedback — what users say about beurer Wrist Blood Pressure Monitor BC 51
Users commonly praise the BC 51 for its slim design, large readable display, and straightforward operation—many reviews highlight ease of use when travelling or for daily home monitoring. Typical positive comments note quick measurements, comfortable cuff fit for wrists 12.5–21 cm, and helpful visual risk classification.
Common complaints include sensitivity to wrist positioning (readings can vary if the wrist is not held at heart level), and a desire for built‑in Bluetooth or automatic syncing to smartphone apps on the device itself (some users prefer integrated connectivity rather than Scan & Save workflows.
Representative rating summary from multiple retailer listings: most users give the BC 51 4 out of 5 stars for convenience and feature set, with purchase recommendations for travellers and everyday home users who accept the typical limitations of wrist monitors.
Faqs
How do I set up the beurer Wrist Blood Pressure Monitor BC 51 for the first time?
What should I do if my beurer Wrist Blood Pressure Monitor BC 51 shows incorrect readings?
How does the position indicator work on the beurer Wrist Blood Pressure Monitor BC 51?
Is the beurer Wrist Blood Pressure Monitor BC 51 compatible with smartphone apps?
What wrist sizes fit the beurer Wrist Blood Pressure Monitor BC 51 cuff?
How do I optimize blood pressure measurements with beurer Wrist Blood Pressure Monitor BC 51?
How do I maintain and clean the beurer Wrist Blood Pressure Monitor BC 51?
What does the arrhythmia detection mean on beurer Wrist Blood Pressure Monitor BC 51?
More beurer manuals
- Setup: Beurer Blood Pressure Monitor BM-51 easyClip User Manual
- Setup: Beurer Blood Pressure Monitor BM 26 User Manual
- Setup: Beurer Upper Arm Blood Pressure Monitor BM-23 User Manual
- Setup: Beurer Upper Arm Blood Pressure Monitor BM-81 EasyLock User Manual
- Setup: Beurer Upper Arm Blood Pressure Monitor BM-54 User Manual
- Setup: Beurer Upper Arm Blood Pressure Monitor BM 27+ User Manual
Leave a Comment