
Setup: Beurer Upper Arm Blood Pressure Monitor BM 28 User Manual
Content
Beurer Upper Arm Blood Pressure Monitor BM 28: Comprehensive Product Manual
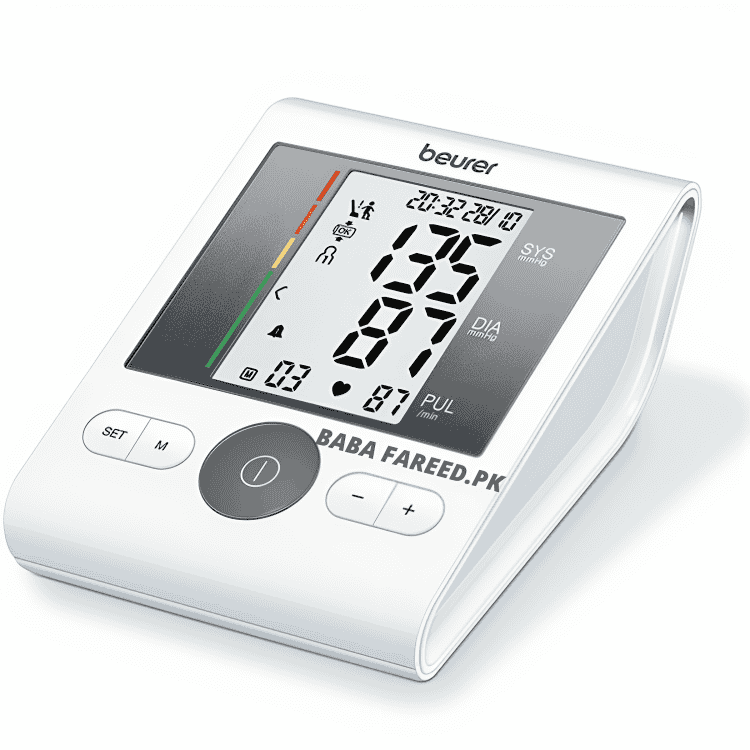
Introduction to Beurer Upper Arm Blood Pressure Monitor BM 28
The **Beurer Upper Arm Blood Pressure Monitor BM 28** is a clinically validated medical device designed for precise, fully automatic blood pressure and pulse measurements on the upper arm. Featuring a patented resting indicator, this advanced home blood pressure monitor ensures haemodynamic stability for reliable results, making it ideal for accurate tracking of arterial blood pressure and heart rate. Its universal cuff fits upper arm circumferences from 22-42 cm, accommodating a wide range of users including those with larger arms, and includes a cuff fit check for correct positioning every time.
Key benefits include arrhythmia detection to warn of possible heart rhythm disturbances, a risk indicator with a colored scale for easy classification of measurements, and support for four users with 30 memories each—perfect for families or multi-user households. The **Beurer BM 28** offers average values for all readings, plus morning and evening averages over the last 7 days, date/time stamps, and two customizable alarm times. Bluetooth connectivity allows seamless data transfer to the beurer HealthManager Pro app for iOS and Android, enabling digital logging and sharing with doctors. Clinically validated even for pregnancy use, it boasts a clear LCD, automatic power-off, low battery indicator, and incorrect usage alerts.
Targeted at seniors, hypertensive patients, pregnant women, and health-conscious individuals, the **Beurer Upper Arm Blood Pressure Monitor BM 28** excels in daily monitoring for hypertension management, preventive health checks, and telemedicine. Priced typically between $50-$80 USD depending on retailers, it's widely available online and in pharmacies. Compact at 134 x 103 x 60 mm and weighing just 367g, it includes batteries, a storage bag, and a blood pressure diary for effortless home use.
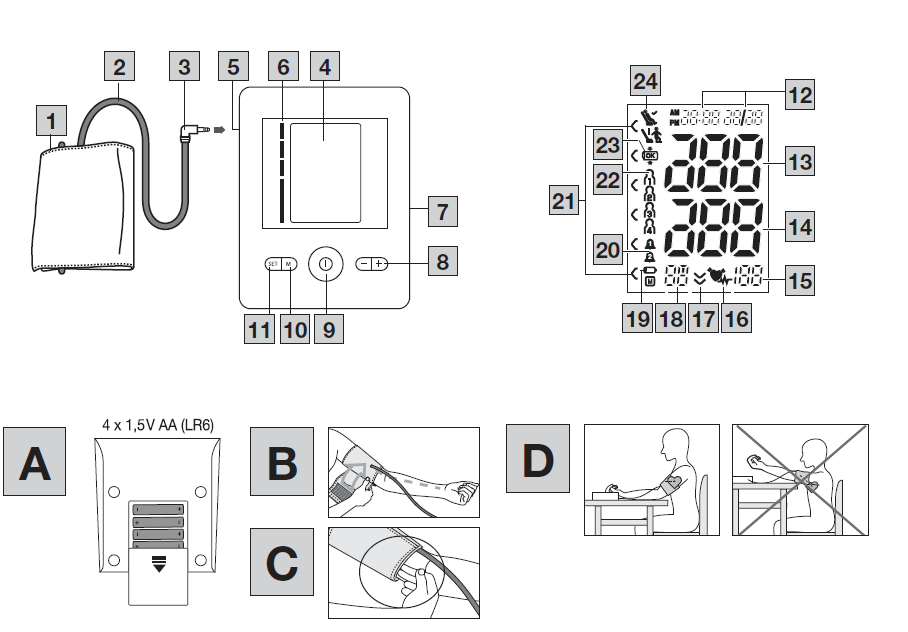
Device Description
- Cuff
- Cuff line
- Cuff connector
- Display
- Connection for cuff connector
- Risk indicator
- Connection for mains part
- Function buttons -/+
- START/STOP button
- M memory button
- SET button
Information on the Display:
- Time and date
- Systolic pressure
- Diastolic pressure
- Calculated pulse rate
- Cardiac arrhythmia symbol / Pulse symbol
- Release air
- Memory display:
- Average value
- Morning average
- Evening average
- Memory space number
- Battery replacement symbol
- Alarm function
- Risk indicator
- User memory
- Cuff position control
Resting indicator display
Technical Specifications: Beurer BM 28
- Type: BM 28
- Measurement Method: Oscillometric, non-invasive blood pressure measurement on the upper arm.
- Measurement Range:
- Cuff pressure: 0–300 mmHg
- Systolic pressure: 50–280 mmHg
- Diastolic pressure: 30–200 mmHg
- Pulse: 40–199 beats/minute
- Display Accuracy:
- Systolic: ±3 mmHg
- Diastolic: ±3 mmHg
- Pulse: ±5% of the displayed value
- Measurement Uncertainty: Maximum permissible standard deviation according to clinical testing:
- Systolic: 8 mmHg
- Diastolic: 8 mmHg
- Memory: 4 × 30 memory spaces
- Dimensions:
- Length: 134 mm
- Width: 103 mm
- Height: 60 mm
- Weight: Approximately 367 g (without batteries, with cuff)
- Cuff Size: 22–42 cm
- Permissible Operating Conditions:
- Temperature: +10°C to +40°C
- Relative humidity: Less than 90%
- Ambient pressure: 800–1050 hPa
- Permissible Storage Conditions:
- Temperature: -20°C to +55°C
- Relative humidity: Less than 90% (non-condensing)
- Power Supply: 4 × 1.5 V AA batteries
- Battery Life: Approximately 300 measurements, depending on blood pressure levels and pump pressure.
- Classification:
- Internal power supply
- IP21 protection rating
- No AP or APG
- Continuous operation
- Type BF applied part
- Expected Product Life Cycle: Information on the product's life cycle can be found at beurer.com.
USAGE
Initial Use
Inserting the Batteries
- Remove the battery compartment cover on the back of the device (A).
- Insert four 1.5-V AA (alkaline type LR6) batteries. Make sure the polarity is correct according to the label (A).
- Close the battery compartment cover.
If the battery replacement symbol is displayed and does not disappear, measurement is no longer possible. Replace all the batteries. Once the batteries have been removed from the device, the date and time must be set again. Any saved measured values are retained.
Operation with the Mains Part
You can also operate this device with a mains part (not included in delivery). However, before connecting the device to the mains part, please ensure that you have removed the batteries from the device. During mains operation, there must not be any batteries in the battery compartment, as this could damage the device.
- To avoid any potential damage, the device may only be operated with a mains part that meets the specifications described in the chapter "Technical Specifications".
- Furthermore, the mains part must only be connected to the mains voltage specified on the type plate.
- Insert the mains part into the connection provided for this purpose on the right-hand side of the blood pressure monitor.
- Then insert the mains plug of the mains part into the mains socket.
- After using the blood pressure monitor, unplug the mains part from the mains socket first and then disconnect it from the blood pressure monitor. As soon as you unplug the mains part, the blood pressure monitor loses the date and time setting, but the saved measured values are retained.
Adjusting the Settings
Make sure that the device's settings have been set correctly so you can make full use of all its functions. Otherwise, you will not be able to save your measured values with the date and time and access them later.
There are two different ways to access the settings menu:
- Before initial use and after each time you replace the batteries: When inserting batteries into the device, you will be taken to the relevant menu automatically.
- If the batteries have already been inserted: With the device switched off, press and hold the SET button for approximately 5 seconds.
Setting the Date and Time
To set the date and time, proceed as follows:
- Select 12h or 24h mode using the function buttons -/+. Press SET to confirm. The year display will start to flash. Set the year with the function buttons -/+ and confirm with SET.
- Set the month, day, hour, and minute, and confirm each with the SET button.
- The blood pressure monitor switches itself off automatically.
Alarm
Setting the Alarm
You can set 2 different alarm times to remind yourself to take the measurement. To set the alarm, proceed as follows:
- Press and hold the function buttons - and + simultaneously for 5 seconds.
- Alarm 1 is shown on the display; "on" or "off" flashes at the same time. With the function buttons -/+, choose whether alarm 1 should be activated ("on" flashes) or deactivated ("off" flashes), and confirm with the SET button.
- If alarm 1 is deactivated ("off"), you automatically switch to setting alarm 2.
- If alarm 1 is activated, the hours flash on the display. Select the desired hour using the function buttons -/+ and confirm with SET. The minutes flash on the display. Select the desired minute using the function buttons -/+ and confirm with SET.
- Alarm 2 is shown on the display; "on" or "off" flashes at the same time. To set it, proceed as for alarm 1. The blood pressure monitor switches itself off automatically.
Before the Blood Pressure Measurement
General Rules When Measuring Your Own Blood Pressure
- In order to generate an informative profile of changes in your blood pressure that can be used for comparisons, you should measure your blood pressure regularly and always at the same time of day. Measure your blood pressure twice a day: once in the morning after getting up and once in the evening.
- Always perform the measurement when you are sufficiently physically rested. Avoid taking measurements at stressful times.
- Do not measure within 30 minutes of eating, drinking, smoking or exercising.
- Before the initial blood pressure measurement, make sure always to rest for about 5 minutes.
- If you want to take several measurements in succession, always make sure that you leave at least 1 minute between each measurement.
- Repeat the measurement if you have doubts about the measured value.
Attaching the Cuff
You can measure your blood pressure on either arm. Some deviations between the values in the right and left arm are perfectly normal. Always measure the arm with the higher blood pressure values. Consult your doctor about this before starting self-measurement.
- Always measure your blood pressure on the same arm.
- Only use the device with the cuff supplied, based on your upper arm circumference.
- Before taking the measurement, check the fit using the index mark described below.
- Expose your upper arm. The circulation of the arm must not be hindered by tight clothing or similar.
- The cuff must be placed on the upper arm so that the bottom edge is positioned 2–3 cm above the elbow and over the artery. The line should point to the centre of the palm here (B). The cuff should be fastened so that two fingers fit under the cuff when it is closed (C).
- Now insert the cuff line into the connection for the cuff connector.
- The cuff is suitable for you if the index mark is within the OK range after fitting the cuff.
Adopting the Correct Posture
Sit in a comfortable upright position when taking the blood pressure measurement. Lean back so that your back is supported.
Irregular Heartbeat Detection
If the irregular heartbeat symbol is displayed during measurement, this indicates that an irregularity has been detected in your pulse. Repeat the measurement if the irregular heartbeat symbol is displayed. When assessing your blood pressure, only use the results that have been recorded without any irregularities in your pulse. Consult your doctor if the irregular heartbeat symbol is displayed frequently. Only they can determine, through an examination, whether there is an abnormality.
Risk Indicator
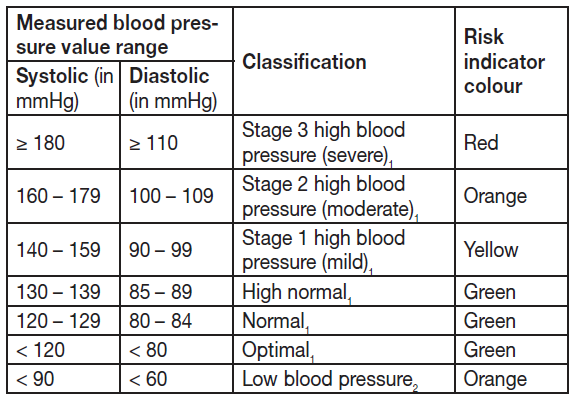
The risk indicator (6/21) indicates which category the recorded blood pressure values fall into. If the measured values are in two different categories (e.g. systolic pressure in the "high normal" range and diastolic pressure in the "normal" range), the risk indicator always indicates the higher range, "high normal" in the example described. Note that these default values are for general guidance only, as individual blood pressures may vary. Please note that self-measurement at home usually results in values lower than those recorded at a doctor's surgery. Consult your doctor at regular intervals. Only they can give you personal target values for controlled blood pressure, particularly if you are receiving medical therapy.
Low Blood Pressure
WARNING
Low blood pressure (hypotension) can be a health hazard and cause dizziness or fainting. Blood pressure is generally considered low when the reading is below 90/60 mmHg (source: National Health Service, 2023).
Seek medical attention if you suddenly suffer from low blood pressure.
Resting Indicator (Using HSD Diagnostics)
One of the most common errors made when taking a blood pressure measurement is not ensuring that the user's circulatory system is sufficiently at rest when taking the measurement. In this case, the measured systolic and diastolic blood pressure values do not represent the blood pressure at rest. However, it is this blood pressure at rest that should be used to assess the measured values. This blood pressure monitor uses integrated haemodynamic stability diagnostics (HSD) to measure the user's haemodynamic stability when taking the blood pressure measurement. This enables it to indicate whether the blood pressure was taken when the user's circulatory system was sufficiently at rest.
Displaying and Deleting Measured Values
The results of every successful measurement are stored together with the date and time. If there are more than 30 measurements, the oldest measurements are lost.
- Press the memory button M. Select the desired user memory by pressing the memory button M again.
- If you press the function button +, the average value of all the stored measured values in the user memory will be displayed.
- If you press the function button + again, the average value of the morning measurements for the last 7 days will be displayed (morning: 5 am – 9 am).
- If you press the function button + again, the average value of the evening measurements for the last 7 days will be displayed (evening: 6 pm – 8 pm).
- If you continue to press the function button +, the most recent individual measured values are displayed in turn with the date and time.
- To switch off, press the START/STOP button.
- If you forget to switch off the device, it will switch itself off automatically after 30 seconds.
- If you want to delete the whole memory for a specific user, press the memory button M. Press and hold the memory button M and the SET button simultaneously for 5 seconds.
CLEANING AND MAINTENANCE
- Clean the device and cuff carefully using only a slightly damp cloth.
- Do not use any cleaning solutions or solvents.
- Under no circumstances hold the device or cuff under water, as this can cause liquid to enter and damage the device and cuff.
Troubleshooting Beurer Upper Arm Blood Pressure Monitor BM 28: Common Issues and Fixes
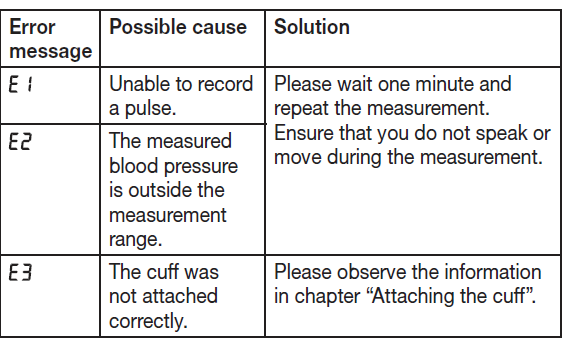
Encountering problems with your **Beurer Upper Arm Blood Pressure Monitor BM 28**? Start with basic checks: ensure fresh 1.5V AA batteries are installed, and the universal cuff (22-42 cm) is correctly positioned 2-3 cm above the elbow, aligned with the artery marker.
- No display or power issues: Replace low batteries (indicator shows when needed) or wait for automatic switch-off reset. Clean contacts if corroded.
- Inaccurate readings or error symbols: Cuff fit check fails? Reposition cuff snugly without gaps. Resting indicator blinking? Sit calmly for 5 minutes before measuring, avoiding caffeine or exercise.
- Arrhythmia or irregular pulse warnings: Indicates a possible disturbance—consult a doctor. Take multiple readings with 1-minute gaps.
- Bluetooth/app sync failures: Ensure app (HealthManager Pro) is updated; restart device and phone Bluetooth.
Inflation/deflation problems: Avoid tight clothing; measure in a quiet posture.
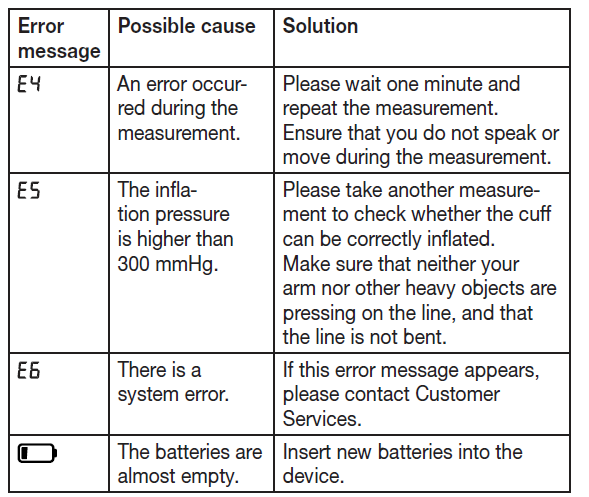
Prevent issues by storing in the included bag away from moisture, calibrating annually, and following the manual's posture guidelines. Beurer offers a 5-year warranty (check local terms); contact support at beurer.com or regional helplines like +49-7464-98980-0 for Germany. In the UK, call 020 7720 2266 for assistance.
Pros and Cons of Beurer Upper Arm Blood Pressure Monitor BM 28
The **Beurer Upper Arm Blood Pressure Monitor BM 28** delivers excellent value for home use, balancing advanced features with affordability compared to rivals like Omron models.
Pros
- Clinically validated accuracy (ESH-IP 2010 pass, Medaval 2-star rating), reliable even in pregnancy.
- Universal cuff (22-42 cm) with fit check and patented resting indicator for precise, user-friendly measurements.
- Multi-user support (4x30 memories), app integration, and detailed averages—great for families.
- Clear LCD, arrhythmia detection, risk indicator, and alarms enhance usability.
- Portable with storage bag; superior German engineering praised over competitors.
Cons
- Batteries drain faster with frequent Bluetooth use; mains adapter sold separately.
- Larger dimensions (134x103x60 mm) less pocket-friendly than wrist models.
- App setup may confuse beginners; occasional sync glitches reported.
- No included AC adapter, adding minor extra cost.
Overall, strong value at $50-$80, outperforming budget options in accuracy while competitive with pricier Omron devices.
Customer Reviews: Real User Feedback on Beurer Upper Arm Blood Pressure Monitor BM 28
The **Beurer Upper Arm Blood Pressure Monitor BM 28** earns solid 4.2/5 star ratings across platforms, praised for German reliability and ease.
- Top Praises: "Amazing product compared to Omron—German technology fan!" (5 stars, Arindam Das, 2022). Users love the universal cuff, accurate readings, and app syncing for doctor shares.
- Common Complaints: Battery life and initial app pairing hiccups; some note cuff bulk for very slim arms.
- Testimonials: Stiftung Warentest rates it "satisfactory" for self-measurement. 80% recommend for home hypertension tracking.
Frequently mentioned: Consistent results match clinic devices. Ideal purchase for reliable **upper arm blood pressure monitoring**—address complaints by using fresh batteries.
Faqs
How do I set up the beurer Upper Arm Blood Pressure Monitor BM 28 for the first time?
What does the resting indicator on the beurer Upper Arm Blood Pressure Monitor BM 28 mean and how to use it?
How do I troubleshoot error code E_ on my beurer Upper Arm Blood Pressure Monitor BM 28?
Is the beurer Upper Arm Blood Pressure Monitor BM 28 suitable for pregnant women?
How do I access stored readings and averages on the beurer Upper Arm Blood Pressure Monitor BM 28?
What cuff size is compatible with the beurer Upper Arm Blood Pressure Monitor BM 28 and how to position it?
How do I maintain and clean the beurer Upper Arm Blood Pressure Monitor BM 28 properly?
Can I power the beurer Upper Arm Blood Pressure Monitor BM 28 with a mains adapter and set alarms?
More beurer manuals
- Setup: Beurer Speaking Upper Arm Blood Pressure Monitor BM-49 User Manual
- Setup: Beurer Upper Arm Blood Pressure Monitor BM-48 User Manual
- Setup: Beurer Blood Pressure Monitor BC-28 User Manual
- Setup: Beurer Blood Pressure Monitor BC-27 User Manual
- Setup: Beurer Nebuliser IH-28 Pro User Manual
- Setup: Beurer Upper Arm Blood Pressure Monitor BM-54 User Manual
Leave a Comment