
Setup: Eufy Video Doorbell 2K User Manual
Content
eufy Video Doorbell 2K
Introduction
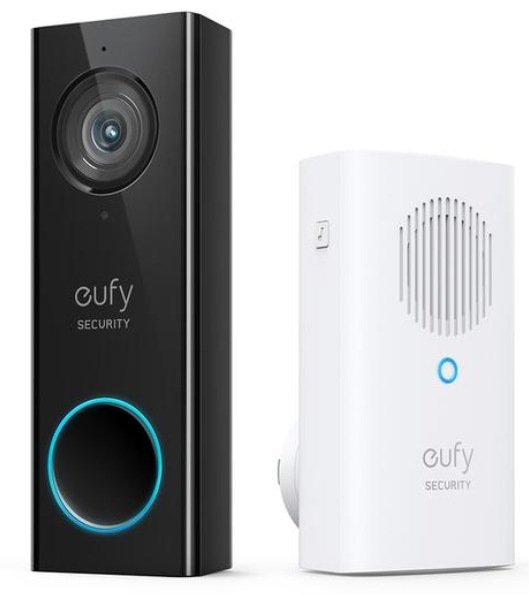
The eufy Video Doorbell 2K offers a cutting-edge smart doorbell experience with 2K HD video clarity, ensuring you can see who's at your door with exceptional detail. This versatile device operates on a rechargeable battery, allowing for both wireless and wired installation using existing doorbell wiring. Key benefits include 4GB of onboard storage, free lifetime tech support, and compatibility with Amazon Alexa and Google Assistant. The eufy Video Doorbell 2K is designed for homeowners seeking enhanced security and convenience, with a price range typically between $100 and $200. It is widely available at major retailers like Best Buy and Amazon.
What’s in the Box
Video Doorbell Installation
- Note: Make sure you have installed the EufySecurity App and scan the QR code before starting the doorbell installation.
- Step 1
Ring the existing doorbell, make sure it’s working,, and locate the place of your existing chimes in the house. - Step 2
Shut off the doorbell power supply. If you're not sure, shut off the main power supply in your house. Turn the lights in your home on / off to make sure the electricity in your house is properly shut off. 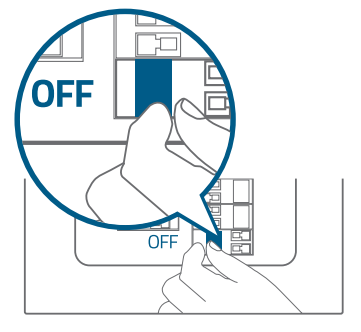
- Note: Always be careful when handling electrical wiring. If you’re not comfortable doing it yourself, do consult a qualified electrician.
- Step 3
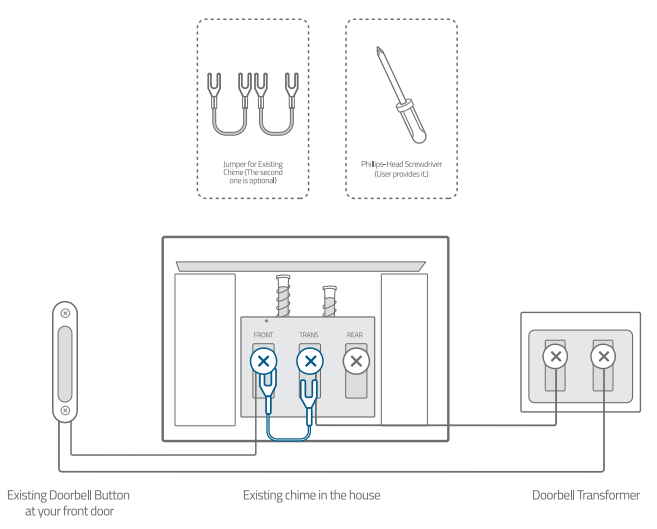
Find the doorbell chime in your house, then remove the cover and find the screw terminals with TRANS and FRONT markings. Use the provided jumper for the existing chime to connect the two terminals. This is to bypass the doorbell chime and will not affect the normal operation of the circuit. - Note:
- The video doorbell requires the user to bypass the existing chime first to get sufficient power. Without this step, the video doorbell will still be able to power on, but will operate unstably.
- In most cases, the existing doorbell circuit looks like the heart below. Find the existing doorbell chime in your house, remove the cover, and take a photo of the wire connection in case you need to reconnect it.
- Use the provided jumper to connect the FRONT and TRANS terminals to bypass the chime on the circuit. Do not remove the original wire connecting to the chime. If your doorbell chime has different markings or you have multiple chimes, refer to the help session in the App for the custom wiring instructions or consult a qualified electrician.
When the jumper is in place, the existing chime will not sound anymore.
Step 4
Remove the existing doorbell button at the front door. Pull the two wires out carefully when removing the old doorbell. Straighten the wire ends if necessary.
What's required: Phillips-Head Screwdriver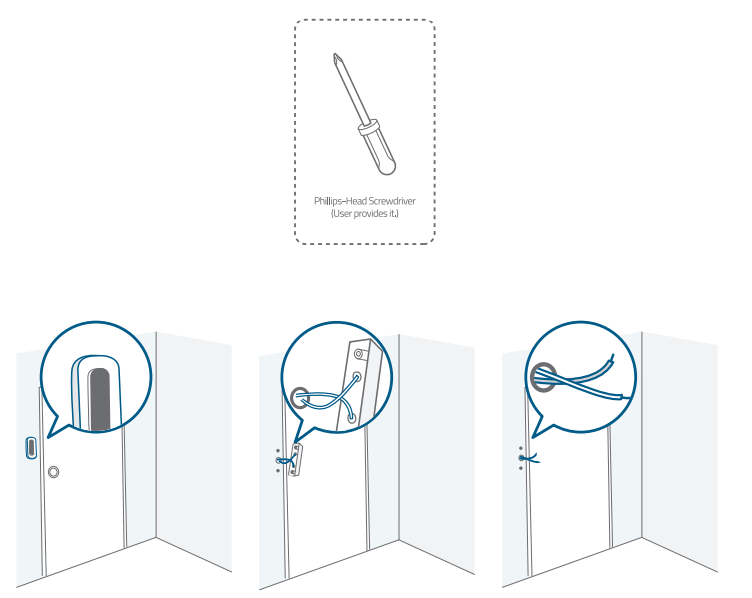
- Step 5
Determine the mounting position of the doorbell. Consider the following factors:- Check if you can reuse the existing holes and anchors on the wall or door frame.
If you are drilling the mounting holes for the first time, the recommended mounting height is 48" from the ground.
If you are mounting the doorbell on a wooden wall or board, do NOT drill holes. Skip to Step 77 and use screws directly to mount the Mounting Bracket.
If your wall is stucco, brick,ck, or concrete, you need to drill holes. Use the Screw Hole Positioning-Card to mark the position and drill holes with the 1/4" (6.35mm) drill bit.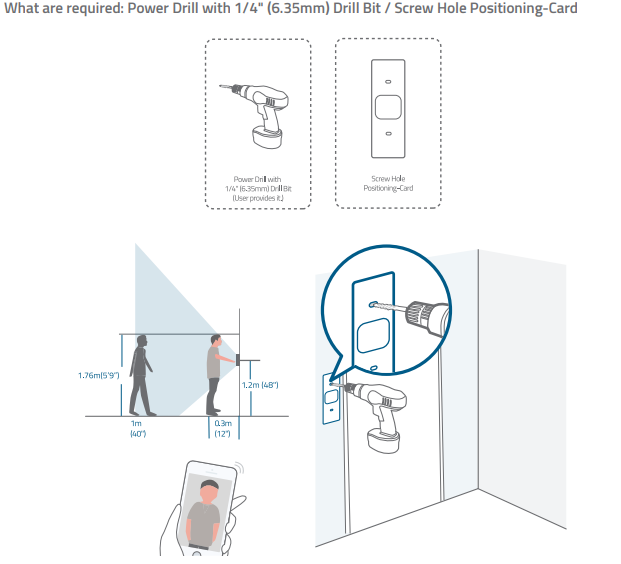
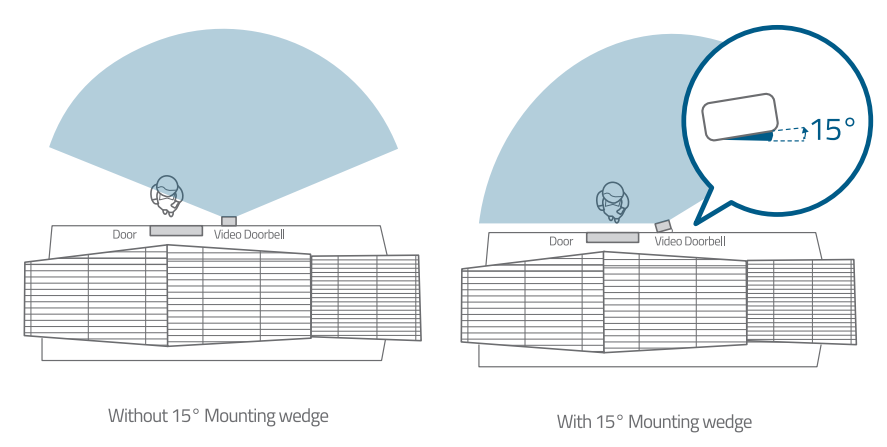
Optional: Use the 15° mounting wedge as a supplementary mounting bracket if you wish to see more on a specific side.
Step 6
Use the anchors provided when installing in materials such as stucco, brick, or concrete. There is no need to use an anchor if you are installing on a wooden doorframe.
What's required: Anchors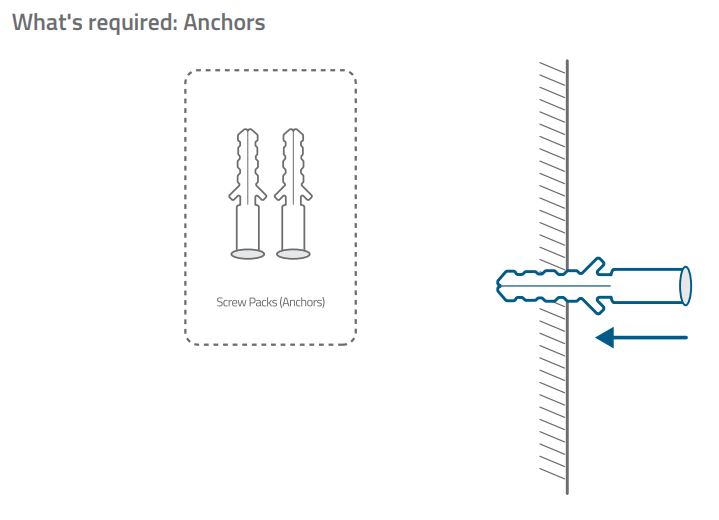
Step 7
Lead the two doorbell wires through the central square hole on the bracket before starting to mount.
Insert the two screws provided through the screw holes or through the 15° mounting wedge(Install the mounting bracket to the 15° mounting wedge in prior), and fasten the screws tightly.
What is required: Mounting Bracket / Screw Packs / 15° Mounting Wedge(Optional) / Phillips-Head Screwdriver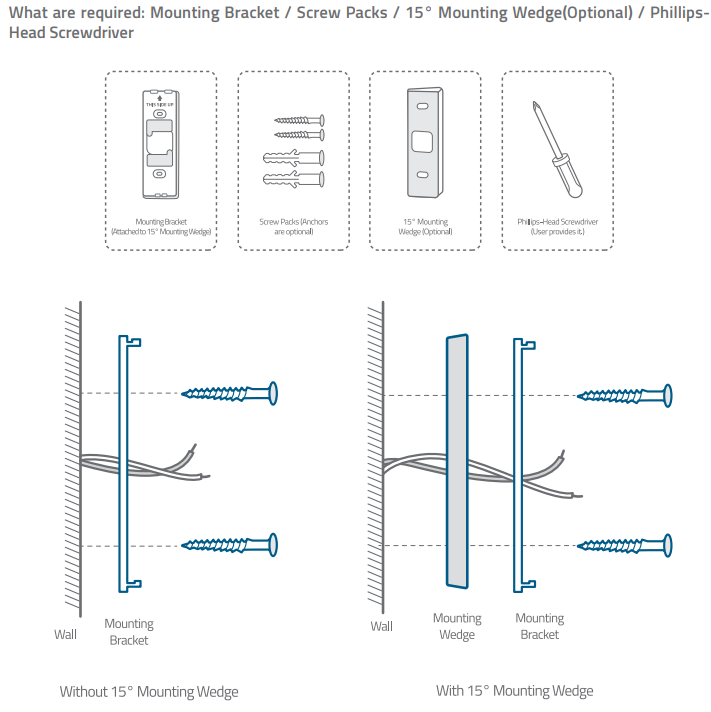
Step 8
Connect the wires to the two terminals at the back of the doorbell, then tighten the terminal screws. A WA wire can connect to any terminal as the electric current is alternating current.
Note: To prevent a short-circuit, make sure the wires are not touching each other after connecting them to the terminals. If the wires are too short, use the extension wires and wire nuts provided to make them longer. Use electrical wiring tape to secure the connection if the wall doesn't have space for wire nuts.
What is required: Extension Wires and Wire Nuts (Optional) / Video doorbell / Philips-Head Screwdriver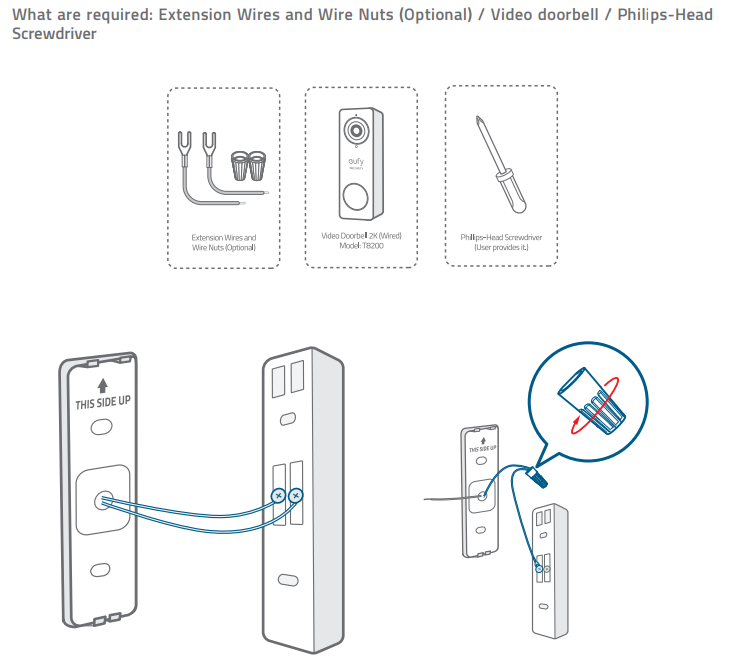
Step 9
There are 2 thermal conductive pads on the mounting bracket. They're used to conduct heat from the video doorbell to the metal bracket. Remove the films from the thermal conductive pads before you mount the doorbell.
Hook the doorbell on top of the mounting bracket and then snap the doorbell bottom to the bracket. You may hear a "click" sound.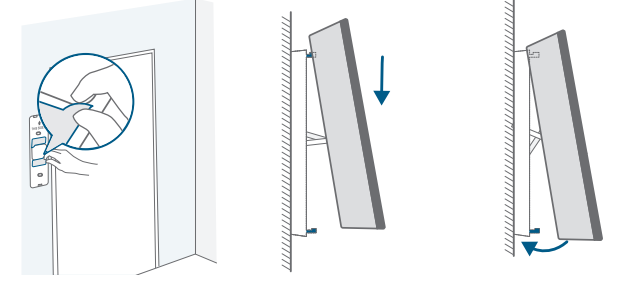
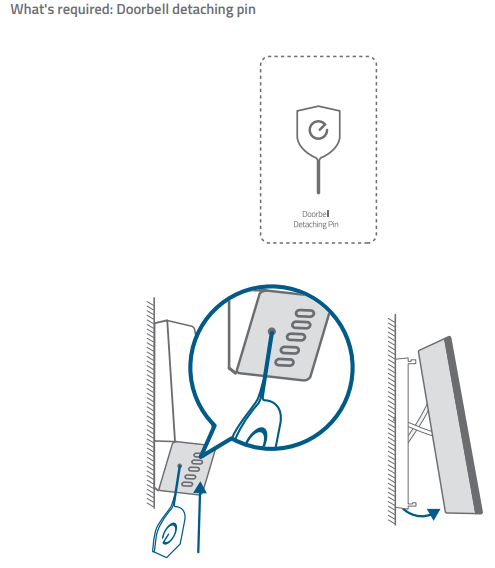
- Use the doorbell detaching pin provided if you wish to detach the doorbell from the mounting Bracket. Press and hold the hole on the bottom of the doorbell and then lift its bottom to take it off.
- The detaching pin has a magnet pad on the black-color side. Stick it on an iron surface where you can find it easily.
- Note: The oval holes are speaker holes. Only press the round hole to detach the doorbell.
What's required: Doorbell detaching pin
Step 10
Switch the doorbell or master circuit breaker to ON.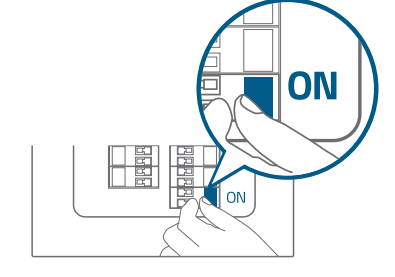
Step 11
Wait until the doorbell ring flashes yellow. Then follow the on-screen instructions in the EufySecurity App to connect the video doorbell to your home Wi-Fi.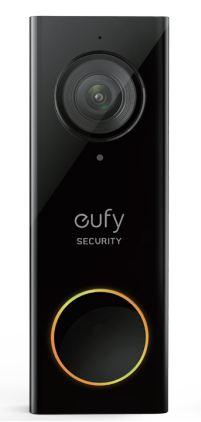
- Step 12
- Follow the on-screen instructions in the EufySecurity App. Install the doorbell power connector to the doorbell chime and then pair it to your video doorbell.
- Note: One video doorbell can link up to 4 electronic chimes. Use the volume and music buttons on the side of the electronic chime to adjust the volume and ringtone.
- What is required: Doorbell chime / Doorbell chime power connector
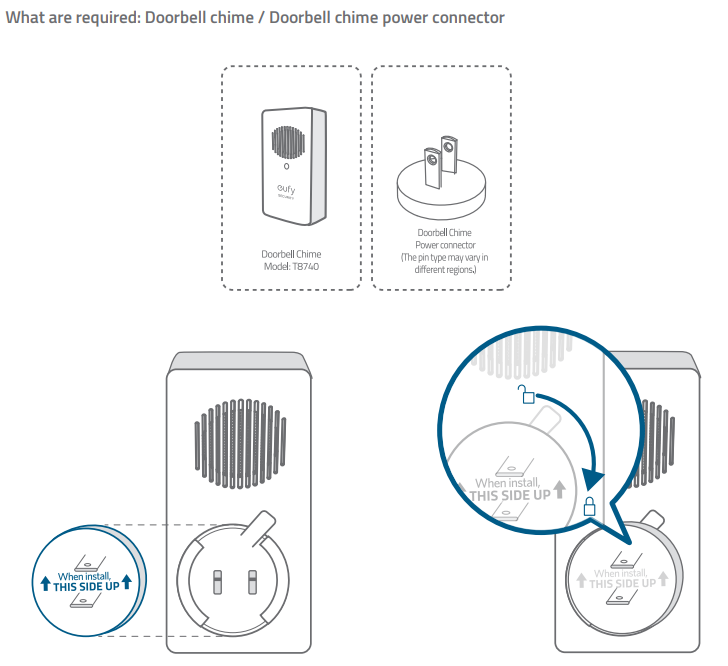
Specifications of the eufy Video Doorbell 2K
The eufy Video Doorbell 2K boasts impressive specifications:
- Resolution: Up to 2K (2560 x 1920 pixels)
- Aspect Ratio: 4:3 for a full head-to-toe view
- Power Supply: Rechargeable battery or wired option with existing doorbell wiring
- Storage: 4GB onboard, with additional storage via a HomeBase (16GB)
- Audio: Full-duplex 2-way audio for seamless communication
- Smart Features: Human body and face detection, motion sensor
- Connectivity: Wi-Fi (2.4 GHz), compatible with Amazon Alexa and Google Assistant
Compared to similar products, the eufy Video Doorbell 2K stands out with its high-resolution video and robust smart features.
Troubleshooting Common Issues
Common problems with the eufy Video Doorbell 2K include connectivity issues and battery drain. Solutions include:
- Connectivity Issues: Restart the device or check Wi-Fi settings.
- Battery Drain: Adjust detection settings or ensure efficient charging.
The eufy Video Doorbell 2K comes with a warranty and dedicated customer support. For assistance, contact eufy support via their official website.
Pros and Cons of the eufy Video Doorbell 2K
Pros
- High-Quality Video: Offers 2K resolution for clear visuals.
- Flexible Installation: Supports both battery and wired options.
- Smart Integration: Compatible with major smart assistants.
Cons
- Design Limitations: No customizable faceplates.
- Battery Life: May require frequent recharging.
Customer Reviews and Feedback
Customers praise the eufy Video Doorbell 2K for its excellent video quality and ease of use. Common praises include its clear video and reliable smart features. However, some users note issues with battery life. Overall, it is rated highly for its value and performance.
For those considering purchasing, this doorbell offers a great balance of features and price, making it a top choice for smart home enthusiasts.
Leave a Comment