
Setup: Hive Window or Door Sensor User Manual
Content
Hive Window or Door Sensor
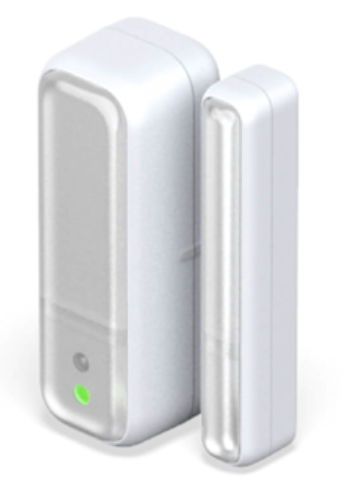
Introduction to the Hive Window or Door Sensor
- The Hive Window or Door Sensor is a smart home security device designed to monitor the status of windows and doors in your home, sending real-time notifications to your smartphone whenever they open or close. This intelligent sensor integrates seamlessly into modern smart home ecosystems, allowing homeowners to maintain security and energy efficiency with minimal effort. Whether you're away on vacation, at work, or simply want peace of mind about your home's security, the Hive Window or Door Sensor provides instant alerts and remote monitoring capabilities through the intuitive Hive app and online dashboard.
- The sensor is particularly valuable for families with children, enabling parents to receive immediate notifications when doors or windows are opened. Beyond security applications, the device supports home automation workflows, such as automatically turning off heating when a window is opened to conserve energy. The Hive Window or Door Sensor works with popular voice assistants,, including Amazon Alexa, Google Assistant, Apple HomeKit, and Siri Shortcuts, making it a versatile addition to any smart home setup.
- Priced competitively in the smart home accessory market, the Hive Window or Door Sensor typically ranges between £25-40, making it an affordable entry point for home security automation. The device requires no subscription to operate, eliminating ongoing costs and making it an economical choice for budget-conscious consumers. Installation is straightforward, and the sensor's compact design ensures it blends seamlessly with any interior décor. The product is widely available through Hive Home's official website, major retailers, and online marketplaces.
Technical Specifications and Features
Physical Dimensions and Design:
- Sensor Unit: Width 23mm, Height 70mm, Depth 24mm
- Magnet Component: Width 11mm, Height 69mm, Depth 15mm
- Sensor Weight: 19g
- Magnet Weight: 12g
- Compact, minimalist design suitable for any room aesthetic
Power and Battery Specifications:
- Battery Type: 1 CR123A lithium battery (included with product)
- Battery Life: Extended operational period with a single battery
- Wattage: 16 watts
- Battery replacement is user-friendly with a slide-open case design
Connectivity and Compatibility:
- Wireless Frequency: 2405-2480 MHz
- Maximum Radiated Power: Less than 10 dBm
- Compatible with Amazon Alexa and Google Assistant
- Full integration with Apple HomeKit and Siri Shortcuts
- Works with IFTTT for advanced automation workflows
- Connects with Philips Hue Lights and other Hive devices
Core Features of the Hive Window or Door Sensor:
- Real-time notifications when windows or doors open or close
- Activity history is viewable for the last 7 days
- Up to six customizable notification time slots per day
- Remote monitoring through the Hive app and online dashboard
- Grouping capability with other Hive devices for unified control
- No subscription required for basic functionality
- Indoor use only design for optimal performance
- 1-Year Limited Manufacturer Warranty included
Setup and Installation Guide
- Step 1: Prepare Your Equipment
Before beginning installation, ensure you have the Hive app downloaded and installed on your smartphone or tablet. Verify that your Hive Hub is properly set up and connected to your network, as the sensor requires a hub to function. The CR123A lithium battery comes pre-installed in the sensor. Check that you have the adhesive strips or mounting hardware ready for installation. - Step 2: Add the Sensor to Your Hive System
Open the Hive app on your device and log in with your credentials. Navigate to the Menu button and select "Install devices." When prompted, pull the tab from the sensor case to activate the pairing process.[4] The LED light on the front will begin flashing amber as it searches for your Hive Hub. Once the sensor appears on your screen, name it appropriately (for example, "Front Door" or "Kitchen Window") and press Save to complete the setup. - Step 3: Choose Installation Location
Select an appropriate location for your Hive Window or Door Sensor on a door, window, or cupboard.[4] Ensure the location is within range of your Hive Hub or signal booster to maintain consistent connectivity. Before permanently fixing the sensor, check the signal strength through the Hive app under "Manage devices" to confirm adequate reception. - Step 4: Proper Sensor Placement and Alignment
One part of the sensor mounts on the door or window, while the magnet component attaches to the frame. Align both parts so that the marked strips are parallel and properly positioned. The two components should ideally be no more than 10mm apart when the door, window, or cupboard is closed to ensure proper triggering.[4] Use the included adhesive strips or mounting hardware to secure both parts firmly in place. - Step 5: Configure Notification Settings
After installation, customize your notification preferences through the Hive app. Set up to six different time slots for when you want to receive alerts, allowing you to avoid notifications during specific hours. You can enable or disable alerts based on your home status, receiving notifications only when you're away or during specific times of day.
Safety Precautions: Keep the CR123A battery away from children. Ensure adequate space remains around the sensor case for future battery replacement without damaging the device or mounting surface.
Getting started
- Add your sensor
You can do this using your Hive app or the online dashboard.
Using the Hive app:- Open the Hive app on your smartphone or tablet. You may be asked to log in.
- Tap the Menu button and then Install devices, then follow the on-screen instructions.
Using the online dashboard: - Log in to your Hive account at hivehome.com
- Under Settings, select Install devices, then follow the on-screen instructions.
- When prompted, pull the tab from the sensor case to start the pairing process.
- The LED light on the front will begin to flash amber while it searches for ur hub.
- Once your sensor appears on the screen, you can name it and press Save to complete the setup.
- Choose a location
You can place your Hive Window or Door Sensor on a door, window, or cupboard. Whichever you choose, make sure it’s near enough to your Hive Hub or signal booster to stay connected. - Fix it in place
Check your sensor’s signal before fixing it in place. You can do this in the Hive app or online dashboard under Manage devices.
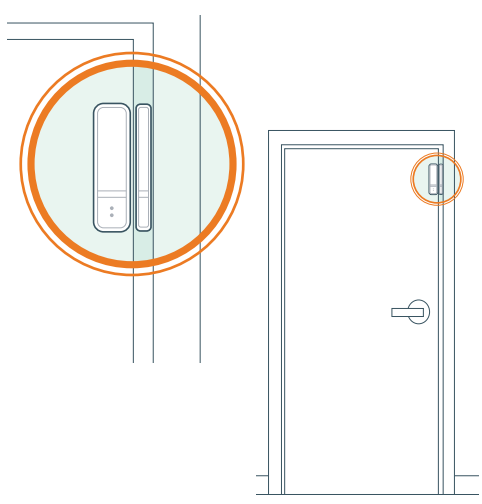
One part of the sensor goes on the door , nd the other part goes on the frame. Arrange both parts so that the marked strips are aligned.
The sensor parts should ideally be no more than 10mm apart when the door, cupboard , or window is closed so that they trigger when opened.
When fixing the sensor in place, ensure there is enough space to slide open the case for future battery replacement.
Using the adhesive strips:
- Peel one strip from the backing paper and stick it to the smaller part of the Hive Window or Door Sensor.
- Stick another strip to the bigger part of the sensor.
- Wipe the area on the door or window frame where the adhesive strips will be attached and allow it to dry.
- Remove the backing from the adhesive strips so that you can firmly place the sensor on the door or window frame.
Remember: Removing the provided adhesive strips from the paint can leave marks nonnthe surface.
Usage
Your Hive Window or Door Sensor is designed for indoor use only.
Battery
When your Hive Window or Door Sensor battery needs replacing, we recommend replacing it with 1 new CR123A lithium battery. Caution: Keep battery away from children.
If swallowed, consult a physician at once. The battery can explode or leak if heated, disassembled, shorted, recharged, exposed to fire or high temperature, or inserted incorrectly. Keep in original package until ready to use. Do not carry batteries loose in your pockets or purse.
Maintenance
Remove the battery from your Hive Window or Door Sensor before cleaning and keep it away from water and other liquids at all times.
Troubleshooting and Common Issues
- Sensor Not Connecting to Hive Hub
If your Hive Window or Door Sensor fails to connect during setup, verify that your Hive Hub is powered on and connected to the internet. Move the sensor closer to the hub to test connectivity, as distance or obstacles may be interfering with the signal. Restart both the sensor (by removing and reinserting the battery) and the Hive Hub. Ensure you're using the latest version of the Hive app, as outdated software can cause connection issues. - LED Light Not Flashing During Pairing
A non-responsive LED indicates the battery may be depleted or improperly installed. Remove the sensor case and verify the CR123A battery is seated correctly in the battery compartment. If the battery appears old or damaged, replace it with a new CR123A lithium battery. Pull the tab again to restart the pairing process. - Notifications Not Arriving on Your Smartphone
Check that push notifications are enabled for the Hive app in your device's notification settings. Verify your smartphone has an active internet connection and sufficient battery. Confirm that notification time slots in the Hive app include the current time. Re-add the sensor to your system if notifications continue to fail after checking these settings. - Weak Signal or Disconnections
Relocate the sensor to a position closer to your Hive Hub or signal booster. Remove physical obstacles such as thick walls, metal objects, or other electronic devices that may interfere with the 2405-2480 MHz frequency. Consider installing a Hive Signal Booster if the sensor is in a location with persistent connectivity issues. - Battery Replacement Process
When the battery requires replacement, slide open the sensor case carefully to access the battery compartment. Remove the old CR123A battery and insert a new lithium CR123A battery, ensuring correct polarity. Close the case securely and verify the sensor reconnects to your system through the Hive app. - Warranty and Support: The Hive Window or Door Sensor includes a 1-Year Limited Manufacturer Warranty covering defects in materials and workmanship. For technical support, visit hivehome.com/support for comprehensive guides and troubleshooting resources.
Advantages and Disadvantages
Advantages of the Hive Window or Door Sensor:
- No subscription fees required for core functionality, reducing long-term costs
- Extensive smart home compatibility,, including Alexa, Google Assistant, Apple HomeKit, and IFTTT
- Simple, intuitive setup process requiring minimal technical knowledge
- Compact, discreet design that blends seamlessly with interior décorA eliablele lithium battery provides extended operational life between replacements
- Remote access through the Hive app and online dashboard from anywhere
- Customizable notification scheduling with up to six daily time slots
- Integration with other Hive devices for comprehensive home automation
- Activity history tracking for the past 7 days provides security insights
- Affordable price point compared to competing smart home security sensors
Disadvantages and Limitations:
- Indoor use only design restricts outdoor applications and weatherproof monitoring
- Requires Hive Hub for operation, necessitating additional investment for new users
- Limited activity history retention of only 7 days may be insufficient for detailed security reviews
- Requires proximity to a hub or signal booster, limiting placement flexibility in larger homes
- Battery replacement requires manual intervention every 1-2 years, depending on usage. The motion sensor feature mentioned in some documentation may have limitedaccuracyy
- No direct integration with some third-party smart home systems without IFTTT
Value for Money Assessment: The Hive Window or Door Sensor offers excellent value for budget-conscious homeowners seeking basic door and window monitoring without subscription costs. While it requires a Hive Hub investment, the sensor's affordable price and broad compatibility make it a practical choice for expanding existing smart home setups.
Customer Reviews and User Feedback
- Users consistently praise the Hive Window or Door Sensor for its straightforward installation process and reliable performance. Customers appreciate the absence of subscription requirements, noting this as a significant advantage over competing products. Many parents highlight the peace of mind gained from receiving instant notifications when children arrive home or when doors open unexpectedly.
- Common user feedback emphasizes the sensor's compatibility with multiple smart home ecosystems, allowing seamless integration with existing Alexa, Google Home, and Apple HomeKit setups. Users report satisfaction with the compact design, which remains visually unobtrusive in living spaces. The 7-day activity history is viewed favorably by security-conscious homeowners who appreciate reviewing door and window access patterns.
- Some users note that signal connectivity can be inconsistent in larger homes or when placed far from the Hive Hub, requiring careful placement consideration. A few customers mention that battery replacement reminders could be more prominent in the app interface. Overall, the Hive Window or Door Sensor receives positive recommendations for homeowners seeking an affordable, reliable smart home security addition without ongoing subscription commitments.
Conclusion and Recommendations
The Hive Window or Door Sensor represents a practical, affordable solution for homeowners implementing smart home security systems. Its combination of broad compatibility, straightforward setup, and subscription-free operation makes it an excellent choice for both smart home beginners and experienced users expanding existing installations. The device delivers reliable door and window monitoring with real-time notifications and remote access through the intuitive Hive app, providing genuine security and peace of mind for families of all sizes.
Faqs
How do I set up my Hive Window or Door Sensor for the first time?
Why is my Hive Window or Door Sensor not connecting to the Hive Hub?
Can I use the Hive Window or Door Sensor with other smart home systems?
How do I check the battery level of my Hive Window or Door Sensor?
Where should I place my Hive Window or Door Sensor for optimal performance?
How do I receive notifications when my Hive Window or Door Sensor is triggered?
How often should I maintain or clean my Hive Window or Door Sensor?
What should I do if my Hive Window or Door Sensor gives false alerts?
Tags
More hive manuals
Leave a Comment