
How to Use: Honeywell Home T9 Smart Thermostat with Smart Room Sensor User Manual
Content
Honeywell Home T9 Smart Thermostat with Smart Room Sensor: Complete Product Manual
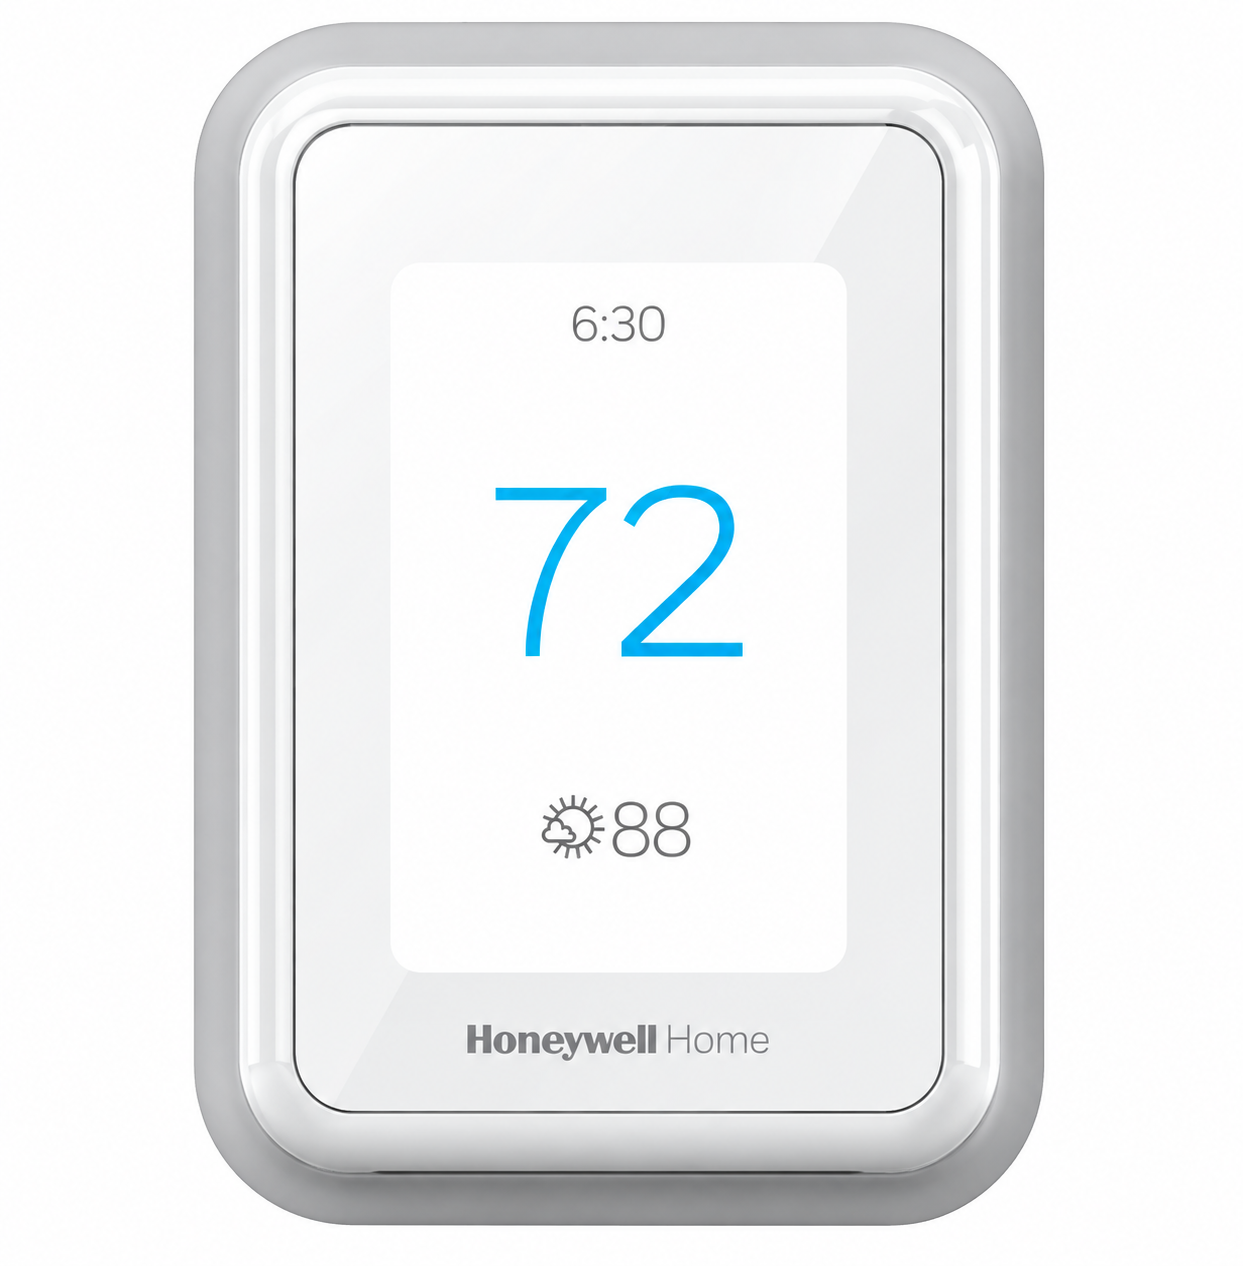
Introduction: Transform Your Home Climate Control
The Honeywell Home T9 Smart Thermostat with Smart Room Sensor represents a significant advancement in residential climate control technology. This Wi-Fi-enabled thermostat combines intelligent room sensing, geofencing capabilities, and intuitive touchscreen controls to deliver personalized comfort throughout your home while optimizing energy consumption.
The Honeywell Home T9 Smart Thermostat is designed for homeowners seeking greater control over their heating and cooling systems without complex installation or programming. Whether you're managing a single-zone apartment or a multi-room house, this smart thermostat adapts to your lifestyle patterns and automatically adjusts temperatures based on occupancy and your daily schedule.
Key benefits include the included Smart Room Sensor with 200-foot range capability, ENERGY STAR certification for reduced utility costs, compatibility with major smart home platforms (Amazon Alexa, Google Assistant, Apple Home, Samsung SmartThings), and advanced features like geofencing and occupancy detection. The T9 thermostat typically retails between $250-$350, making it a mid-range investment for smart home automation. It's widely available through major retailers including Home Depot, Lowe's, and online marketplaces. This product appeals to environmentally conscious homeowners, tech enthusiasts, and anyone looking to reduce energy bills while maintaining optimal comfort levels.
Technical Specifications and Compatibility
Understanding the technical requirements ensures proper installation and optimal performance of your Honeywell Home T9 Smart Thermostat.
Physical Dimensions and Design
- Thermostat Unit: 3.7 inches wide × 4.92 inches tall × 0.94 inches deep
- Smart Room Sensor: 2.6 inches × 2.6 inches × 0.77 inches
- Display: Color graphical LCD touchscreen with backlit interface
HVAC System Compatibility
The Honeywell Home T9 Smart Thermostat works with single-stage and multi-stage HVAC systems, supporting up to 3 heating stages and 2 cooling stages. It's compatible with heat pump systems and provides emergency heat functionality. The thermostat requires a C-wire connection; however, an easy-to-install power adapter is included if your home lacks a C-wire configuration.
Electrical and Connectivity Specifications
- Voltage: 24V
- Wire Configuration: 4-wire minimum
- WiFi Support: 802.11 B/G/N (2.4 and 5 GHz bands)
- Smart Home Integration: Amazon Alexa, Google Assistant, Apple HomeKit, Samsung SmartThings
Product Overview and Key Features
The Honeywell Home T9 Smart Thermostat delivers comprehensive climate management through several standout features:
Smart Room Sensing Technology
The included Smart Room Sensor provides occupancy detection and motion sensing within a 200-foot range. The T9 thermostat can support up to 20 additional wireless room sensors, allowing you to monitor temperature and humidity across your entire home. Intelligent motion detection algorithms distinguish between people passing through and those spending time in a room, automatically prioritizing comfort where it matters most.
Geofencing and Location-Based Control
Using location-based geofencing technology, the Honeywell Home T9 Smart Thermostat automatically adjusts temperatures when everyone leaves the house. This feature helps reduce energy consumption during extended absences and ensures your home reaches the desired temperature before you arrive, eliminating the need for manual adjustments.
Smart Response Learning
The thermostat's Smart Response feature learns your home's heating and cooling cycle times, delivering optimal temperatures at precisely the right moment. This intelligent adaptation reduces energy waste while maintaining consistent comfort throughout your day.
7-Day Programmable Scheduling
With four time periods per programmable day, you can create customized heating and cooling schedules for weekdays and weekends. The flexible scheduling works in combination with geofencing for maximum energy efficiency and comfort control.
Installation and Setup Guide
The Honeywell Home T9 Smart Thermostat features quick and easy installation designed for homeowners with basic electrical knowledge.
Pre-Installation Checklist
Before beginning installation, verify that your HVAC system is compatible with the thermostat's multi-stage heating and cooling capabilities. Locate your existing thermostat and identify the wire connections (typically labeled R, W, Y, G, and C). If you lack a C-wire, ensure the included power adapter is available. Turn off power to your HVAC system at the breaker for safety.
Installation Steps
Turn off power to your heating and cooling system at the circuit breaker. Remove your existing thermostat and photograph the wire connections for reference. Use the wire labels to connect each wire to the corresponding terminal on the T9 thermostat's backplate. If no C-wire exists, install the included power adapter following the provided instructions. Secure the thermostat to the wall using the mounting plate and screws. Restore power and proceed to the initial setup process through the touchscreen interface.
- WiFi Connection and App Setup
- On the thermostat's touchscreen, navigate to Settings and select WiFi Setup. Choose your home network from the available list and enter your password. Download the Honeywell Home mobile application on your smartphone and create an account. Follow the in-app prompts to add your thermostat and Smart Room Sensor to your account. Enable geofencing by allowing location access in the app settings.
- Smart Room Sensor Placement
- Place the included Smart Room Sensor in your most-used room, such as a living room or master bedroom, approximately 4-6 feet above the floor for optimal temperature and humidity readings. Ensure the sensor is within 200 feet of the thermostat. The sensor will pair automatically with the T9 thermostat; if pairing fails, use the app to manually add the sensor by scanning its setup code.
Getting the Most from the T9 Smart Thermostat
Prioritize Rooms
Prioritize a specific room or multiple rooms, or let comfort follow your movement using built-in motion detection.
Control on the Go
Adjust your thermostat from anywhere using your tablet or smartphone.
Save Energy
With geofencing, you can save money on the most expensive part of your energy bill while you’re away.
Simple Installation
The thermostat automatically programs itself. Just answer a few simple questions, and you’ll be up and running in no time.
Whole-Home Range
With a 200-foot range, up to 20 sensors with temperature, humidity, and occupancy detection can connect to your thermostat from throughout your home.
Keep an Eye on Your Home
Get customizable alerts on your mobile device when the basement is so cold that a pipe could burst or if the baby’s room is getting warm.
Using Your Thermostat
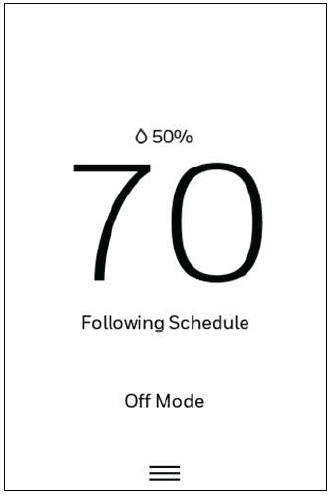
The screen will wake up by pressing the center area of the displayed temperature.
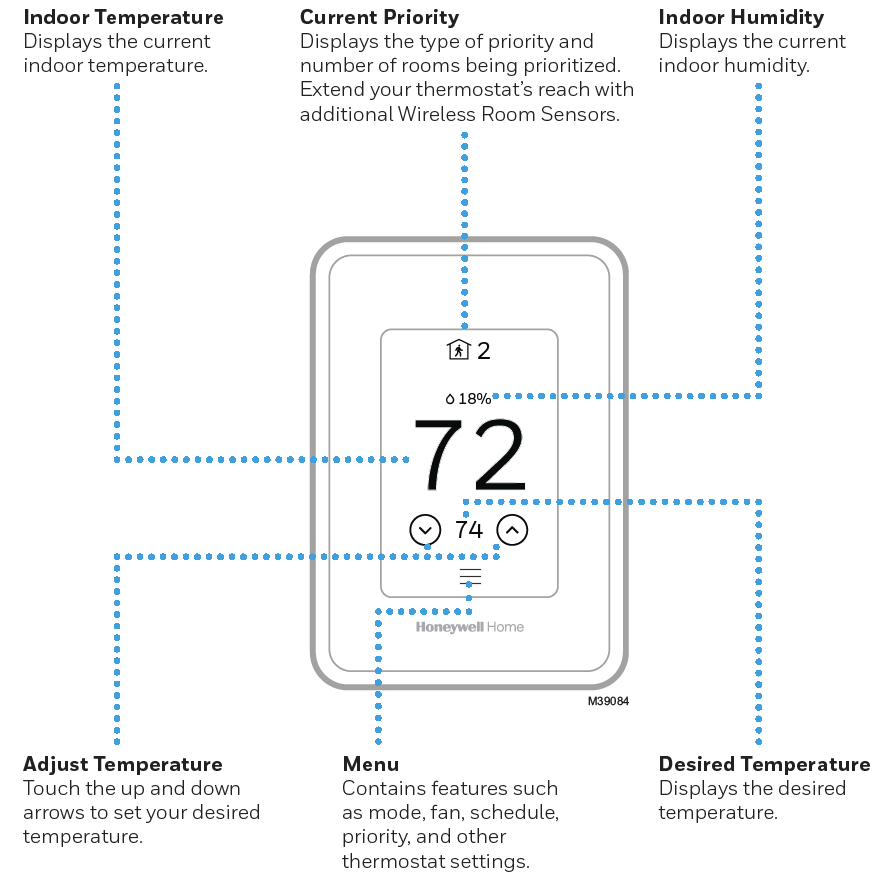
Using the Resideo App
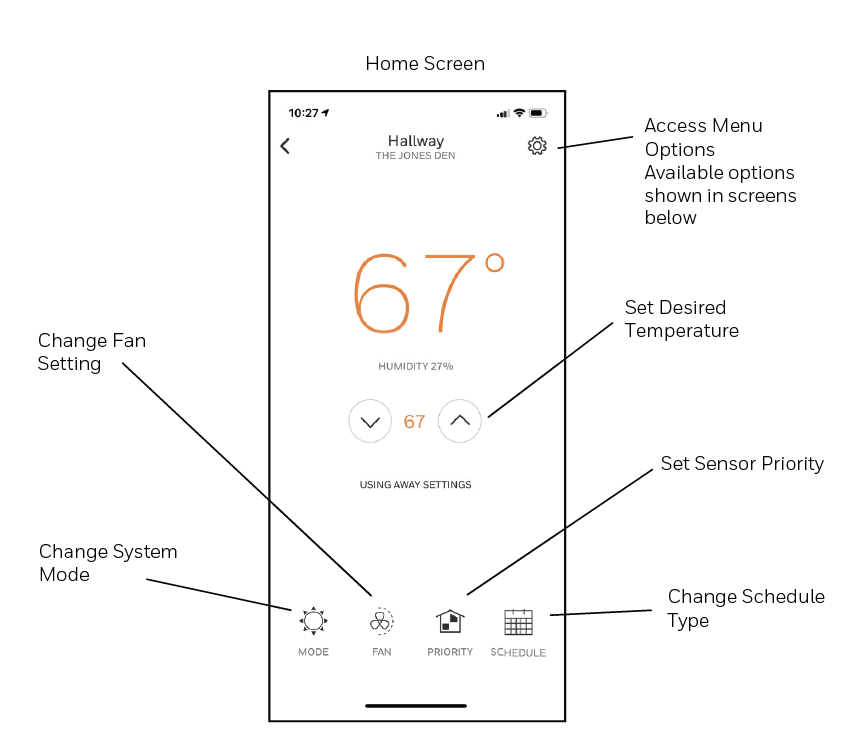
Main Menu Options
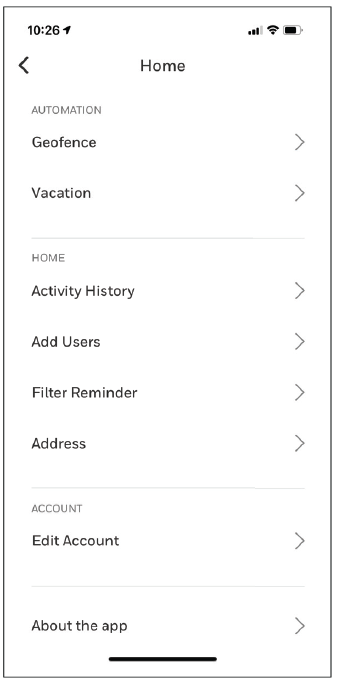
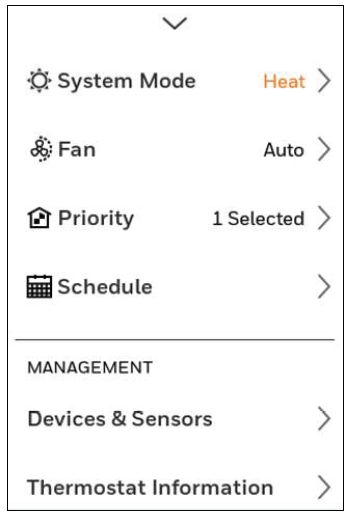
Main Menu on Thermostat
System Mode (Available modes vary depending on how the thermostat was configured)
- Heat
- Off
- Cool
- Auto – See Auto Changeover Operation.
- Em Heat – See Em Heat Mode.
Fan (Fan setting not available for all system types)
- Auto (Fan only runs with a call for heat or cool)
- On (Fan runs continuously)
- Circulate (Fan runs approximately 33% of the time)
Priority
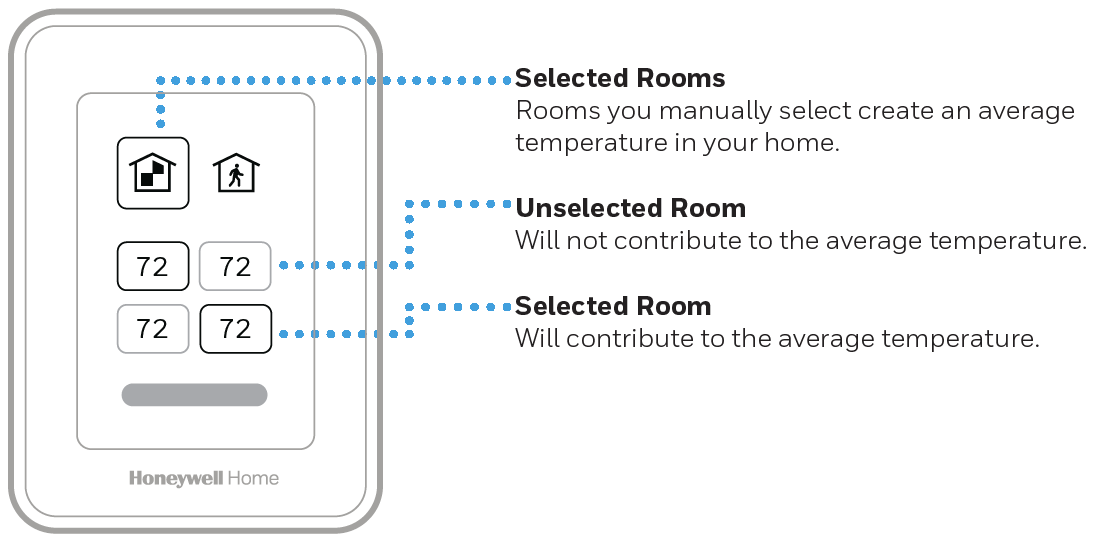
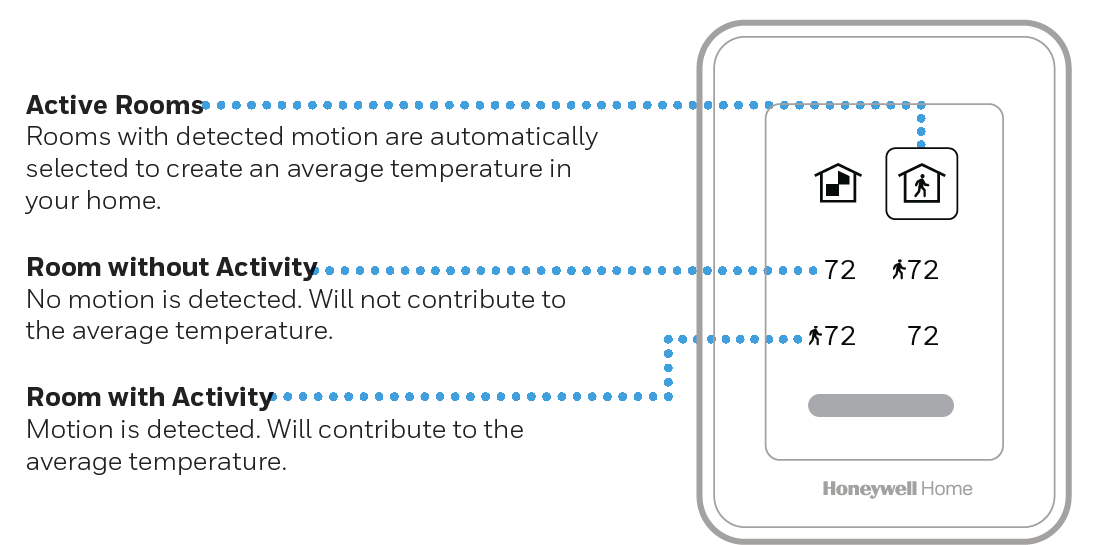
If wireless indoor temperature, humidity, and motion sensors are used, select which sensors are used for temperature control. You can choose active sensors (those detecting motion) or manually select which sensors to use.
Schedule
- Create New Schedule (Set a time-based schedule)
- Disable Schedule
- Reset to Default Schedule
Devices & Sensors
- View the temperature and humidity readings from Smart Room Sensors.
- Identify a Smart Room Sensor.
- Add a new Smart Room Sensor.
- Remove a Smart Room Sensor.
Thermostat Information
- MAC Address
- IP Address
- Date Code
- Model Number
- Build Date
- Collection Version
- Wi-Fi Bootloader Version
- Wi-Fi Application Version
Equipment Status
- System Mode
- Heat Stages (On or Off)
- Cool Stages (On or Off)
- Fan (On or Off)
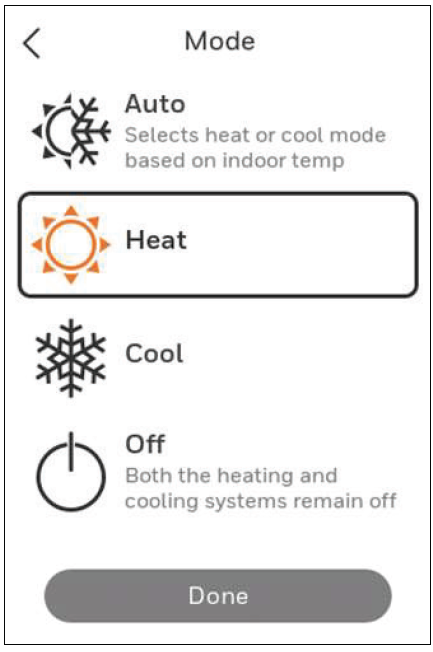
Selecting System Mode
Touch the home screen to wake the thermostat.
Touch the menu icon and then touch “Select Mode.”
- Heat: Controls the heating system.
- Cool: Controls the cooling system.
- Off: Turns the heating and cooling systems off.
- Auto: When enabled, the thermostat will automatically use heating or cooling to reach the desired temperature. See Auto Changeover Operation.
- Em Heat: Controls auxiliary or emergency heat; only available on systems with a heat pump. See Em Heat Mode.
Auto Changeover Operation
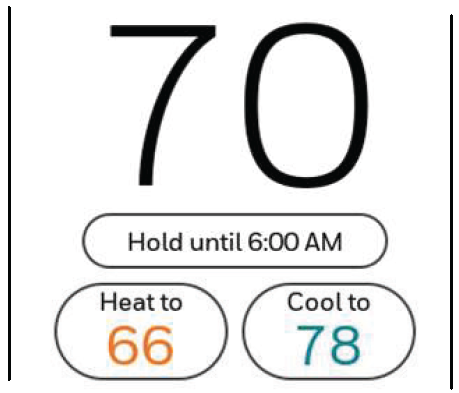
Auto changeover is available if the thermostat is configured for at least one heat stage and one cool stage, and the installer has enabled auto changeover. When configured this way, you can select “Auto” as one of the options under “System Mode.” When in Auto mode, you can set the heat and cool setpoints to the same temperature, although most customers prefer to have a cool setpoint that is at least 3 degrees above the heat setpoint. A 1.5°F differential is enforced automatically to ensure that heating does not start immediately after cooling shuts off, or vice versa.
Em Heat Mode
Emergency heat runs when you manually switch the thermostat to Em Heat mode. When the thermostat is in emergency heat mode, the heat pump is locked out, and backup heat is used to maintain the heat setpoint. Emergency heat mode is only available when the thermostat has been configured by the installer for a heat pump with backup heat. From the home screen, touch the menu icon and then “System Mode.” You can set the thermostat to Heat, Off, Cool, Emergency Heat, or Auto (Auto is only available if configured by the installer).
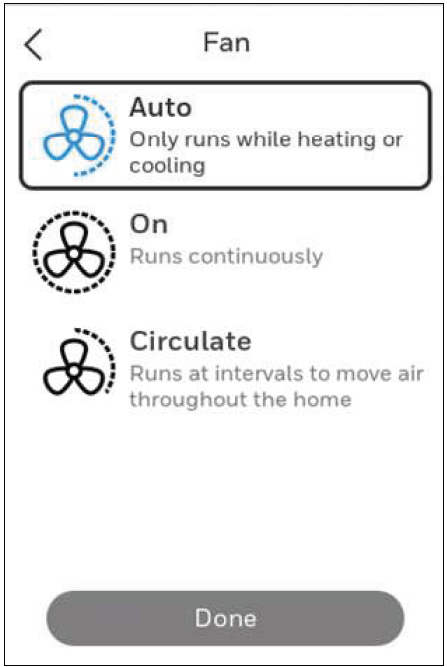
Setting the Fan
Note: Fan settings are not available for all system types.
- Touch any part of the display to wake the thermostat.
- Touch the MENU icon at the bottom of the screen.
- Touch “Fan.”
Choose On, Auto, or Circulate.
Touch the arrow in the upper-left corner to return to the previous screen.
- Auto: Runs the fan only when the heating or cooling system is operating.
- On: Runs the fan continuously.
- Circulate: Runs the fan approximately 33% of the time to ensure air circulation.
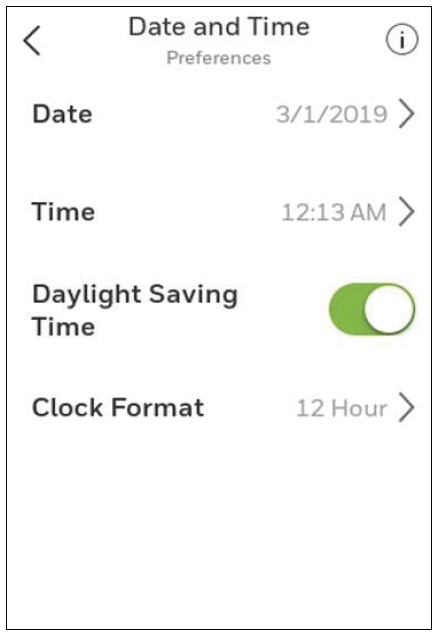
Setting the Time/Date
When the thermostat is linked to the home Wi-Fi router and registered to an account using the Resideo app, the date and time will update automatically. If you are not using Wi-Fi, you can set the time and date as follows:
- Touch any part of the display to wake the thermostat.
- Touch the MENU icon at the bottom of the screen.
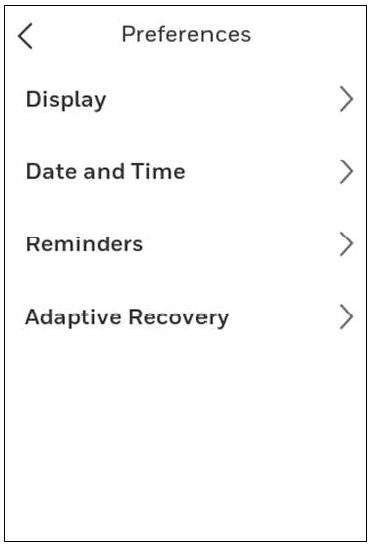
- Scroll down and select “Preferences.”
- Select “Date and Time.”
- The date and time information will be displayed.
Set Date
- If the date shown is incorrect, touch “Date.”
- Scroll up or down on the left of the display until the correct month is in the middle of the screen.
- Scroll up or down in the center of the display until the correct day is in the middle of the screen.
- Scroll up or down on the right of the display until the correct year is in the middle of the screen.
- Touch “Done.”
Set Time
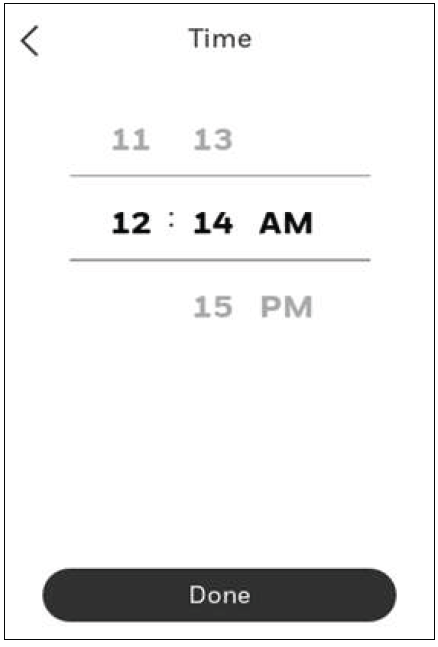
- If the time shown is incorrect, touch “Time.”
- Scroll up or down on the left of the display until the current hour is in the middle of the screen.
- Scroll up or down in the center of the display until the current minutes are in the middle of the screen.
- Scroll up or down on the right of the display until the correct AM or PM is in the middle of the screen.
- Touch “Done.”
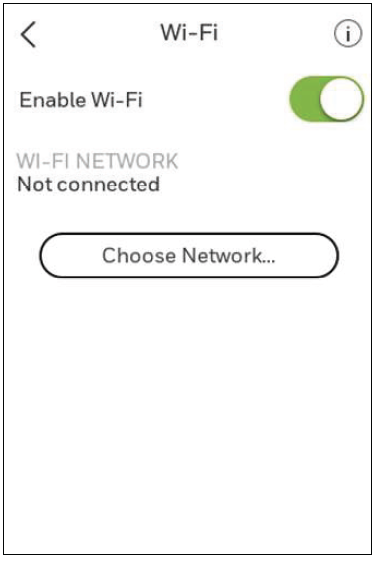
Connect to Wi-Fi
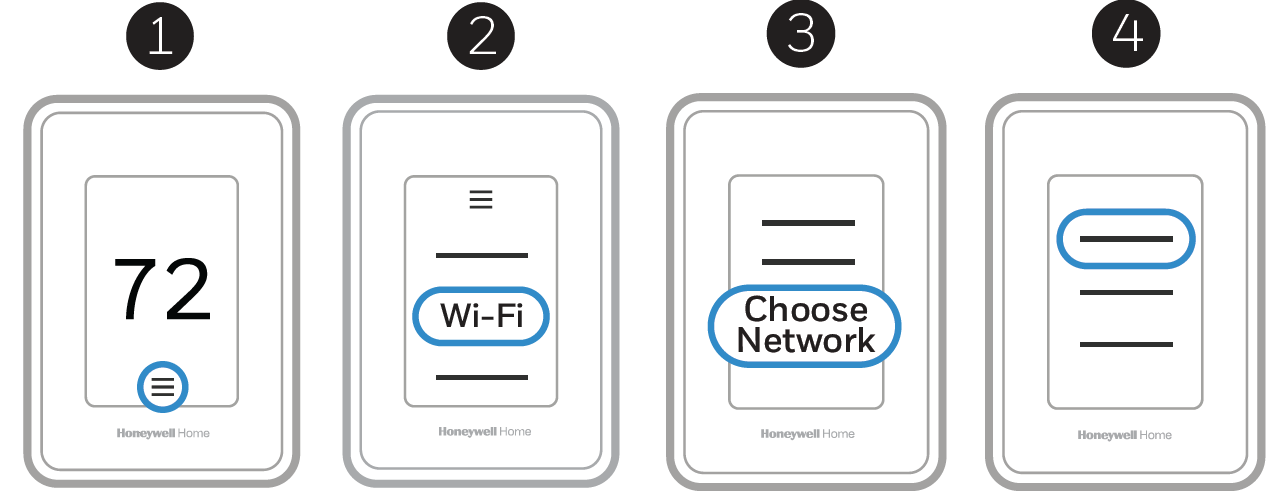
- Open the Menu.
- Scroll to and select “Wi-Fi.”
- Tap “Choose Network.”
- Select a network.
Connect to the Resideo App
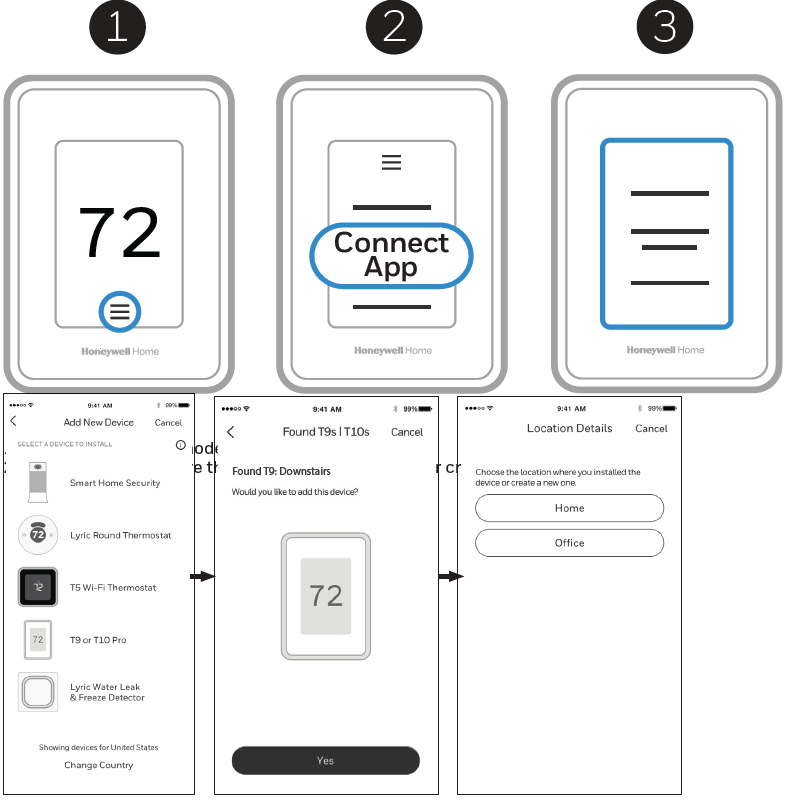
- Open the Menu.
- Tap “Connect App.”
- Follow the on-screen instructions.
Enabling or Disabling Wi-Fi and Disconnecting or Reconnecting to a Wi-Fi Network
On Thermostat
Enable Wi-Fi
- Touch any part of the display to wake the thermostat.
- Touch the MENU icon at the bottom of the screen.
- Scroll down and select “Wi-Fi.”
- Verify that “Enable” is selected.
Connecting to a Wi-Fi Network
- Verify that Wi-Fi is enabled using the steps above.
- Touch “Choose Network.”
- Select the network you wish to connect to from the list and enter the password.
Disable Wi-Fi
- Touch any part of the display to wake the thermostat.
- Touch the MENU icon at the bottom of the screen.
- Scroll down and select “Wi-Fi.”
- Verify that “Enable” is deselected.
Disconnecting from a Wi-Fi Network
- Touch any part of the display to wake the thermostat.
- Touch the MENU icon at the bottom of the screen.
- Scroll down and select “Wi-Fi.”
- Touch “Choose Network.”
- Select the network you wish to connect to from the list and enter the password.
Apple HomeKit Setup
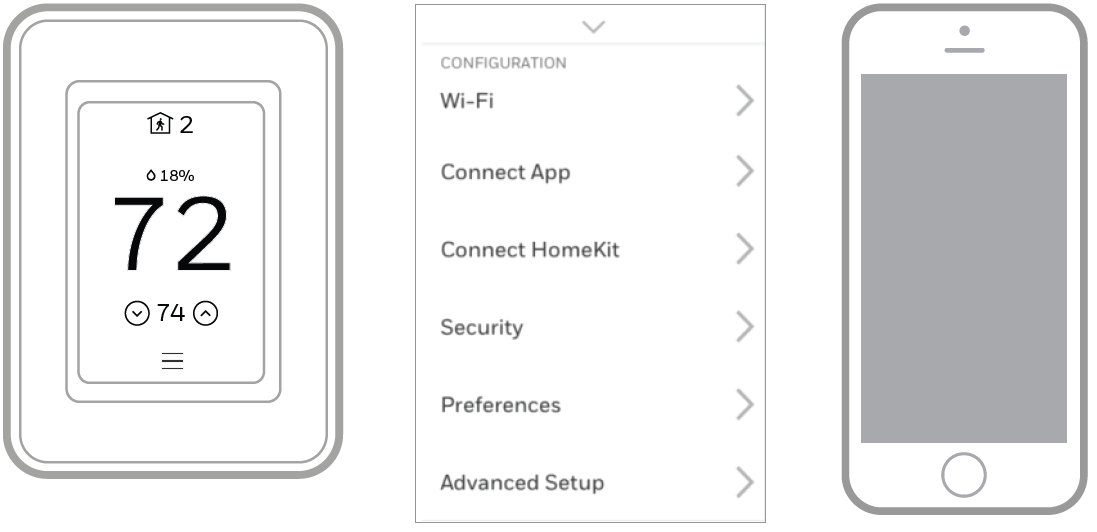
- Touch the Menu icon at the bottom of the T9 home screen.
- Scroll down and select “Connect HomeKit.”
- Use the Apple Home app and select “Add Accessory.” Scan the code shown on your thermostat with your phone.
- Follow the instructions on your phone.
Setting a schedule on the thermostat
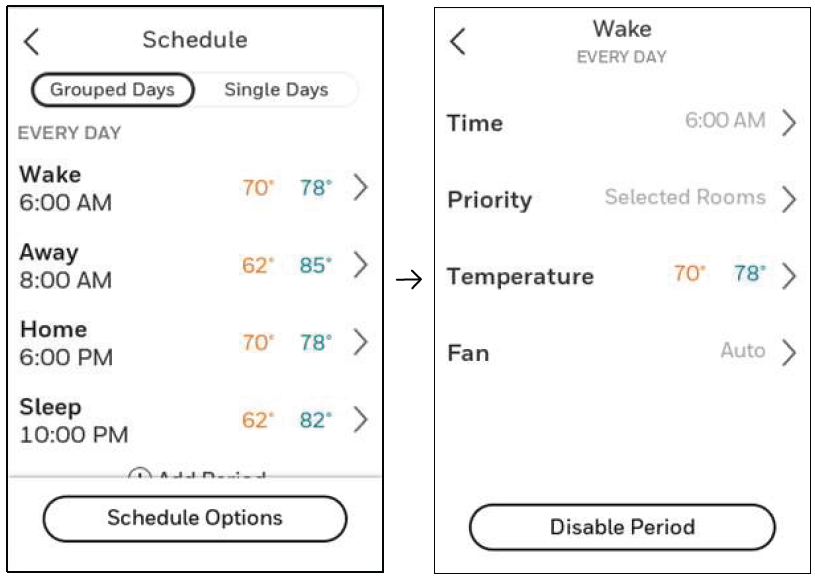
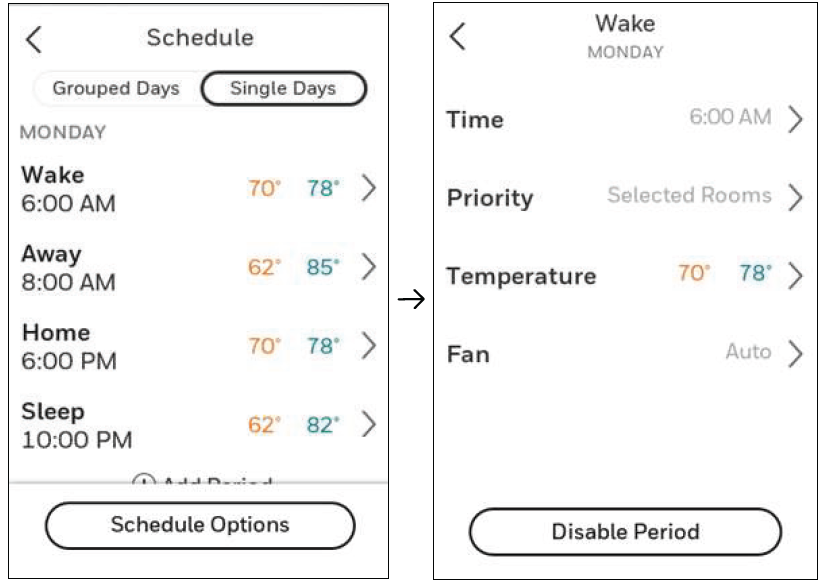
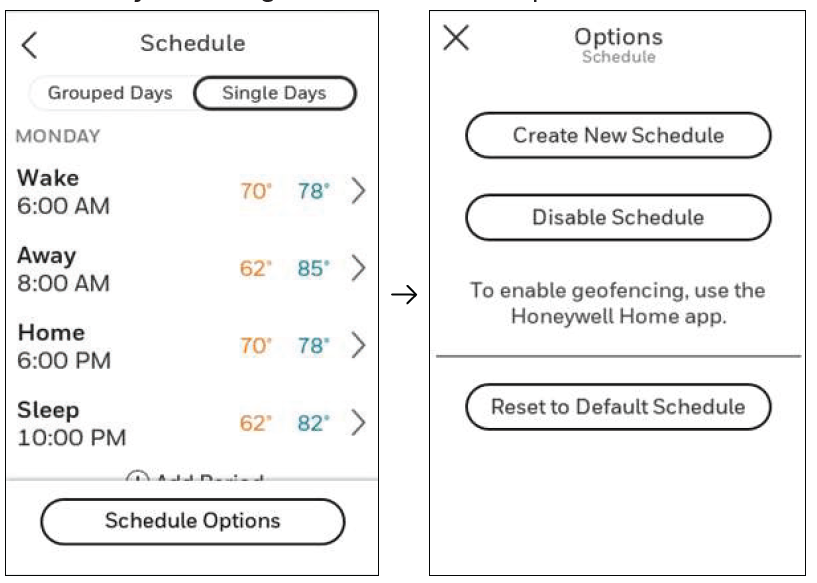
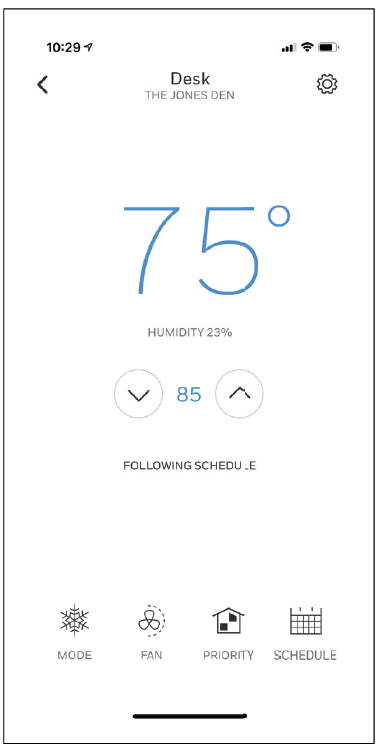
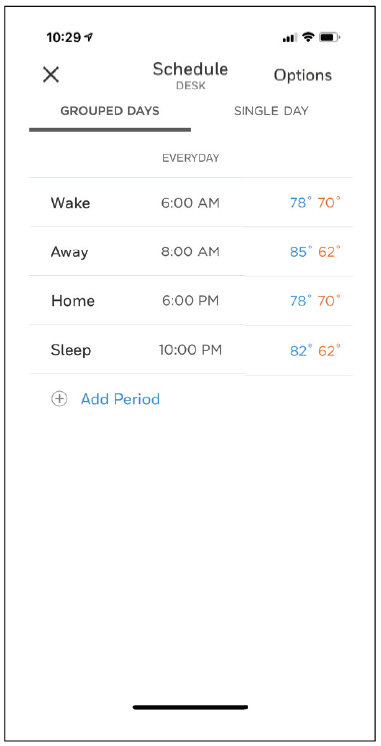
Scheduling Through the App
Flexible Scheduling: You can choose to use location-based temperature control (geofencing technology), time-based scheduling, or a combination of both to make sure your home is always comfortable.
- Location-Based Temperature Control: Using geofencing technology, the T9 Smart Thermostat will automatically use your smartphone’s location, which can save energy when you leave and make your home comfortable by the time you return.
- Smart Scheduling: Adds a Sleep period to location-based temperature control.
- Time-Based Scheduling: You can program a schedule where every day is different, a schedule where weekdays and weekends are different, or a schedule where every day is the same. There are four adjustable periods per day: Wake, Away, Home, and Sleep.
- No Schedule: You can also choose not to set a schedule and adjust the thermostat manually.
- Sensor Priority: Select which sensors are used for each program period or when the thermostat is operated manually.
Schedule Override on Device
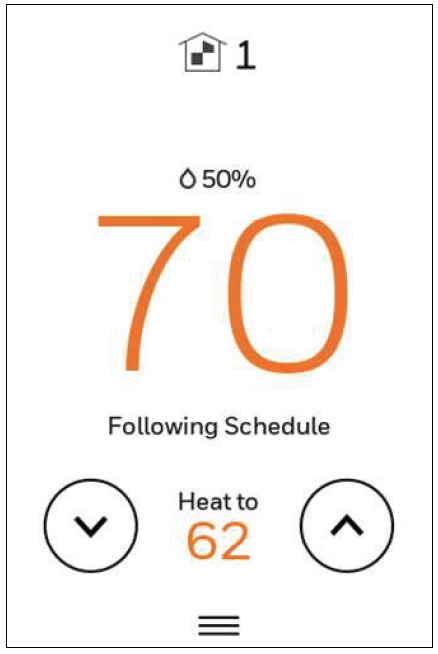
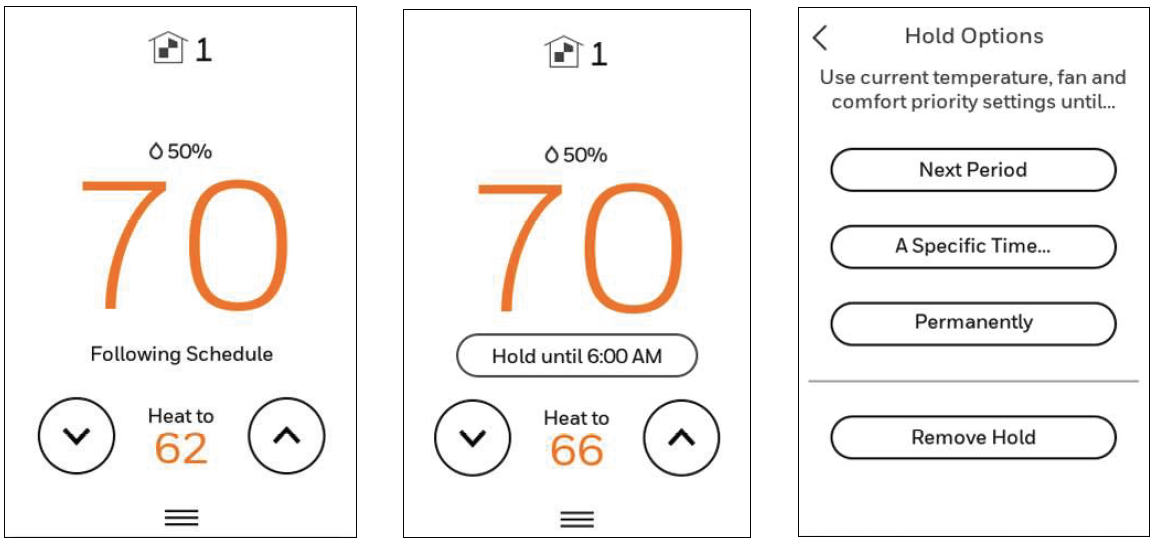
With the thermostat in Heat, Cool, Auto, or Em Heat mode, press the up or down arrow to change the setpoint. If the thermostat is in Auto mode, you need to press “Heat To” or “Cool To” first.
If scheduling is enabled, the display will show “Hold Until” and a time at the bottom of the screen. Touch this option.
The display will show “Use current temperature, fan, and comfort priority settings until…”
Options are:
- Next Period
- A Specific Time
- Permanently
- Remove Hold
Configuration Settings (Revising Settings)
If this is not a new installation and you want to access the configuration menu to view or revise settings:
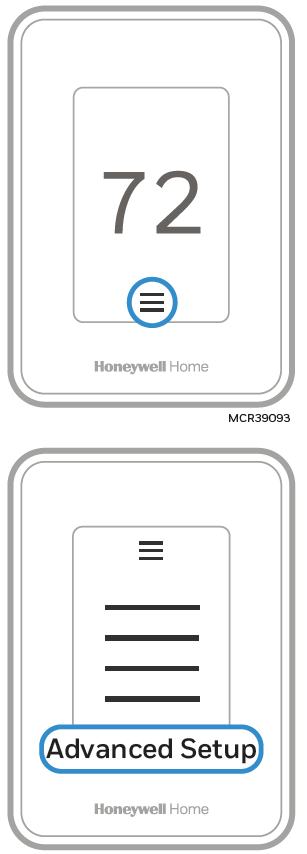
- Touch the menu icon (three horizontal lines at the bottom of the display).
- Scroll down and touch “Advanced Setup.”
- Touch “Modify Configuration.”
- After selecting the correct option for each setting, touch “NEXT” at the bottom of the display to advance to the next option.
- To see a list of all setup parameters, go to “Configuration Settings.”
- To finish setup and save your settings, touch “Done” in the upper-left corner of the display.
Adding a Wireless Sensor
- Touch any part of the display to wake the thermostat.
- Touch the MENU icon at the bottom of the screen.
- Scroll down and touch “Devices and Sensors.”
Advantages and Strengths
The Honeywell Home T9 Smart Thermostat offers numerous compelling benefits that justify its position as a leading smart thermostat option:
Energy Efficiency and Cost Savings
ENERGY STAR certification guarantees the T9 thermostat meets strict energy efficiency standards, reducing your heating and cooling costs significantly. Geofencing prevents conditioning empty homes, while occupancy detection focuses climate control only on occupied rooms. Monthly energy reports track your consumption patterns and compare your usage against similar homes in your area, identifying optimization opportunities. Users typically report 10-15% reductions in HVAC-related energy costs after installation.
Intelligent Learning and Automation
The Smart Response feature learns your home's thermal characteristics and HVAC cycle times, automatically pre-conditioning your home to reach desired temperatures exactly when you need them. This eliminates manual adjustments and reduces energy waste from unnecessary heating and cooling cycles.
Comprehensive Smart Home Integration
Compatibility with all major smart home ecosystems allows seamless integration with existing devices. Control the Honeywell Home T9 Smart Thermostat through voice commands via Alexa or Google Assistant, or automate temperature adjustments through routines and scenes in your preferred smart home platform.
Multi-Room Capability
Support for up to 20 additional wireless room sensors enables sophisticated multi-zone temperature management. Prioritize comfort in multiple rooms simultaneously, ensuring consistent temperatures throughout your home regardless of size or layout.
Reliable Monitoring and Alerts
Automated alerts notify you of filter change requirements, frost conditions, WiFi connectivity issues, and potential HVAC system failures. These proactive notifications prevent equipment damage and maintain optimal system performance.
Limitations and Considerations
While the Honeywell Home T9 Smart Thermostat offers substantial benefits, several factors warrant consideration before purchase:
C-Wire Requirement and Installation
The thermostat requires a C-wire connection for full functionality. Although an included power adapter addresses this for homes lacking C-wires, installation complexity may exceed some users' comfort levels. Professional installation typically costs $100-$200 if DIY installation isn't feasible.
Initial Setup Complexity
While the thermostat itself installs relatively easily, WiFi configuration, app setup, and geofencing enablement require smartphone access and some technical familiarity. Users unfamiliar with smart home technology may find the initial setup process time-consuming.
Pricing and Value Proposition
At $250-$350, the T9 thermostat represents a mid-to-premium price point. Budget-conscious consumers might find more affordable smart thermostat options, though fewer offer comparable multi-room sensor capability and intelligent learning features.
Sensor Range Limitations
The 200-foot sensor range may prove insufficient for large homes or buildings with significant structural obstacles. Additional sensors cost extra and may be required for comprehensive whole-home coverage.
Pros and Cons Summary
Advantages
- Energy Star Certified: Reduces heating and cooling costs through intelligent efficiency optimization
- Included Smart Room Sensor: Provides occupancy detection and temperature monitoring without additional purchase
- Geofencing Technology: Automatically adjusts temperatures based on family location for maximum savings
- Multi-Room Scalability: Supports up to 20 wireless sensors for comprehensive home coverage
- Universal Compatibility: Works with single-stage and multi-stage HVAC systems and heat pumps
- Smart Home Integration: Compatible with Alexa, Google Assistant, Apple Home, and SmartThings
- Intuitive Touchscreen Interface: Color LCD with backlit design for easy operation
- Comprehensive Alerts: Notifies users of maintenance needs and system issues
Disadvantages
- C-Wire Requirement: May necessitate professional installation in older homes
- Higher Price Point: More expensive than basic programmable thermostats
- WiFi Dependency: Requires stable internet connection for full functionality
- Sensor Range Constraints: 200-foot range may be insufficient for very large homes
- Initial Setup Complexity: App configuration and geofencing setup require smartphone access
Customer Reviews and User Feedback
Users consistently praise the Honeywell Home T9 Smart Thermostat for its intelligent learning capabilities and energy savings. Customers report that the geofencing feature effectively reduces energy waste by preventing conditioning of empty homes, with many noting 10-15% monthly savings on heating and cooling costs.
The included Smart Room Sensor receives particular appreciation for eliminating hot and cold spots throughout homes. Users value the automatic occupancy detection, which prioritizes comfort in actively used rooms while reducing energy consumption in unoccupied spaces.
Common praise points include the responsive touchscreen interface, reliable mobile app control, and seamless integration with popular smart home platforms. The comprehensive alert system for filter changes and system issues resonates well with maintenance-conscious homeowners.
Occasional complaints center on the WiFi connectivity requirements and the necessity of C-wire connections in some installations. A few users report learning curve challenges during initial setup, particularly with geofencing configuration. However, these concerns represent a minority of user experiences.
Recommended for: Energy-conscious homeowners seeking comprehensive climate control, multi-room homes requiring zone management, and users already invested in smart home ecosystems. The Honeywell Home T9 Smart Thermostat delivers exceptional value for those prioritizing both comfort and energy efficiency.
Warranty and Support
The Honeywell Home T9 Smart Thermostat includes a comprehensive 2-year limited manufacturer's warranty covering defects in materials and workmanship. Honeywell's customer support team provides technical assistance through phone, email, and online resources. The Honeywell Home mobile application includes built-in troubleshooting guides and system diagnostics to resolve common issues independently.
Conclusion: Making Your Decision
The Honeywell Home T9 Smart Thermostat with Smart Room Sensor represents an excellent investment for homeowners seeking intelligent climate control with genuine energy savings. Its combination of geofencing, occupancy detection, multi-room capability, and smart home integration addresses the needs of modern households while delivering measurable reductions in heating and cooling costs. Whether you're upgrading from a basic programmable thermostat or expanding your smart home ecosystem, the T9 thermostat provides reliable performance, intuitive controls, and the flexibility to adapt to your family's unique comfort requirements.
```
More honeywell home manuals
- Setup: Honeywell Home Color Touchscreen Programmable Thermostat RTH9585WF User Manual
- Setup: Honeywell Home FocusPRO P200 Series Programmable Thermostats User Manual
- Setup: Honeywell Home Programmable Thermostat RTH2300/RTH221 Series User Manual
- Setup: Honeywell Home T10 Pro Smart Programmable Thermostat with RedLINK THX321WFS2001W User Manual
- Setup: Honeywell Home RTH6500WF Smart Series Programmable Thermostat User Manual
- Setup: Honeywell Home X1N Non-Programmable Thermostat RTH11B/RTHC11B User Manual
Leave a Comment