
Pairing & Setup: Jbl Control 1 Pro Loudspeaker Step by Step Guide
Content
JBL Control 1 Pro Loudspeaker
Introduction
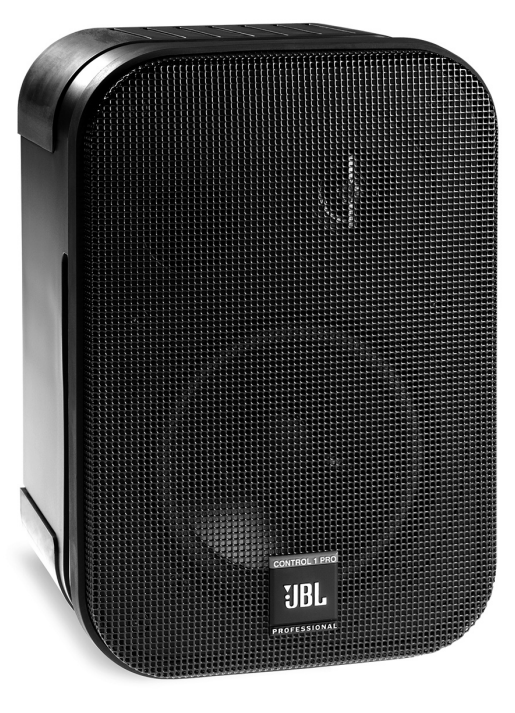
The JBL Control 1 Pro Loudspeaker is a compact, high-performance professional audio solution designed to deliver exceptional sound quality in demanding near-field applications. Equipped with monitor-grade low and high-frequency drivers and a state-of-the-art professional crossover network, this loudspeaker is crafted to provide transparent, faithful sonic performance, ideal for both critical listening and multimedia use. Its durable polypropylene structural foam enclosure is magnetically shielded, making it safe for use near video monitors, computers, and other magnetically sensitive equipment.
Key benefits include a robust 150-watt continuous power handling, a wide frequency range from 80 Hz to 20 kHz, and SonicGuard™ overload protection that safeguards the speaker’s internal components. The included wall-mount bracket allows flexible installation on walls or flat surfaces, optimizing space in studios, control rooms, or home audio setups.
This loudspeaker is targeted at audio professionals, broadcasters, recording studios, multimedia workstations, and audiophiles seeking compact yet powerful near-field monitors. It is also highly suited for foreground and background music in commercial environments. The JBL Control 1 Pro typically falls within the mid-range price segment, offering excellent value given its professional-grade components and build quality. It is widely available through authorized JBL distributors and online retailers.
Bracket Assembly and Mounting Guide
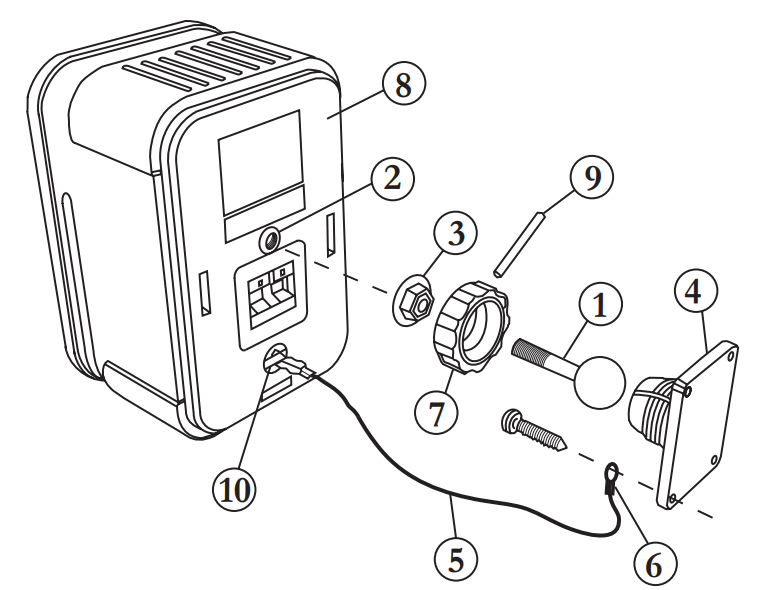
- Screw the metal rod/ball assembly (1) into the threaded insert (2) on the back of the cabinet (8) until it is seated against the bottom of the insert.
- Next, tighten the “knurled” nut (3) with a small wrench until it is seated against the back of the cabinet. Tighten the nut until it has “locked” the rod/ball assembly (1) to the cabinet. Note: the nut may leave marks on the back of he cabinet where the attachment is made h; however, the flange of the nut will cover these marks.
- Mount the wall bracket plate (4) onto a flat , sturdy surface using the appropriate mounting hardware for the surface. A safety cable (5) (not included) may be attached to the wall bracket via its eyelet (6) at one of the two lower screw mounting points or to a secondary point off the mounting plate.
- Next, slip the large molded nut (7) over the ball on the metal rod/ball assembly (1).
- Holding the cabinet (8) with both hands, insert the ball on the metal rod/ball assembly (1) into the cup of the wall plate (4).
- Orient the speaker into the desired position and hand-tighten the molded nut
- Once the orientation is finalized, use the metal bar (9) in one of the holes
on the molded nut (7) to securely tighten. - Finally, clip the safety cable to the cabinet’s safety bar (10) on the back of the cabinet.
Rotating the Logo
The Control 1 Pro’s logo can be oriented for display at 90° increments. To rotate the logo, first gently pry the grille and gasket from the cabinet. Next, push in the logo’s fastener (found on the underside of the grille) and rotate the logo to the desired position.
Troubleshooting
If there is no sound from your speakers:
- Make sure your power amplifier is on and the gain is set above its minimum setting.
- Make sure there is a signal to your amplifier from your mixer.
- Ensure all wires are connected and that none are cut or frayed.
- If more than one pair of speakers is being used, check the minimum impedancrequirementsss of your amplifier (overloading your amplifier can result in damage to your amp).
If there is no sound from one of your speakers:
- Check the balance control on your mixer.
- Check the channel output gains of your amplifier.
- Ensure all wires are connected and that none are cut or frayed.
If there is no (or weak) bass output or a poor stereo image:
- Make sure the polarities (+ and -) of the speakers' inputs are properly connected.
Specifications
System:
- FrequencRangeeng-- e (-10 dB): 80Hz - 20kHz
- Frequency Response (+/- 3 dB): 100Hz - 18kHz
- Power Capacity1: 150 W
- Sensitivity2: 87dB SPL, 1 W 1m (3.3 ft)
- Maximum SPL3: 108dB continuous, 114dB peak
- Directivity Factor (Q)2: 6.0
- Directivity Index (DI): 7.8dB
- Nominal Impedance: 4 ohms
- Crossover Frequency: 4.2kHz
- Overload Protection: Full-range SonicGuard™ power limiting to protect the network and transducers
Transducers:
- LF Driver: 135mm (5.25 in) low-frequency loudspeaker
- HF Driver: 19mm (.75 in) polycarbonate dome tweeter
Enclosure:
- Enclosure Material: Polypropylene Structural Foam
- Finish: Black or White
- Dimensions: 235mm x 159mm x 143mm (9.25 in x 6.25 in x 5.6 in)
- Net Weight (each): 1.8 kg (4 lbs)
- Shipping Weight (pair): 4.6 kg (10 lbs)
- Included Accessories: Mounting Bracket Assembly
Pros & Cons of the JBL Control 1 Pro Loudspeaker
- Pros:
- High fidelity sound with wide frequency response (80 Hz - 20 kHz) and professional-grade drivers.
- Compact and versatile design with included wall-mount bracket for flexible installation.
- Magnetically shielded enclosure suitable for use near video and computer equipment.
- SonicGuard™ overload protection enhances durability and reliability.
- Good value for money compared to other professional near-field monitors in its class.
- Cons:
- Nominal impedance of 4 ohms may require compatible amplifiers to avoid a mismatch.
- Limited low-frequency extension compared to larger studio monitors; may need subwoofer augmentation for full-range audio.
- Basic connectivity with spring-loaded terminals rather than more advanced inputs.
Customer Reviews of the JBL Control 1 Pro Loudspeaker
Many users praise the JBL Control 1 Pro Loudspeaker for its clear, detailed sound and robust build quality. Reviewers highlight its excellent performance in small to medium studio environments and its magnetically shielded design as a significant advantage for multimedia setups. Typical ratings average around 4.5 stars out of 5, with users recommending it for both professional and home audio use.
Common complaints include the need for pairing with a subwoofer for deeper bass presence and occasional concerns about the speaker’s 4-ohm impedance requiring careful amplifier matching. Nonetheless, the majority of feedback notes the product’s excellent value and reliable performance, making it a popular choice among audio engineers and hobbyists alike.
Faqs
How do I properly set up the JBL Control 1 Pro Loudspeaker for optimal sound performance?
What should I do if the JBL Control 1 Pro Loudspeaker produces distorted or weak sound?
Can the JBL Control 1 Pro Loudspeaker be used safely near video or computer monitors?
What are the key features of the JBL Control 1 Pro Loudspeaker that enhance its professional use?
How do I mount the JBL Control 1 Pro Loudspeaker on a wall or flat surface safely?
Is the JBL Control 1 Pro Loudspeaker compatible with standard home or professional amplifiers?
What maintenance steps should I follow to ensure the longevity of my JBL Control 1 Pro Loudspeaker?
How can I optimize the placement of the JBL Control 1 Pro Loudspeaker for the best audio experience?
Leave a Comment