
Setup: Panasonic Home Network System Indoor Siren KX-HNS105 User Guide
Content
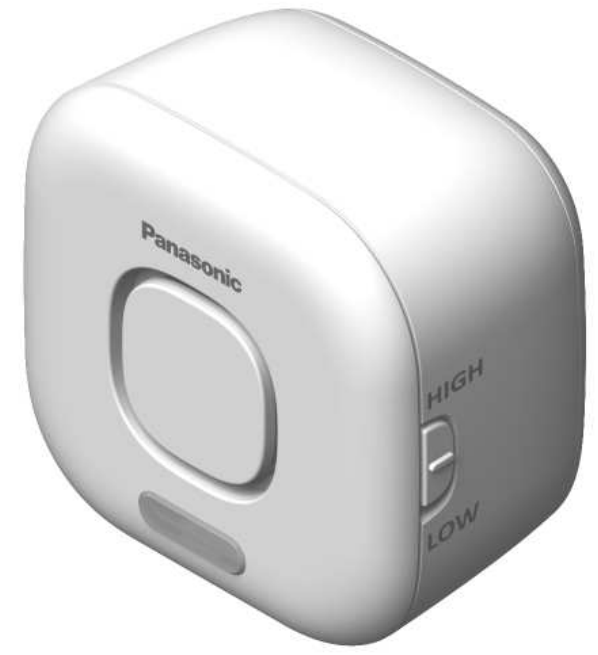
Panasonic Home Network System Indoor Siren KX-HNS105
Introduction
The Panasonic Home Network System Indoor Siren KX-HNS105 is a robust, easy-to-integrate accessory designed to enhance your smart home security. As part of the Panasonic Home Monitoring System, this indoor siren works seamlessly with the KX-HNB600 Hub to deliver instant alerts when sensors detect unauthorized entry or other security events. Key features include a powerful 110 dB alarm, a visible flashing LED warning light, and a sound volume switch for customizable alerts—ensuring that both homeowners and intruders are immediately aware of a security breach.
One of the standout benefits of the KX-HNS105 is its simple setup, thanks to a one-push pairing button, making it accessible even for users new to smart home technology. The device is designed for indoor use, with a compact, wall-mountable white casing that blends into most home environments. It operates within the DECT frequency range, ensuring reliable wireless communication with the hub.
The Panasonic Home Network System Indoor Siren KX-HNS105 is ideal for families, renters, and small business owners seeking an affordable yet effective layer of security. Typical use cases include integration with door/window sensors and motion detectors, providing peace of mind whether you’re at home or away. The system can support up to 50 sensors, including smart plugs, motion detectors, and additional sirens, allowing for scalable protection.
While the KX-HNS105 is a discontinued product in some regions, it remains available through select retailers and online marketplaces. The estimated price range is typically mid-tier for smart home accessories, offering strong value given its reliability and integration with the broader Panasonic Home Monitoring System. Availability may vary by region, so checking with local authorized Panasonic dealers is recommended.
Part names and functions
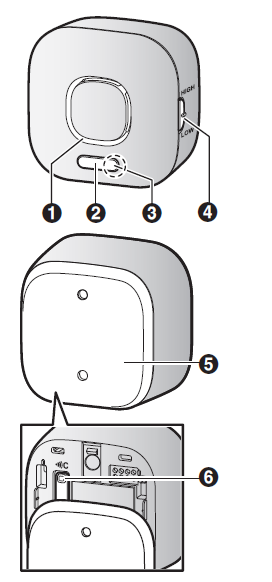
- Horn
- Strobe light
Flashes when the siren is sounding. - LED indicator
- HIGH/LOW
Used to adjust the siren’s volume (page 12). 
Rear cover- Used to register the siren to the hub.
Specifications
- Standards
DECT 6.0 (Digital Enhanced
Cordless Telecommunications 6.0) - Frequency range
DECT: 1.92 GHz – 1.93 GHz - RF transmission power
DECT: 115 mW (max.) - Power source
120 V AC, 60 Hz - Power consumption
Standby: Approx. 1.5 W
Maximum: Approx. 2.5 W - Alert tone volume
High alert level: approx. 110 dB
Low alert level: approx. 104 dB (measured approx. 10 cm (3 15/16 inches) from the product) - Operating conditions
0 °C – 40 °C (32 °F – 104 °F) - Dimensions (height ´ width ´ depth)
Approx. 71 mm ´ 73 mm ´ 46 mm (2 13/16 inches ´ 2 7/8 inches ´ 1 13/16 inches) - R Mass (weight)
Approx. 90 g (0.20 lb)
Accessory information
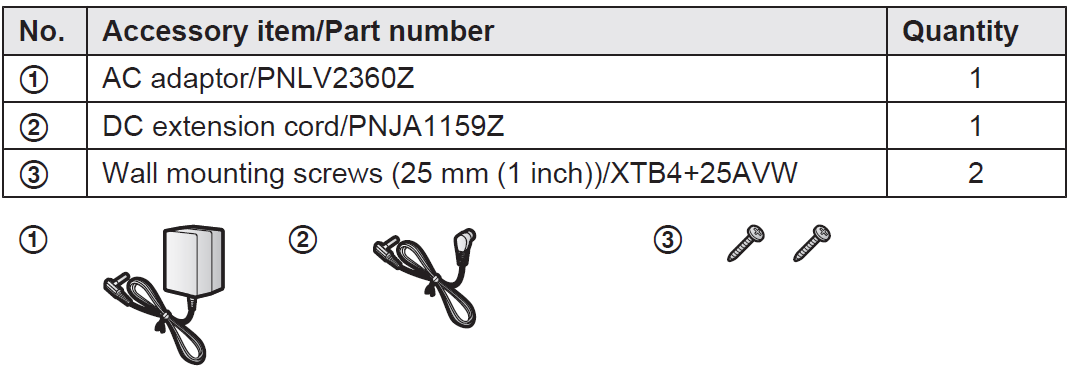
Supplied accessories
Installation
- To prevent the risk of fire or electrical shock, do not expose the product to rain or any type of moisture.
- Do not place or use this product near automatically controlled devices such as automatic doors and fire alarms. Radio waves emitted from this product may cause such devices to malfunction,, resulting in an accident.
- Do not allow the AC adaptor to be excessively pulled, bent, or placed under heavy objects.
- Install the product only on a vertical surface. Do not install the product on a ceiling, as the product may fall, resulting in damage or injury.
- Keep small parts (screws, etc.) out of the reach of children. There is a risk of swallowing. In the event they are swallowed, seek medical advice immediately.
Installation
Mount the siren on a wall using the holes in the rear cover.
Note:
- The strobe light flashes when the siren sounds. Mount the siren in a location where its strobe light will be visible.
- Mount the siren in a stable location where the siren can be adequately supported when mounting.
- Mount the siren securely to a wall. Vibrations may cause it to fall if it is not secured.
- Do not mount a siren on a soft material. It may fall down, break,, or cause injury.
- Do not mount the siren on the following places: gypsum board, ALC (autoclaved lightweight cellular concrete), concrete block, plywood less than 25.4 mm (1 inch) thick, etc.
- Use only the supplied Panasonic AC adaptor PNLV236.
Remove the rear cover by pressing the upper sides of the cover (A) and sliding it down (B).

- Attach the rear cover to the wall by using screws (A ).
- Place the rear cover with the “UP” mark facing upwards.
37 mm (1 15/32 inches)

- Use the DC extension cord (A) to connect the AC adaptor (B) to the siren.
- Insert the male plug of the DC extension cord (C) firmly into the DC jack (D, E).
- Insert the female plug of the DC extension cord (F) firmly into the AC adaptor plug (G).
Connect the AC adaptor to the power outlet (H).

- Attach the siren to the rear cover. R Insert the grooves on the siren into the 4 tabs on the rear cover, and then push down the siren.

Operating safeguards
- Unplug the product from power outlets before cleaning. Do not use liquid or aerosol cleaners.
- Do not disassemble the product. R Never put metal objects inside the product. If metal objects enter the product, turn off the circuit breaker and contact an authorized service center.
Installation and location
- Never install wiring during a lightning storm.
- The AC adaptor is used as the main disconnect device. Ensure that the AC outlet is installed near the product and is easily accessible.
- To avoid the risk of strangulation, keep the product and the AC adaptor cord at least 1 m (3 feet) from a child’s crib and out of the reach of small children.
Important safety instructions
When using your product, basic safety precautions should always be followed to reduce the risk of fire, electric shock, and injury to persons, including the following:
- Do not use this product near water,, for example, near a bathtub, washbowl, kitchen sink, or laundry tub, in a wet basement,, or near a swimming pool.
- Use only the power cord indicated in this document.
Setup overview
- Initial setup
Make sure you can access the system using your mobile device. For details, refer to the System Setup Guide included with your hub. - Registration
Required only if the siren was purchased separately (i.e., not as part of a bundle). - Confirm the installation area..
Read the information in this document to confirm that the desired installation area is suitable for proper operation. - Installation
Install the siren in the desired location.
Features available when using the [Home Network] app
Some of the siren’s features that are available when using the [Home Network] app are listed below. For more information, refer to the User’s Guide (page 12).
- Alarm system
You can use the app to arm and disarm the alarm system, confirm the current status of the system’s devices, and view a log of previous events. You can also use the app to stop the siren from sounding. - Device management
You can use the app to confirm the wireless signal strength of the siren, change the siren’s name, change whether the siren sounds, flashes, or both, and test the siren.
Troubleshooting Common Issues with the Panasonic KX-HNS105 Indoor Siren
Even reliable devices like the Panasonic Home Network System Indoor Siren KX-HNS105 can occasionally encounter issues. Below are common problems, their solutions, and tips to keep your system running smoothly.
Common Problems and Solutions
- Siren Not Sounding: Check that the device is properly paired with the KX-HNB600 Hub. Use the one-push pairing button to re-establish the connection if needed. Ensure the hub is powered and within range.
- No LED Flashing: Verify that the siren is receiving power. If the LED still does not flash, a factory reset may be necessary (refer to the installation guide for reset instructions).
- Low Volume: The KX-HNS105 features a sound volume switch—ensure it is set to “High” for maximum alert volume.
- Intermittent Alerts: Interference or a low battery in sensors can cause inconsistent performance. Replace batteries in sensors and ensure devices are within the recommended operating range.
Error Codes and Fixes
While the KX-HNS105 does not display traditional error codes, persistent issues may require checking the status LED (red/green) for pairing or power problems. Red typically indicates an error, while green shows normal operation.
Preventive Measures
- Regularly test the siren and connected sensors.
- Keep firmware updated if your hub supports it.
- Avoid placing the siren in areas with extreme temperatures (operating range: 0°C to 40°C).
Warranty and Support
Panasonic products generally come with a limited warranty. For the KX-HNS105, check your purchase documentation for specific coverage. For further assistance, contact Panasonic customer support via their official website or local service center. Always keep your proof of purchase for warranty claims.
Panasonic Home Network System Products Limited Warranty
Limited Warranty Coverage
If your product does not work properly because of a defect in materials or workmanship, Panasonic Corporation of North America (referred to as “the warrantor”) will, for the length of the period indicated on the chart below, which starts with the date of original purchase (“Limited Warranty period”), at its option either (a) repair your product with new or refurbished parts, or (b) replace it with a new or a refurbished equivalent value product, or (c) refund your purchase price. The decision to repair, replace , or refund will be made by the warrantor.
Home Network System Products microSD card (Included model only)
- Parts: One (1) Year 90 days
- Labor: One (1) Year N/A
During the “Labor” Limited Warranty period,, there will be no charge for labor. During the “Parts” Limited Warranty period, there will be no charge for parts. You must mail in your product prepaid during the Limited Warranty period. This Limited Warranty excludes both parts and labor for batteries, antennas, and cosmetic parts (cabinet). This Limited Warranty only applies to products purchased and serviced in the United States or Puerto Rico. This Limited Warranty is extended only to the original purchaser and only covers products purchased as new.
Pros and Cons of the Panasonic KX-HNS105 Indoor Siren
Advantages
- Loud, Deterrent Alarm: At 110 dB, the siren is highly effective at alerting residents and deterring intruders.
- Visible Warning: The flashing LED provides a visual alert, enhancing security for hearing-impaired users.
- Easy Installation: One-push pairing and wall-mount design simplify setup.
- Scalable System: Integrates with up to 50 sensors, supporting comprehensive home monitoring.
- Customizable Volume: Adjustable sound level ensures the alarm meets your needs without being overly disruptive.
Limitations
- Hub Required: Must be used with the KX-HNB600 Hub, which is sold separately.
- Discontinued Status: May be harder to find as a new product in some regions.
- Limited Smart Features: Lacks advanced integrations (e.g., voice assistants, app notifications) compared to newer competitors.
- Basic Design: No battery backup; relies on AC power.
Value for Money
The Panasonic Home Network System Indoor Siren KX-HNS105 offers solid value for users invested in the Panasonic ecosystem, providing reliable alerts at a reasonable price point. While not as feature-rich as some modern smart sirens, it excels in core functionality and ease of use.
Comparison with Alternatives
Compared to standalone smart sirens, the KX-HNS105’s integration with a broader sensor network is a key differentiator. However, users seeking app control or voice assistant compatibility may prefer newer, Wi-Fi-enabled models from other brands.
Customer Reviews and Feedback
User feedback for the Panasonic Home Network System Indoor Siren KX-HNS105 highlights its reliability and ease of installation. Many customers appreciate the loud alarm and visible flashing light, noting that these features provide peace of mind and effectively deter potential intruders. The device typically receives 4 out of 5 stars, with praise for its straightforward operation and seamless integration with other Panasonic sensors.
Common complaints include the necessity of a separate hub for operation and the lack of advanced smart features found in competing products. Some users have mentioned occasional pairing issues, though these are generally resolved by following the setup instructions carefully. A few reviewers note that the siren’s design is somewhat basic compared to more modern alternatives, but most agree it delivers on its core promise of home security.
Testimonials often recommend the KX-HNS105 for users already invested in the Panasonic Home Monitoring System, emphasizing its value as part of a larger, reliable security setup. For those seeking a simple, effective indoor siren without the need for app integration, the KX-HNS105 remains a solid choice.
Faqs
How do I install and configure the panasonic Home Network System Indoor Siren KX-HNS105 for the first time?
What should I do if my panasonic KX-HNS105 indoor siren is not sounding during an alarm event?
Can the panasonic Home Network System Indoor Siren KX-HNS105 be integrated with third-party smart home systems?
How loud is the alarm on the panasonic KX-HNS105 indoor siren, and can I adjust the volume?
What maintenance does the panasonic KX-HNS105 indoor siren require, and how often should it be checked?
How many panasonic KX-HNS105 indoor sirens can I add to a single Home Network System hub?
Can the panasonic KX-HNS105 indoor siren operate during a power outage?
How do I troubleshoot connectivity issues between my panasonic KX-HNS105 indoor siren and the Home Network System hub?
More panasonic manuals
- How to Use: Panasonic Home Network System Keychain Remote KX-HNK102 User Manual
- Setup: Panasonic Garage Door Sensor KX-HNS107 User Guide
- How to Use: Panasonic Home Network System Access Keypad KX-HNK101 User Manual
- How to Use: Panasonic Glass Break Sensor KX-HNS104 User Guide
- Setup: Panasonic Home Network System Digital Cordless Handset KX-HNH100 User Manual
- Setup & Usage: Panasonic VACUUM CLEANER MC-UL815 User Manual
Leave a Comment