
Setup & Usage: Panasonic VACUUM CLEANER MC-UL815 User Manual
Content
Panasonic VACUUM CLEANER MC-UL815
Introduction
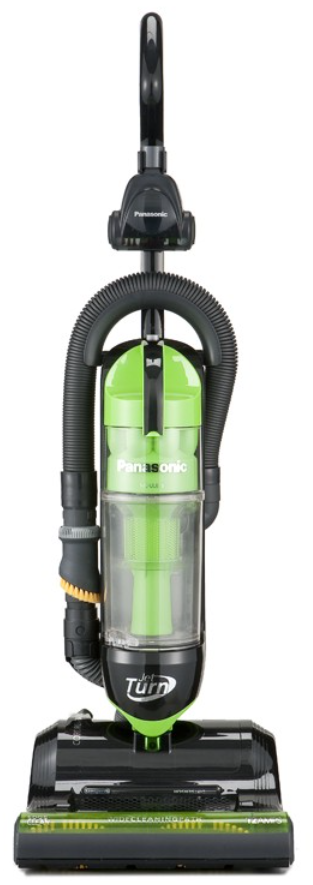
The Panasonic VACUUM CLEANER MC-UL815 is a versatile, high-performance upright vacuum designed to deliver thorough cleaning across multiple floor types. Equipped with a powerful 12-amp motor, this model excels in picking up dirt, dust, and debris with efficiency and ease, making it an ideal choice for households seeking reliable and consistent cleaning performance. Its bagless design,, paired with HEPA filtration,, on ensures not only convenience in maintenance but also cleaner air quality by trapping fine dust and allergens.
Unique features such as the Electronic Dirt Sensor and Bare Floor Cleaning Option enhance user confidence by detecting hidden dirt and optimizing cleaning on hard surfaces, respectively. The vacuum’s lightweight design and adjustable handle positions make it practical for use in homes with varied furniture arrangements, including tight spaces and edges. Targeted at everyday users looking a for a balance between power and usability, the MC-UL815 suits apartments, family homes, and multi-surface environments.
Currently, the Panasonic MC-UL815 is available through select online retailers and specialty stores, with an estimated price range of $150 to $200, offering competitive value for the features it provides. Its combination of performance, filtration, and ease-of-use makes it a strong contender in the mid-range vacuum cleaner market.
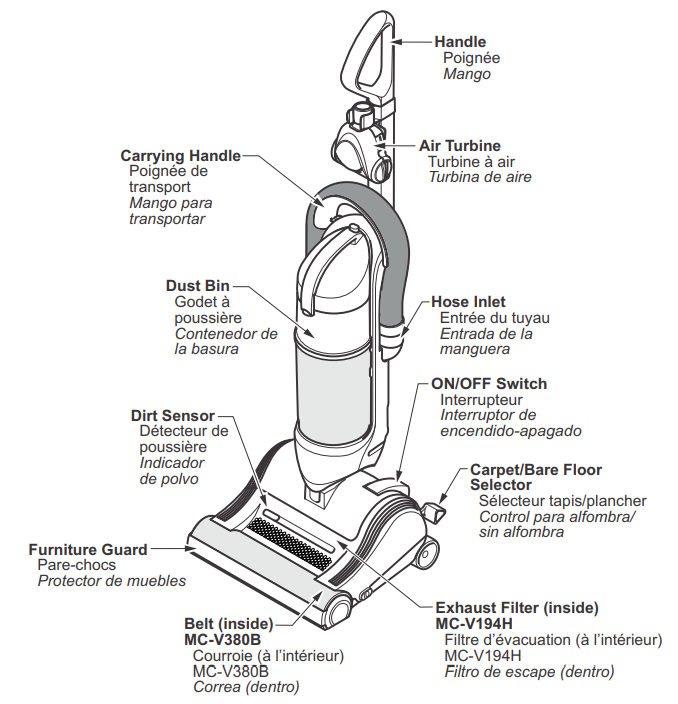
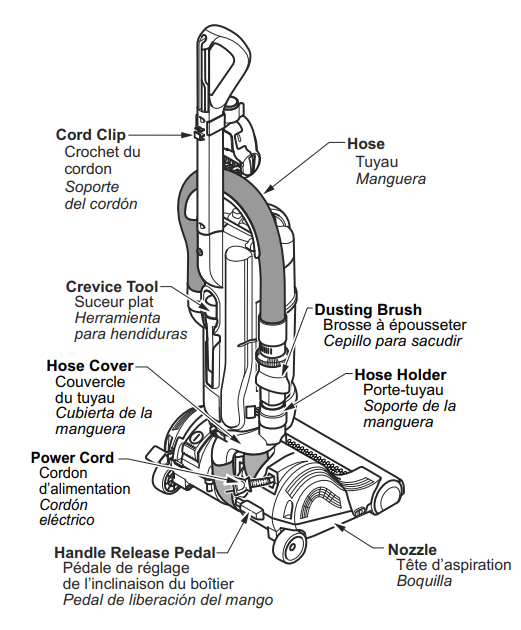
PARTS IDENTIFICATION
Nomenclature
ASSEMBLY
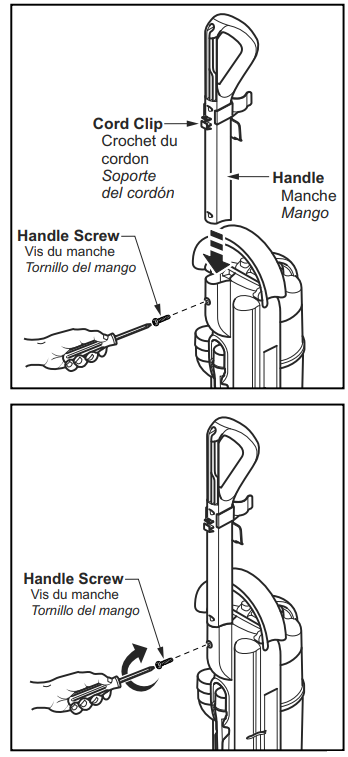
Attaching Handle
- DO NOT plug in until assembly is complete.
- Remove the handle screw.
- Insert the handle with the cord clip into the back of the vacuum cleaner as shown.
- Insert the screw.
- Tighten the screw.
- Do not overtighten.
- Overtightening could strip the screw holes.
- Do not operate the vacuum cleaner without the screw in place.
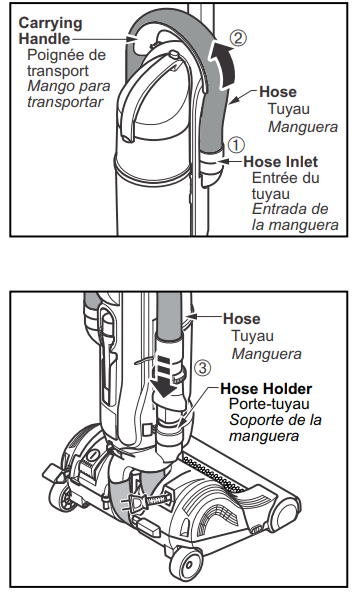
Attaching Hose
- Place the vacuum cleaner in the upright position.
- Attach the hose to the hose inlet, aligning the locking tab with the hose inlet hole.
- Stretch the hose over the vacuum cleaner, routing the hose through the handle.
- Firmly press the end of the hose onto the hose holder.
Attachment Storage
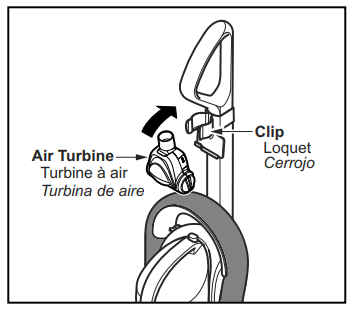
AIR TURBINE
- Set the bottom of the Air Turbine into the caddy and rotate until the Air Turbine snaps into the clip.
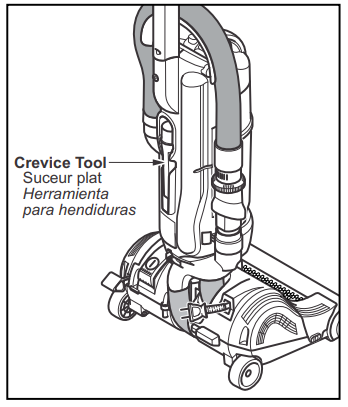
- Press the crevice tool firmly into the vacuum cleaner.
- Pull the power cord out of the vacuum cleaner to the desired length.
- Plug the polarized power cord into a 120 Volt outlet located near the floor.
- Make sure the power cord is placed into the cord clip as shown.
- To Rewind:
- Turn off and unplug the vacuum cleaner.
- Hold the plug while rewinding to prevent damage or injury from the moving cord.
- A slight tug will release the locking pawls in the cord reel, allowing it to retract.
FEATURES
Edge Cleaning
This model is equipped with an "Edge Cleaning" function for cleaning carpet edges near baseboards and stationary furniture.
Thermal Protector
- This vacuum cleaner has a thermal protector that automatically trips to protect the vacuum cleaner from overheating.
- If a clog prevents the normal flow of air to the motor, the thermal protector turns the motor off automatically. This allows the motor to cool to prevent possible damage to the vacuum cleaner.
TO CORRECT PROBLEM:
- Turn the vacuum cleaner off and unplug the power cord from the outlet to allow the vacuum cleaner to cool and the thermal protector to reset.
- Check for and remove clogs, if necessary (See REMOVING CLOGS, p. 46). Also,, check and replace any clogged filters and empty the dust bin, if necessary.
- Wait approximately fifty (50) minutes and then plug the vacuum cleaner in and turn it back on to see if the motor protector has reset.
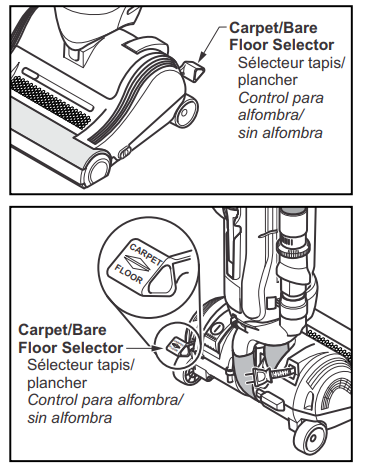
Carpet/Bare Floor Selector
- The selector should be placed down in the FLOOR position when using a vacuum cleaner on bare floors and when using tools. The agitator does not rotate in the FLOOR position.
- The selector should be placed up in the CARPET position when using a vacuum cleaner on carpeted floors.
- Incorrect settings may cause floor or carpet damage.
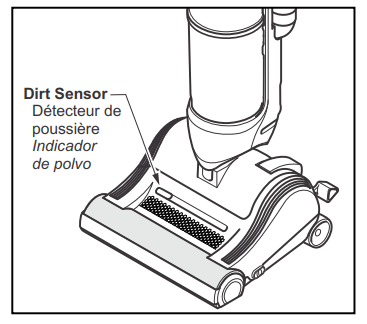
Dirt Sensor
- The electronic dirt sensor is a feature that will detect particles as they pass through the vacuum cleaner.
- The dirt sensor indicator is located on the nozzle of the vacuum cleaner, as illustrated.
- When there is little or no dirt present, the dirt sensor is green.
- With normal or heavy dirt concentration,n the dirt sensor is red.
ROUTINE CARE OF VACUUM CLEANER
Performing the tasks in the following sections will keep your new Panasonic vacuum cleaner operating at peak performance levels and will ensure these high levels for years to come. Check the BEFORE REQUESTING SERVICE section in this manual for recommendations on performing some of these tasks to help solve various problems that may occur.
WARNING: Electrical Shock or Personal Injury Hazard
- Disconnect the electrical supply before servicing or cleaning the vacuum cleaner. Failure to do so could result in electrical shock or personal injury from a vacuum cleaner suddenly starting.
Cleaning Exterior and Tools
- Turn off and unplug the vacuum cleaner.
- Clean exterior using a clean, soft cloth the dipped in a solution of mild liquid detergent and water and wrung dry.
- DO NOT drip water on the vacuum cleaner and wipe dry after cleaning.
- DO NOT clean tools in the dishwasher or clothes washer.
- Crevice tool may be washed in warm soapy water, rinsed, and air-dried.
- DO NOT use tools if they are wet.
Emptying the Dust Bin
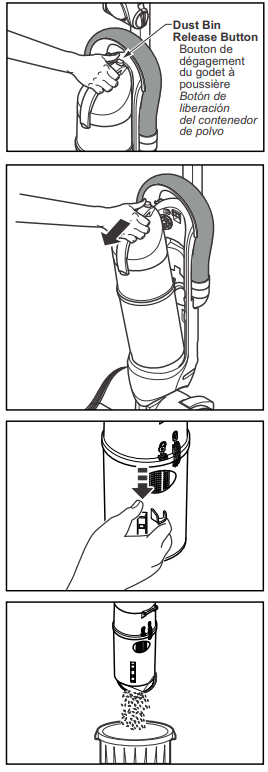
- Always empty the dust bin when the dirt level reaches the “MAX” line.
- Grasp the handle on the top of the dust bin.
- Press the dust bin release button.
- Lift up and out to remove the dust bin from the vacuum cleaner.
- Be sure to hold the dust bin over a proper trash container before releasing the door of the dust bin.
- Press the dust bin lid release, and the dust bin will open,n and the debris will fall out.
- Remove any clogs that might be located in the pre-filter. (See CLEANING PRE-FILTER, p. 40)
- Shake the dust bin to release any debris that might hang in the pre-filter
TO REPLACE DUST BIN
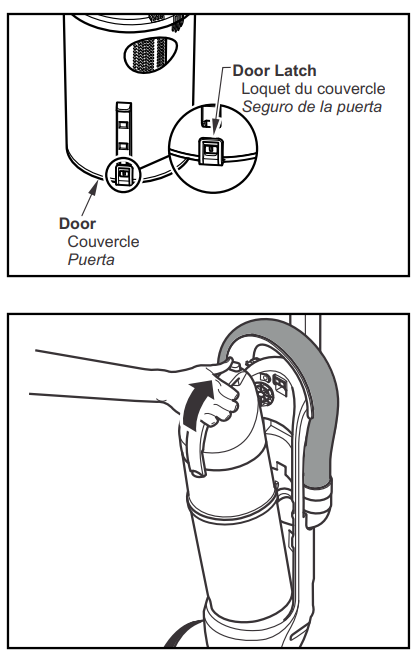
- After the dust bin is empty of debris, firmly close the door. Make sure you hear a “click” sound to indicate that the door is fully latched.
- Place the dust bin back into the vacuum cleaner by inserting the bottom first and tilting it back.
- Push forward and lower the dust bin handle to lock the dust bin in place.
Cleaning Pre-Filter
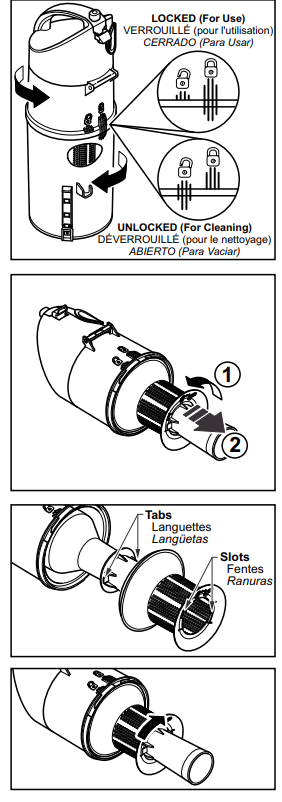
- Make sure the dust bin is empty.
- Rotate the dust bin lid assembly (as indicated on the lid), and lift off.
- Grasp the pre-filter and rotate counter-clockwise to remove.
- Clean the re-filter by gently tapping over a trash container.
- Rinse with water only as needed; do not use any detergent or soap.
- Allow the e-filter to dry for 24 hours before placing it back into the vacuum cleaner.
To Reinstall:
- Align the slot on the pre-filter with the alignment tab inside the dust bin.
- Rotate the pre-filter clockwise to lock it in place.
Cleaning Primary Filter
- It is recommended to clean the filter with cold water at least every month. Check the primary filter frequently and clean it when dirty.
- Turn off and unplug the vacuum cleaner.
- Remove dust bin (See EMPTYING DUST BIN, p. 36).
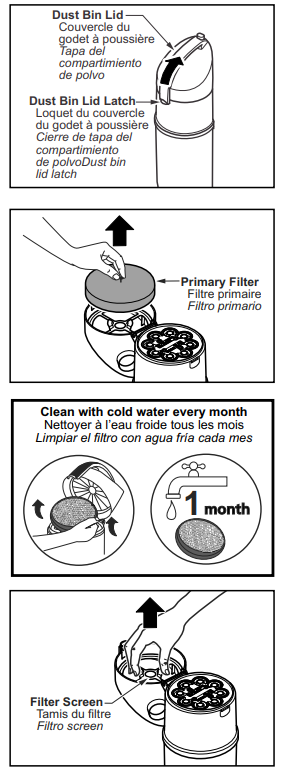
- Pull the dust bin lid latch and open the lid.
- Remove the primary filter.
- Wash with cold water only, DO NOT use detergent or soap.
- Once the filter is washed clean, squeeze by hand and allow to air dry.
- Allow the filter to dry for 24 hours before placing it back into the vacuum cleaner.
- NOTE: When the cleaning of the filter no longer restores the vacuum cleaner's suction to full power, replace the filter.
- DO NOT operate without a primary filter installed.
- DO NOT wash in the dishwasher.
- DO NOT install damp.
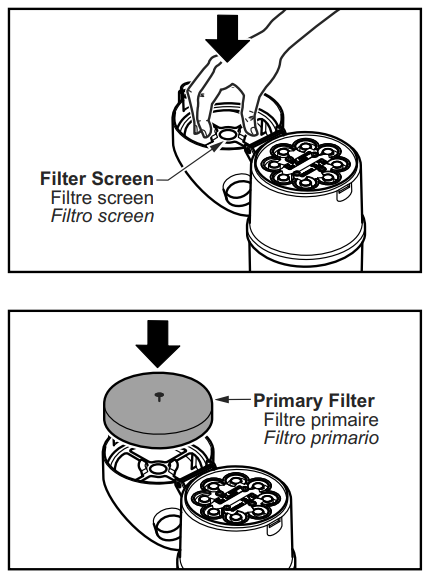
FILTER SCREEN
- Remove the filter screen.
- The filter CANNOT be washed as it will lose its dust-trapping ability.
- Remove the filter and clean it by tapping it on a firm surface.
TO REPLACE FILTERS
- Place the filter screen into the dust bin lid.
- Place the primary filter into the dust bin lid.
- Close the dust bin lid. Be sure the lid snaps in place. A noticeable “click” should be heard.
- Reinstall the dust bin into the vacuum cleaner (See EMPTYING DUST BIN, p. 36).
Cleaning Agitator
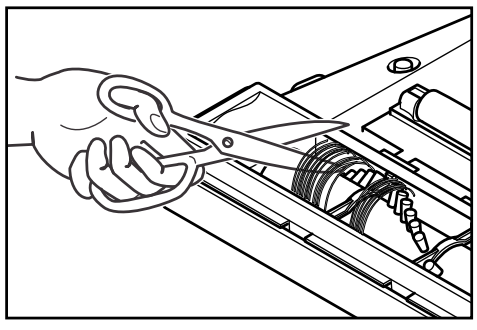
- Clean the agitator after every five uses and every time the belt is replaced.
- Turn off and unplug the vacuum cleaner.
- Cut off any hair, thread, string, carpet pile, and lint entangled around the agitator with a pair of scissors.
- Remove the agitator. (See: REPLACING BELT, p. 48)
- Remove any string or debris located on the end caps.
- Reinstall the agitator.
Cleaning Dirt Sensor Optics
- The dirt sensor optics consist of two optic cells located inside the suction inlet. Occasionally, it may become necessary to clean the two optic cells to ensure maximum performance.
- Clean optic cells:
- When dirt or dust adheres to the optic cells.
- Whenever the dust bin is cleaned.
- To clean the dirt sensor optics, remove the nozzle cover from the vacuum cleaner. (See REPLACING BELT, page 48)
- Wipe the optic cells with a soft, dry cloth.
- Never use cleaners or liquids, as they can help speed the recoating of the optic cells and make it necessary to clean them much sooner than normal.
Specifications and Key Features of Panasonic VACUUM CLEANER MC-UL815
- Motor Power: 12-amp motor delivering strong suction for deep cleaning on carpets and hard floors
- Cleaning Path Width: 13 inches, allowing efficient coverage in fewer passes
- Filtration System: HEPA filtration that captures small dust particles and allergens for improved indoor air quality
- Bagless Design: Easy-to-empty dust bin reduces maintenance costs and hassle
- Electronic Dirt Sensor: Detects hidden dirt to ensure thorough cleaning (unique to MC-UL815 model)
- Bare Floor Option: Specialized setting optimized for cleaning hard floors without damage
- Edge Cleaning Function: Designed to clean carpet edges and corners near baseboards
- Adjustable Handle: Three positions (Upright, Normal, Parallel) to facilitate cleaning under furniture and in tight spaces
- Thermal Protector: Automatic motor shutoff to prevent overheating and extend product life
Compared to similar mid-range upright vacuums, the MC-UL815 offers competitive filtration and motor power but may lack some advanced smart features found in premium models. Its strength lies in practical cleaning performance and user-friendly maintenance.
LIMITED WARRANTY (ONLY FOR U.S.A. AND PUERTO RICO)
- Panasonic Consumer Marketing Company of North America, Division of Panasonic Corporation of North America
- One Panasonic Way, Secaucus, New Jersey 07094
- Panasonic Vacuum Cleaner
Limited Warranty
- Limited Warranty Coverage (For USA and Puerto Rico Only)
- If your product does not work properly because of a defect in materials or workmanship, Panasonic Consumer Marketing Company of North America (referred to as “the warrantor”) will, for the length of the period indicated on the chart below, which starts with the date of original purchase (“warranty period”), at its option either (a) repair your product with new or refurbished parts, (b) replace it with a new or a refurbished equivalent value product, or (c) refund your purchase price. The decision to repair, replace,e or refund will be made by the warrantor.
- During the “Labor” warranty period, od there will be no charge for labor. During the “Parts” warranty period, there will be no charge for parts.
- This Limited Warranty Excludes both Labor and Parts for the following it, ems which require normal replacement: Disposable Dust Bag, Filters, Belts, Light Bulbs, Agitator Brushes, and Batteries (if supplied).
- This warranty only applies to products purchased and serviced in the United States or Puerto Rico. This warranty is extended only to the original purchaser of a new product that was not sold “as is”. Carry-In or Mail-in Service:
- To find a service center, please call 1-800-211-PANA (7262).
- IF REPAIR IS NEEDED DURING THE WARRANTY PERIOD, THE PURCHASER WILL BE REQUIRED TO FURNISH A SALES RECEIPT/PROOF OF PURCHASE INDICATING DATE OF PURCHASE, AMOUNT PAID , D AND PLACE OF PURCHASE. CUSTOMER WILL BE CHARGED FOR THE REPAIR OF ANY UNIT RECEIVED WITHOUT SUCH PROOF OF PURCHASE.
Limited Warranty Limits And Exclusions
- This warranty ONLY COVERS failures due to defects in materials or workmanship, and DOES NOT COVER normal wear and tear or cosmetic damage. The warranty ALSO DOES NOT COVER damages which occurred in shipment, or failures which are caused by products not supplied by the warrantor, or failures which result from accidents, misuse, abuse, neglect, mishandling, misapplication, alteration, faulty installation, set-up adjustments, misadjustment of consumer controls, improper maintenance, power line surge, lightning damage, modification, introduction of sand, humidity or liquids, commercial use such as hotel, office, restaurant, or other business or rental use of the product, or service by anyone other than a Factory Service Center or other Authorized Servicer, or damage that is attributable to acts of God.
- THERE ARE NO EXPRESS WARRANTIES EXCEPT AS LISTED UNDER “LIMITED WARRANTY COVERAGE”.
- THE WARRANTOR IS NOT LIABLE FOR INCIDENTAL OR CONSEQUENTIAL DAMAGES RESULTING FROM THE USE OF THIS PRODUCT, OR ARISING OUT OF ANY BREACH OF THIS WARRANTY. (As examples, this excludes damages for lost time, travel to and from the servicer, loss of or damage to media or images, da, ta or other memory or recorded content. The items listed are not exclusive, but for illustration only.)
- ALL EXPRESS AND IMPLIED WARRANTIES, INCLUDING THE WARRANTY OF MERCHANTABILITY, ARE LIMITED TO THE PERIOD OF THE LIMITED WARRANTY.
- Some states do not allow the exclusion or limitation of incidental or consequential damages, or limitations on how long an implied warranty lasts, so the exclusions may not apply to you.
- This warranty gives you specific legal rights,hts and you may also have other rights which vary from state to state. If a problem with this product develops during or after the warranty period, you may contact your dealer or service center. If the problem is not handled to your satisfaction, then write to:
- Consumer Affairs Department
- Panasonic Consumer Marketing Company 661 Independence Pkwy
- Chesapeake, VA 23320
Troubleshooting Common Issues with Panasonic VACUUM CLEANER MC-UL815
- Vacuum Motor Shuts Off Unexpectedly: Likely caused by the thermal protector activating due to motor overheating. Solution: Turn off and unplug the vacuum, remove any clogs or clean filters, wait about 50 minutes for cooling, then restart.
- Reduced Suction Power: Check and empty the dust bin, clean or replace clogged filters, and inspect for blockages in suction pathways.
- Dirt Sensor Not Responding: Ensure the sensor is clean and not obstructed; refer to the user manual for sensor reset procedures.
- Handle Release Difficulty: Use the handle release pedal properly to adjust the handle to the desired cleaning position (Upright, Normal, or Parallel).
Preventive measures include regular filter cleaning, emptying the dust bin before full, and avoiding vacuuming large debris that can clog the system. The product comes with a limited warranty—register your vacuum on Panasonic’s official website for warranty tracking and support access. For further assistance, Panasonic customer service can be contacted through their official support portal or hotline.
Pros & Cons of Panasonic VACUUM CLEANER MC-UL815
- Pros:
- Powerful 12-amp motor ensures strong suction for various floor types
- HEPA filtration provides effective allergen control for healthier indoor air
- Electronic Dirt Sensor aids in identifying hidden dust, enhancing cleaning confidence
- Adjustable handle and edge cleaning make it versatile for different home layouts
- Bagless design offers easy maintenance and cost savings on replacement bags
- Competitive pricing offers good value compared to premium upright vacuums
- Cons:
- Limited distribution may affect availability in some markets
- Lacks some advanced smart features like cordless operation or app connectivity
- Some users report bulkiness compared to lighter stick vacuums
- Not ideal for very large homes due to the o corded design and weight
Customer Reviews and Feedback on Panasonic VACUUM CLEANER MC-UL815
Users frequently praise the Panasonic MC-UL815 for its reliable suction power and effective HEPA filtration, especially noting the useful electronic dirt sensor that assures comprehensive cleaning. Many highlight its ease of use on both carpets and bare floors, appreciating the adjustable handle for maneuverability under furniture. The vacuum generally earns around 4 out of 5 stars in consumer ratings.
Common complaints include its heavier weight compared to newer stick vacuums and occasional difficulty in finding replacement parts due to limited distribution. Some users mention that the cord length could be longer for greater reach. However, the majority recommend the MC-UL815 as a durable, cost-effective choice for regular household cleaning tasks.
Overall, the Panasonic VACUUM CLEANER MC-UL815 is endorsed for buyers seeking a balance of power, filtration, and practical features without premium pricing.
Faqs
How do I set up the Panasonic VACUUM CLEANER MC-UL815 for the first time?
What should I do if the Panasonic VACUUM CLEANER MC-UL815 is not working properly?
Can I use the Panasonic VACUUM CLEANER MC-UL815 on all types of floors?
How often should I maintain the Panasonic VACUUM CLEANER MC-UL815?
What are the key features that make the Panasonic VACUUM CLEANER MC-UL815 different?
How do I use the edge cleaning feature on the Panasonic VACUUM CLEANER MC-UL815?
Is the Panasonic VACUUM CLEANER MC-UL815 compatible with all types of vacuum cleaners accessories?
How can I optimize the performance of the Panasonic VACUUM CLEANER MC-UL815?
Leave a Comment