
Usage & Setup: Panasonic VACUUM CLEANER MC-UL915 Instruction Manual
Content
Panasonic Vacuum Cleaner MC-UL915
Introduction
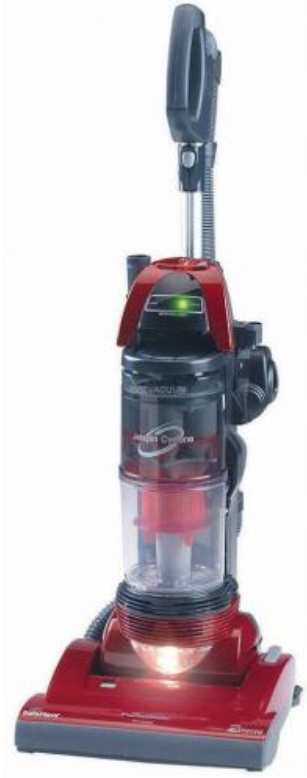
The Panasonic Vacuum Cleaner MC-UL915 is a versatile and powerful upright vacuum designed to tackle various cleaning tasks with ease. This bagless model features a **HEPA filtration system**, capturing allergens and pollutants, making it ideal for households with pets or allergy sufferers. The **QuickDraw2 system** allows for easy transition to above-floor cleaning, with a telescopic wand providing up to 12 feet of reach. The **Dirt Sensor** uses an infrared beam to indicate when areas are clean, ensuring a thorough cleaning experience. Targeted at homeowners seeking a reliable and efficient cleaning solution, the MC-UL915 is available in a range of retailers, priced around $200-$300.
Key benefits include its **bagless design**, reducing maintenance costs, and the **EZ Bare Floor feature**, which allows for smooth transitions from carpet to hardwood floors without scratching. The vacuum is also equipped with a **35-foot power cord** and weighs approximately 20-25 lbs, making it both portable and convenient for extensive cleaning sessions.
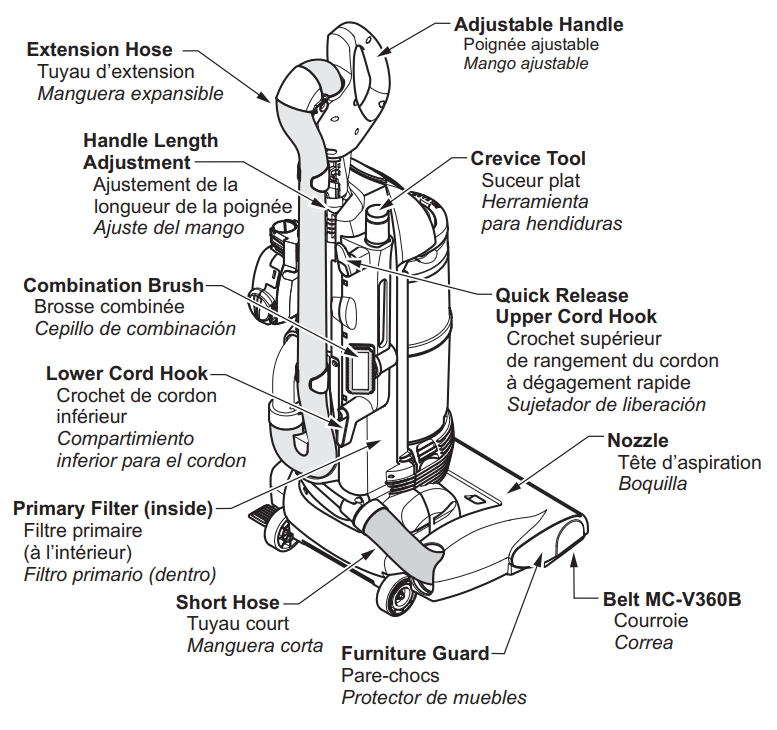
PARTS IDENTIFICATION
ASSEMBLY
- DO NOT plug in until assembly is complete.
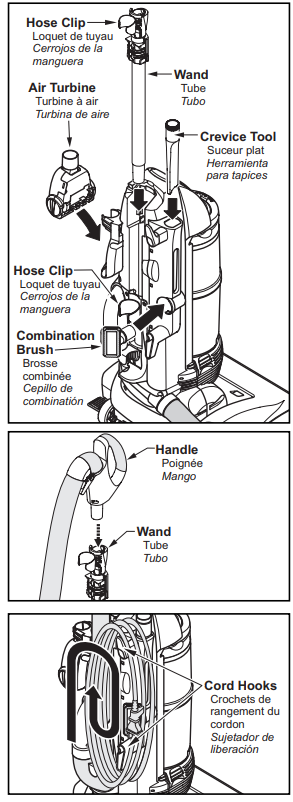
- Insert the wand into the vacuum cleaner until it locks in place.
- Insert the crevice tool, dusting brush, and Air Turbine into the storage locations on the vacuum cleaner.
- Insert the handle into the wand.
- Insert the hose into the clips on the wand and the back of the vacuum cleaner.
- Wrap the power cord clockwise around the upper and lower cord hooks as shown.
Replacing Headlight Bulb
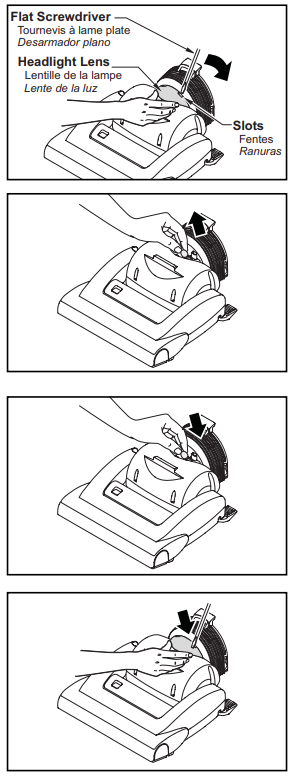
- Disconnect the power cord from the electrical outlet. Lower the body to lay the vacuum cleaner flat.
- Gently pry out the light lens at the slots by inserting a screwdriver into the slot, pushing down on the lens,, and rotating the screwdriver handle toward the vacuum cleaner.
- Remove the light bulb by pulling straight out.
- Do not use a bulb rated over 9W (13V). During extended use, heat from the bulb could overheat surrounding plastic parts.
- To replace the light bulb,, carefully insert it securely into the slot. Replace the lens cover.
- Replace the lens cover by inserting the bottom tab of the lens into the slot, then applying pressure to the top tabs.
- A “popping” sound indicates the lens is snapped properly in place.
FEATURES
Overload Protection
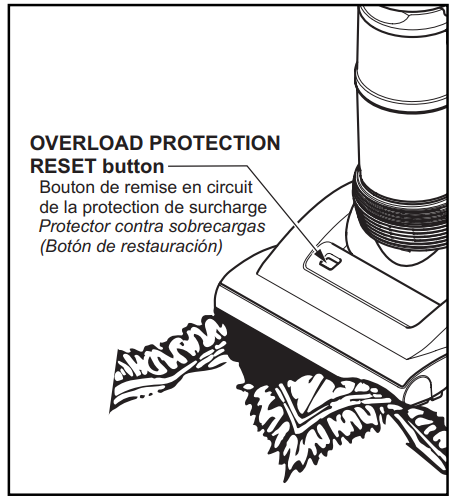
- The OVERLOAD PROTECTION RESET button stops the nozzle motor when the brush jams to prevent belt breakage.
- NOTE: The vacuum cleaner motor will continue to run.
- TO CORRECT PROBLEM:
- Unplug the electrical cord.
- Check nozzle areas for excessive lint buildup or jamming.
- Clean the jammed area.
- TO RESET:
Press the reset button on top of the nozzle. Plug in and turn on the vacuum cleaner.
Automatic Self-Adjusting Nozzle
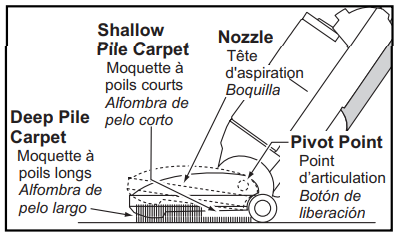
- The nozzle of your Panasonic vacuum cleaner automatically adjusts to any carpet pile height.
- The feature allows the nozzle to float evenly over carpet pile surfaces.
- No manual adjustments required.
Replacing Belt
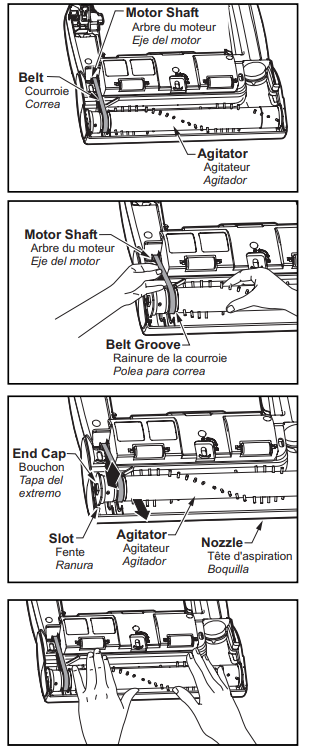
- Replace the belt whenever a burning rubber smell caused by excessive slippage occurs.
- Remove the lower plate. See “Removing and Installing Lower Plate”
- Remove the agitator by carefully lifting it out.
- Remove worn or broken belt.
- Clean the agitator and the end caps.
- Loop the new belt around the motor shaft and the agitator belt groove; see illustration for correct belt routing.
- Reinstall the agitator back into the nozzle housing grooves.
- After reinstalling the agitator, turn it by hand to make sure that the belt is not twisted or pinched and that all rotating parts turn freely.
- Reinstall the lower plate. Ensure tabs are locked into slots.
Dirt Sensor
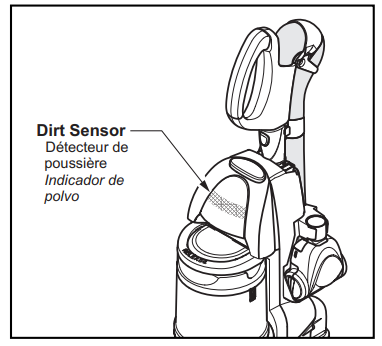
- The electronic dirt sensor is a feature that will detect particles as they pass through the vacuum cleaner.
- The dirt sensor indicator is located on the front of the vacuum cleaner , as illustrated.
- When there is little or no dirt present, the dirt sensor is green.
- With normal or heavy dirt concentration,, the dirt sensor is red.
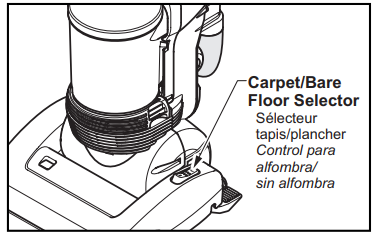
Carpet/Bare Floor Selector
- The selector should be placed in the BARE FLOOR (TOOLS) position when using a vacuum cleaner on bare floors and when using tools. The agitator does not rotate in the BARE FLOOR (TOOLS) position.
- The selector should be placed in the CARPET position when using a vacuum cleaner on carpeted floors.
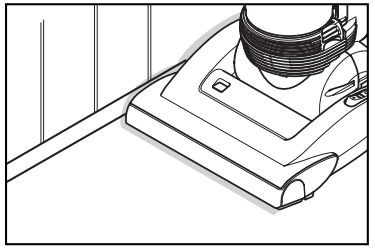
Edge Cleaning
- The edge cleaning feature enables improved cleaning of carpets near walls and furniture.
WARNING:: Electrical Shock or Personal Injury Hazard
Disconnect the electrical supply before servicing or cleaning the vacuum cleaner. Failure to do so could result in electrical shock or personal injury from m vacuum cleaner suddenly starting.
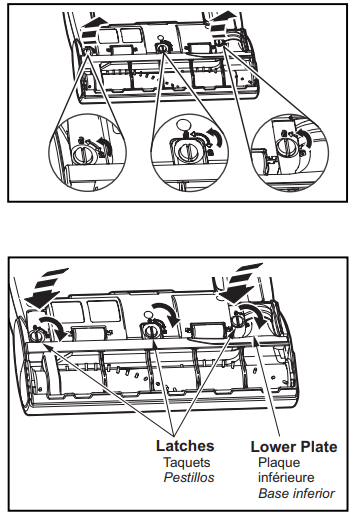
Removing and Installing the Lower Plate
- Before servicing any parts, disconnect the vacuum cleaner from the electrical outlet.
- Always place paper under the nozzle whenever the lower plate is removed to protect the floor.
- Place the body in an upright position and turn the vacuum cleaner over to expose the lower plate.
- Release the lower plate by rotating the lower plate latches to the UNLOCK position.
- Remove the lower plate and remove any residue that may exist in the belt area.
- Reinstall the lower plate by hooking the front end of the lower plate into the slots on the front of the nozzle.
- Press the lower plate onto the nozzle and secure it by rotating the lower plate latches to the LOCK position.
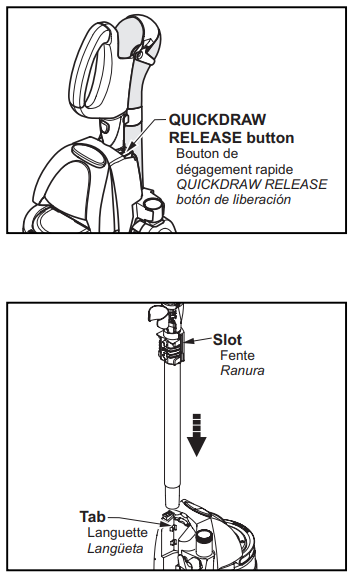
Adjustable Handle Release
- Remove the handle by pushing the QUICKDRAW RELEASE button.
- Lift the adjustable handle assembly out of the vacuum cleaner.
- With the handle free from the vacuum cleaner,, can now be used as an extension wand. Length can be changed when being used as a wand.
- Add attachments to suit your cleaning needs.
- Place the adjustable handle securely back into the vacuum cleaner by aligning the slots on the handle assembly with tabs on the body as shown.
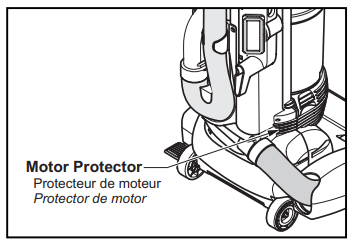
Motor Protector
- Automatically opens to provide cooling air to the motor when a clog occurs or when the dust bin needs emptying.
- The motor protector may open when using tools.
- If the motor protector opens, the vacuum cleaner will make a slightly different sound.
- Note: Do not block the motor protector.
Primary Filter Cleaning
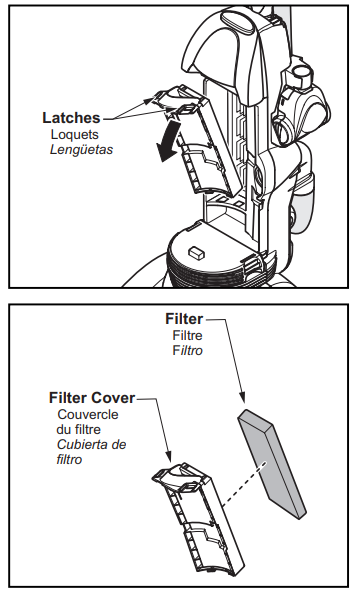
- It is recommended to clean the filter with cold water at least every three (3) months.
- Check the primary filter frequently and clean it when dirty.
- Remove the cover by pressing the latches located on each side.
- Lift the cover off of vacuum cleaner.
- Remove the primary filter from the filter cover.
- Wash with cold water only, DO NOT use detergent or soap.
- Once the filter is washed clean, squeeze by hand and allow to air dry
- Allow the filter to dry for 24 hours before putting it back into the vacuum cleaner.
- NOTE: When the cleaning of the filter no longer restores the vacuum cleaner's suction to full power, replace the filter.
- DO NOT operate without a primary filter installed.
- DO NOT wash in the dishwasher.
- DO NOT install damp.
- Reinstall the filter into the filter cover.
- Reinstall the filter cover by snapping it into place on the the vacuum cleaner. A noticeable “click” should be heard.
Thermal Protector
- This vacuum cleaner has a thermal protector that automatically trips to protect the vacuum cleaner from overheating.
- If a clog prevents the normal flow of air to the motor, the thermal protector turns the motor off automatically. This allows the motor to cool to prevent possible damage to the vacuum cleaner.
TO CORRECT PROBLEM:
- Turn the vacuum cleaner off and unplug the power cord from the outlet to allow the vacuum cleaner to cool and the thermal protector to reset.
- Check for and remove clogs, if necessary. Also, check and replace any clogged filters and empty the dust bin if necessary.
- Wait approximately fifty (50) minutes and plug the vacuum cleaner in, and turn it back on to see if the motor protector has reset.
Replacing HEPA Exhaust Filter
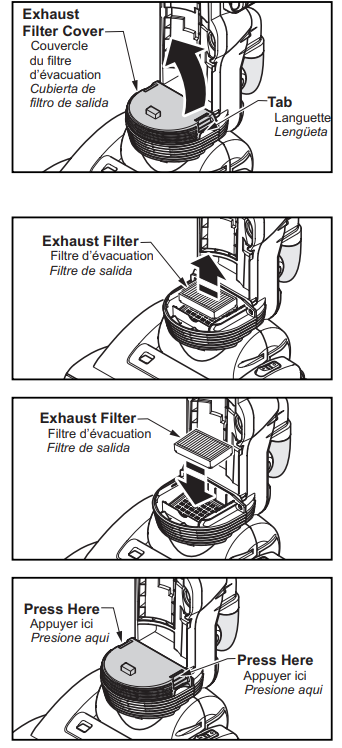
- The HEPA exhaust filter removes dirt from exhaust air.
- Check the filter after emptying the dust bin. Replace when dirty.*
- To remove, lift at tab.
- Grasp the exhaust filter and pull it out to remove.
- Ensure the foam edge of the filter is facing towards the vacuum cleaner when placing the filter into the filter compartment.
- Reinstall the exhaust filter cover by placing the cover on the body and snapping it into place as shown.
- The filter cannot be cleaned and should be replaced at least once each year. Part Number: MC-V194H
ROUTINE CARE OF VACUUM CLEANER
Performing the following tasks will keep your new Panasonic vacuum cleaner operating at peak performance levels and will ensure these high levels for years to come. Check the BEFORE REQUESTING SERVICE section in this manual for recommendations on performing some of these tasks to help solve various problems that may occur.
WARNING:: Electrical Shock or Personal Injury Hazard
- Disconnect the electrical supply before servicing or cleaning the vacuum cleaner. Failure to do so could result in electrical shock or personal injury from m vacuum cleaner suddenly starting.
Emptying the Dust Bin
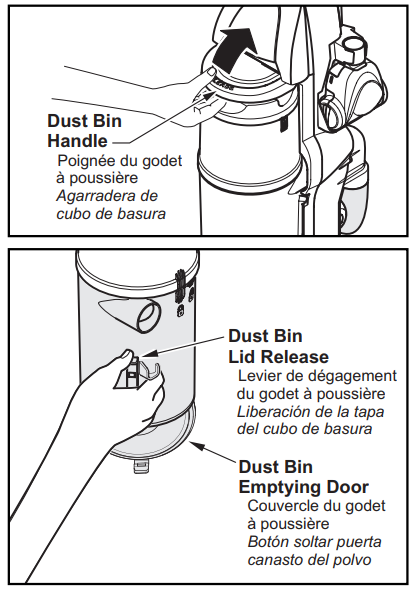
- Always empty the dust bin when the dirt level reaches the “MAX” line.
- Grasp the handle on the top of the dust bin. Lift up and out to remove the dust bin from the vacuum cleaner.
- Remove any clogs that might be located in the pre-filter. (See “Cleaning Pre-Filter”)
- Be sure to hold the dust bin over a proper trash container before releasing the door of the dust bin.
- Press the dust bin lid release, and the dust bin will open,n and the debris will fall out.
- Shake the dust bin to release any debris that might hang in the pre-filter
PANASONIC PRODUCT - LIMITED WARRANTY
- Panasonic Canada Inc. warrants this product to be free from defects in material and workmanship under normal use and for a period as stated below from the date of original purchase agrees to, at its option either (a) repair your product with new or refurbished parts, (b) replace it with a new or a refurbished equivalent value product, or (c) refund your purchase price. The decision to repair, replace, cancel, or refund will be made by Panasonic Canada Inc.
- Vacuum Cleaner - One (1) year, parts and labour
- This warranty is given only to the original purchaser, or the person for whom it was purchased as a gift, of a Panasonic brand product mentioned above sold by an authorized Panasonic dealer in Canada and purchased and used in Canada, which product was not sold "as is", and which product was delivered to you in new condition in the original packaging. TORDER TO BE ELIGIBLE TO RECEIVE WARRANTY SERVICE HEREUNDER, A PURCHASE RECEIPT OR OTHER PROOF OF DATE OF ORIGINAL PURCHASE, SHOWING AMOUNT PAID AND PLACE OF PURCHASE, IS REQUIRED
LIMITATIONS AND EXCLUSIONS - This warranty ONLY COVERS failures due to defects in materials or workmanship, and DOES NOT COVER normal wear and tear or cosmetic damage. The warranty ALSO DOES NOT COVER damages which occurred in shipment, or failures which are caused by products not supplied by Panasonic Canada Inc., or failures which result from accidents, misuse, abuse, neglect, mishandling, misapplication, alteration, faulty installation, set-up adjustments, misadjustment of consumer controls, improper maintenance, power line surge, lightning damage, modification, introduction of sand, humidity or liquids, commercial use such as hotel, office, restaurant, or other business or rental use of the product, or service by anyone other than a
- Authorized Servicer, or damage that is attributable to acts of God.
- Parts such as disposable dust bags, filters, belts, light bulbs,s and agitator brushes are not covered by this warranty.
- THIS EXPRESS, LIMITED WARRANTY IS INSTEAD OF ALL OTHER WARRANTIES, EXPRESS OR IMPLIED, INCLUDING ANY IMPLIED WARRANTIES OF MERCHANTABILITY AND FITNESS FOR A PARTICULAR PURPOSE. IN NO EVENT WILL PANASONIC CANADA INC. BE LIABLE FOR ANY SPECIAL, INDIRECT, OR CONSEQUENTIAL DAMAGES RESULTING FROM THE USE OF THIS PRODUCT OR ARISING OUT OF ANY BREACH OF ANY EXPRESS OR IMPLIED WARRANTY. (As examples, this warranty excludes damages for lost time, travel to and from the Authorized Servicer, loss of or damage to media or images, data, or other memory or recorded content. This list of items is not exhaustive, but for illustration only.)
- In certain instances, some jurisdictions do not allow the exclusion or limitation of incidental or consequential damages, or the exclusion of implied warranties, so the above limitations and exclusions may not be applicable. This warranty gives you specific legal rights,s and you may have other rights which vary depending on your province or territory.
- WARRANTY SERVICE
For product operation and information assistance, please contact: - PANASONIC CONSUMER ELECTRONICS COMPANY
- DIVISION OF PANASONIC CORPORATION OF NORTH AMERICA
- One Panasonic Way
- Secaucus, New Jersey 07094
- Panasonic Vacuum Cleaner
Limited Warranty
- Panasonic Consumer Electronics Company (referred to as "the warrantor") will repair this product, in the event of a defect in materials or workmanship, with new or refurbished parts free of charge, in the U.S.A. or Puerto Rico, for one (1) year from the date of original purchase.
- This Limited Warranty Excludes both Labor and Parts for the following items, which require normal replacement: Disposable Dust Bag, Filters, Belts, Light Bulbs, Agitator Brushes,, and Batteries (if supplied).
Carry-in or mail-in service in the U.S.A. and Puerto Rico can be obtained during the warranty period by calling 1-800-211-PANA (7262) to locate a PSTC authorized service center.r, - This warranty is extended only to the original purchaser. A purchase receipt or other proof of the date of original purchase will be required before warranty performance is rendered.
- This warranty only covers failures due to defects in materials and workmanship which occur during normal use and does not cover damages which occur in shipment, or failures which are caused by products not supplied by the warrantor, or failures which result from accident, misuse, abuse, neglect, bug infestation, mishandling, misapplication, faulty installation, improper operation or maintenance, alteration, modification, power line surge, improper voltage supply, lightning damage, commercial use such as hotel, office, restaurant or other business or rental use of the product, or service by anyone other than a PSTC authorized service center, or damage that is attributable to acts of God.
LIMITS AND EXCLUSIONS:
- There are no express warranties except as listed above.
- THE WARRANTOR SHALL NOT BE LIABLE FOR INCIDENTAL OR CONSEQUENTIAL DAMAGES RESULTING FROM THE USE OF THIS PRODUCT, OR ARISING OUT OF ANY BREACH OF THIS WARRANTY. ALL EXPRESS AND IMPLIED WARRANTIES, INCLUDING THE WARRANTIES OF MERCHANTABILITY AND FITNESS FOR A PARTICULAR PURPOSE, ARE LIMITED TO THE APPLICABLE WARRANTY PERIOD SET FORTH ABOVE.
- Some states do not allow the exclusion or limitation of incidental or consequential damages, or limitations on how long an implied warranty lasts, so the above exclusions or limitations may not apply to you.
- This warranty gives you specific legal rights, and you may also have other rights which vary from state to state. If a problem with this product develops during or after the warranty period, you may contact your dealer or service center. If the problem is not handled to your satisfaction, then write to the Consumer Affairs Department at the listed address on the back cover.
Pros and Cons of the Panasonic MC-UL915
Pros:
- HEPA Filtration: Captures allergens and pollutants, ensuring a healthier indoor environment.
- QuickDraw2 System: Offers extended reach and versatility with on-board tools.
- Dirt Sensor: Provides real-time feedback on cleaning progress.
- Bagless Design: Reduces maintenance costs and is more eco-friendly.
- Value for Money: Offers a range of features at an affordable price.
Cons:
- Weight: May be heavy for some users, especially when maneuvering stairs.
- No Retractable Cord: Requires manual winding after use.
- Assembly Required: Some users may find the initial setup challenging.
Compared to other alternatives, the MC-UL915 offers strong suction power and a comprehensive set of tools, making it a valuable choice for those seeking a versatile upright vacuum.
Customer Reviews
Customers praise the Panasonic MC-UL915 for its effective cleaning performance and ease of use. Common praises include its ability to handle pet hair and the convenience of the QuickDraw2 system for above-floor cleaning. However, some users have noted that the vacuum can be heavy and that the lack of a retractable cord is inconvenient. Overall, it scores well for its value for money, with many users recommending it for its strong suction and versatile features.
Star Rating: 4.2/5
Testimonial: "I've been really impressed with how well this vacuum handles pet hair and high ceilings. The Dirt Sensor is a nice touch too!"
Faqs
How do I set up the panasonic VACUUM CLEANER MC-UL915 for first-time use?
What should I do if the panasonic VACUUM CLEANER MC-UL915 brush stops spinning during use?
How does the Dirt Sensor feature on the panasonic VACUUM CLEANER MC-UL915 work?
Can the panasonic VACUUM CLEANER MC-UL915 be used safely on hardwood floors?
What maintenance is required to keep the panasonic VACUUM CLEANER MC-UL915 working efficiently?
Is the panasonic VACUUM CLEANER MC-UL915 suitable for pet hair removal?
How can I optimize the suction power of my panasonic VACUUM CLEANER MC-UL915 for different floor types?
What should I do if the panasonic VACUUM CLEANER MC-UL915 loses suction during cleaning?
Leave a Comment