
Setup & Pairing: Peztio Rearview Mirror Dash Camera User Manual
Content
peztio Rearview Mirror Dash Camera
Introduction
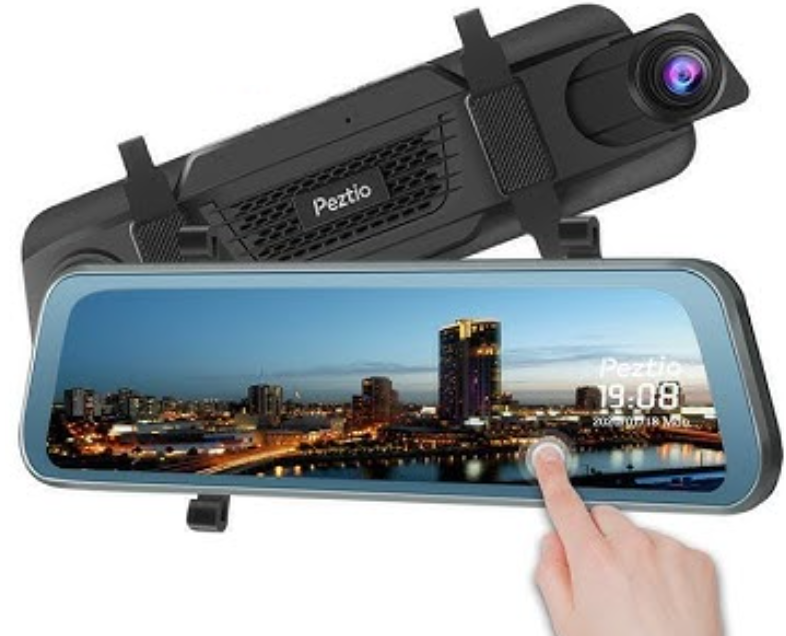
The peztio Rearview Mirror Dash Camera is an innovative dual-lens dash cam designed to enhance vehicle safety and recording capabilities. Combining a sleek rearview mirror design with advanced front and rear camera technology, this dash camera offers comprehensive road coverage without obstructing your view. Its compact and lightweight form factor allows easy installation behind your vehicle's existing rearview mirror, making it ideal for everyday drivers, rideshare operators, and fleet vehicles seeking reliable video evidence on the road.
This dash camera delivers Full HD 1080P resolution for the front lens with a wide 170° viewing angle, capturing crisp, detailed footage of driving events. The rear camera complements this with a 640x480 pixel resolution, providing sufficient coverage of the area behind the vehicle. Key features include intelligent motion detection, gravity (G) sensor-triggered emergency recording, loop recording, and a user-friendly touchscreen interface. It supports plug-and-play operation with automatic start/stop recording when the car powers on or off.
Targeted at safety-conscious drivers who want reliable, dual-view recording with minimal installation hassle, the peztio Rearview Mirror Dash Camera fits well in personal cars, delivery vehicles, and business fleets. The dash cam is typically priced in the mid-range market, estimated between $70 to $120 depending on the retailer and package options, and is widely available through online marketplaces and specialty electronic stores.
Specifications and Features of the Peztio Rearview Mirror Dash Camera
- Video Resolution: Front camera records at 1080P Full HD (1920x1080), rear camera at 640x480 pixels
- Viewing Angles: Front camera 170° ultra-wide lens; rear camera approximately 120°
- Display: 3.16-inch IPS touchscreen with intuitive user interface
- Recording Modes: Continuous loop recording with selectable intervals (1, 3, or 5 minutes)
- Emergency Recording: G-sensor locks footage upon detecting a collision or sudden impact
- Motion Detection: Automatically starts recording when movement is detected in parking mode
- Power Supply: Powered via a 5V 1A car charger connected to the cigarette lighter; minimal internal battery for short power interruptions
- Storage Support: Compatible with microSD cards (typically up to 32GB recommended for stable performance)
- Additional Features: Plug-and-play installation, photo capture mode, and playback directly on the device
- Build: Durable materials designed to withstand vehicle interior conditions
- Comparison: Offers competitive resolution and features compared to similar rearview mirror dash cams, though some higher-end models provide 4K resolutions and enhanced rear camera quality
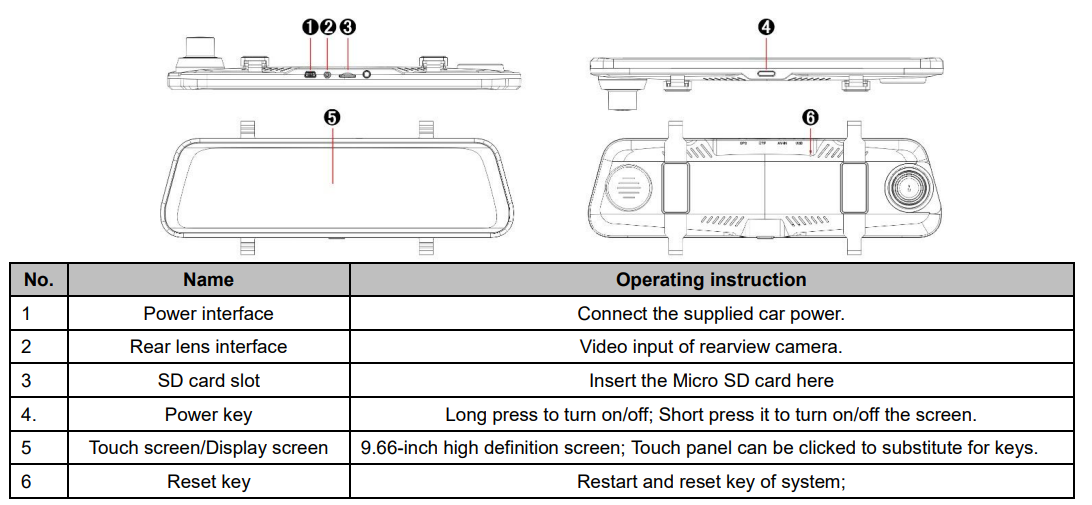
Product Structure
Install the SD card
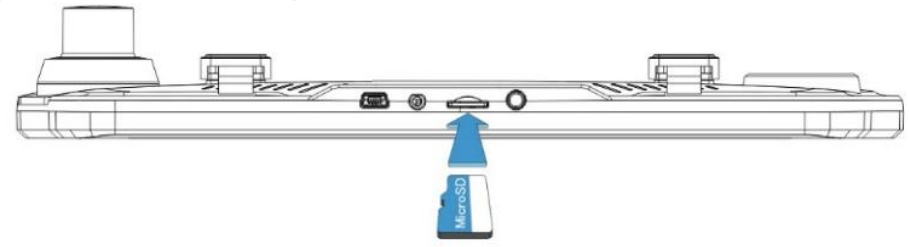
Insert SD card: correctly insert the SD card according to the indicated direction of the SD card notch on the device. Hold down the card until you hear a click and insert it in place.
Note:
- The SD card needs to be formatted before its first use.
- (To know how to format the SD card, please come to the System Settings part.)
- Video storage of the recorder has a higher running speed requirement for the card, so please insert a suitable Micro SD card (Class 10, 48/Mbps) into the DASH CAM.
- Use the edge of a small coin (or similar object) to push the SD card in place if required. Take care that the card has 'clicked' into place; a second push inwards will release the SD card.
- Do not remove or insert the SD card when the DASH CAM is turned on. This may damage the SD card.
- Take care when removing the SD card from the DASH CAM when it is installed in the vehicle. Due to the card slot mechanism, the card will spring from the slot when released.
Install the front camera. a
- Ensure the vehicle's existing rearview mirror is clean and free of grease or dirt; this is so the DASH can achieve maximum grip.
Attach the DASH CAM to the vehicle's existing rear-view mirror
Holding the metal edges of the DAS, H CAM places it onto the vehicle's rear-view mirror. Take care that two rubber mats are placed onto the rear-view mirror's glass, not sitting upon the plastic edge of the rear-view mirror. The lens can be extended to accommodate different rearview mirrors.
DO NOT push directly on the DASH CAM's glass. Route the cables through the top ceiling and the A-pillar so that it does not interfere with driving.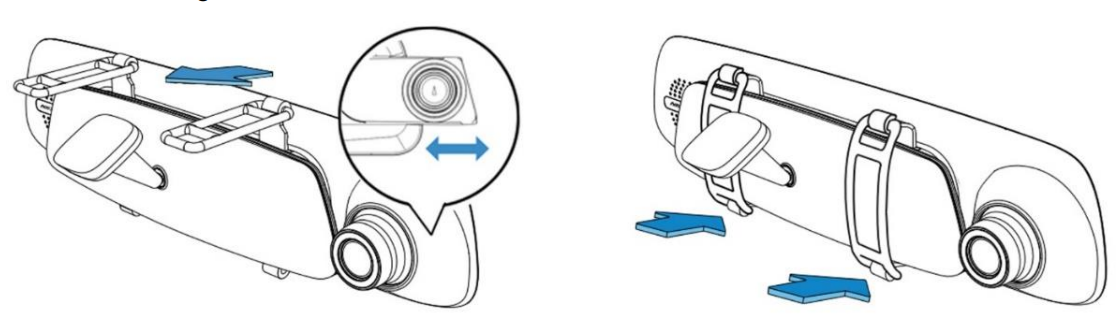
- Attach straps
There is a set of straps supplied with the DASH CAM. Attach the upper end of the straps to the retaining hooks on the top of the rear-view mirror, then extend the straps around the back of the rear-view mirror and attach them to the bottom retaining hooks. the - Route cable and connect the power
Plug the supplied car power cable into the 12-24Vdc outlet of your vehicle, and then connect the Mini USB plug to the DASH CAM. Route the cables through the top ceiling and the A-pillar so that it does not interfere with driving.
Note:
The DASH CAM will automatically power on and start recording once power is available.
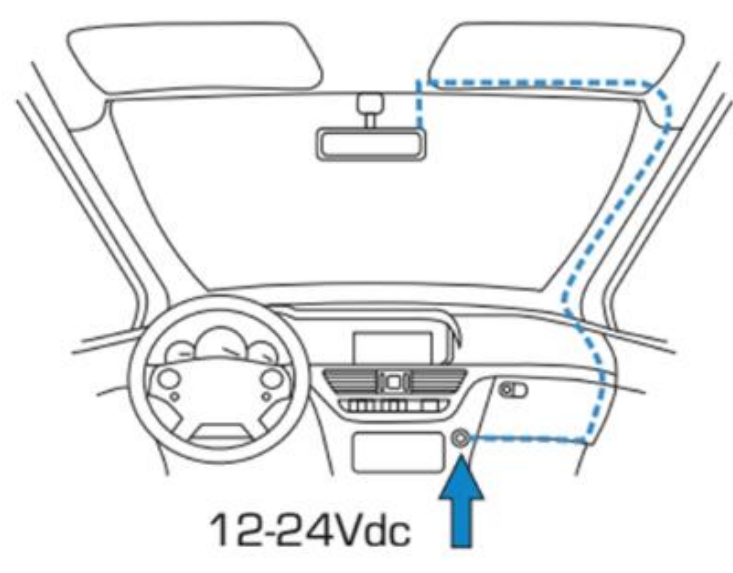
Install the rear camera
There are two methods to place the camera:
Mode 1: Mount on the rear windscreen. The package includes a 3M glue for the rear camera. Please clean the rear windscreen and find an appropriate position before you stick the rear camera onto the windscreen. Mode 2: Mount near the license plate. The package includes fixing screws to help you fix it.
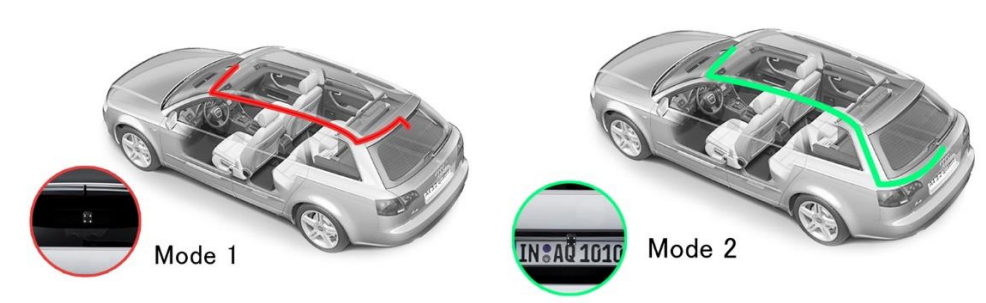
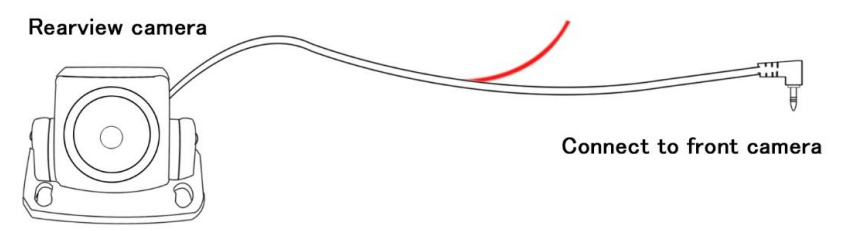
Please connect the cables as shown above:
- Connect the socket to the DASH CAM’s rear camera interface.
- Connect the red cable to the positive lead of the reversing lamp.
Troubleshooting Common Issues with the Peztio Rearview Mirror Dash Camera
- Device does not power on: Ensure the car charger is firmly connected to a live cigarette lighter socket; check that the fuse is intact and the device’s internal battery is charged.
- Recording stops abruptly or files are corrupted: Use a high-quality microSD card formatted within the device; avoid removing the card while recording is active.
- G-sensor not triggering emergency lock: Verify G-sensor sensitivity settings in the menu; reinstall firmware if persistent.
- Screen unresponsive or touchscreen issues: Restart the dash cam or perform a factory reset via settings.
- Error codes: “Card Error” indicates microSD card issues — reformat or replace the card; “Power Error” suggests unstable power supply connection.
- Preventive measures: Keep firmware updated, regularly format the memory card, avoid extreme temperatures, and ensure secure installation.
- Warranty & Support: Typically, Peztio offers a 12-month limited warranty covering defects; customer support can be contacted via their official website or through the retailer’s service channels.
Pros and Cons of the peztio Rearview Mirror Dash Camera
- Pros:
- Dual lens design captures both front and rear views simultaneously, enhancing safety documentation.
- Wide 170° front lens captures broad road scenes, reducing blind spots.
- User-friendly touchscreen interface allows easy control and playback without extra devices.
- G-sensor emergency lock prevents overwriting critical footage during accidents.
- Plug-and-play installation minimizes setup complexity for most drivers.
- Mid-range pricing offers good value compared to higher-priced premium dash cams.
- Cons:
- Rear camera resolution of 640x480 is lower than some competitors offering 1080P rear recording.
- Limited internal memory necessitates reliance on external microSD cards, which must be purchased separately or replaced over time.
- The small built-in battery lasts only seconds without external power, so the device must remain connected.
- Screen size (3.16-inch) may be small for some users who prefer larger displays.
- Lacks advanced features such as 4K recording, GPS logging, and Wi-Fi connectivity found in higher-end models.
Customer Reviews and Feedback on the peztio Rearview Mirror Dash Camera
Users generally praise the peztio Rearview Mirror Dash Camera for its straightforward installation and reliable front camera video quality, often highlighting the wide-angle coverage and clear daytime footage. Many appreciate the emergency recording functionality triggered by the G-sensor, which provides peace of mind during collisions.
Some common complaints include the relatively low resolution of the rear camera and the small screen size, which some find limiting for reviewing footage on the device itself. A few users mention occasional issues with the touchscreen responsiveness and the need for a compatible, high-quality microSD card to avoid recording errors.
Overall, the product receives solid star ratings, typically around 4 out of 5 stars, with recommendations for drivers seeking a budget-friendly, dual-lens dash cam solution that integrates neatly with their vehicle’s interior without obstructing vision.
Faqs
How do I set up the peztio Rearview Mirror Dash Camera for the first time?
What should I do if the peztio Rearview Mirror Dash Camera stops recording unexpectedly?
Can the peztio Rearview Mirror Dash Camera record both front and rear views simultaneously?
Is the peztio Rearview Mirror Dash Camera compatible with my smartphone for video playback?
How does the emergency recording feature work on the peztio Rearview Mirror Dash Camera?
What maintenance is recommended to keep the peztio Rearview Mirror Dash Camera performing well?
How can I optimize video quality on my peztio Rearview Mirror Dash Camera during night driving?
What are common troubleshooting steps if the peztio Rearview Mirror Dash Camera’s menu button is unresponsive?
More peztio manuals
- Setup & Pairing: Peztio Dash Cam 1080P High Definition Wide Angle Lens User Manual
- Setup & Pairing: Peztio Touch Screen Dash Cam User Manual
- Setup: Peztio Dashboard Camera User Manual
- How to Install: Peztio 1080P Dashcam M1 Setup Guide
- Setup Guide: Peztio 4K Dashcam A1 User Manual
- How to install: Peztio Q1 Car Dash Cam 1080p HD User Manual
Leave a Comment